
To insert multiple rows in Excel, we must first select the number of rows. Then, based on that, we can insert those rows. Once the rows are inserted, we can use the F4 key to repeat the last action and insert as many rows as needed.
Table of contents
- How to Insert Multiple Rows in Excel?
- Top 4 Useful Methods to Insert Rows in Excel (Discussed with an Example)
- Method #1 – Using INSERT option
- Method #2 – Using Excel Short Cut (Shift+Space Bar)
- Method 3: Using the Name Box.
- Method 4: Using the Copy & Paste Method
- Alternative Coolest Technique
- Things to Remember
- Recommended Articles
- Top 4 Useful Methods to Insert Rows in Excel (Discussed with an Example)
Top 4 Useful Methods to Insert Rows in Excel (Discussed with an Example)
- Insert Row using INSERT Option
- Insert Multiple Rows in Excel using Short Cut Key (Shift+Space Bar)
- Insert Multiple Rows Using the Name Box
- Insert Multiple Rows Using the Copy & Paste Method
Let us Discuss each method in detail along with an example –
You can download this Insert Multiple Rows Excel Template here – Insert Multiple Rows Excel Template
Method #1 – Using INSERT option
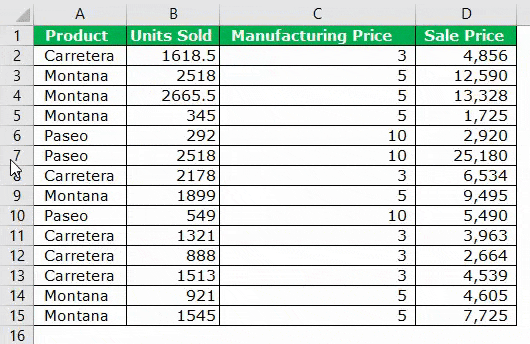
We need to select the row first, but it depends on how many rows we insert. For example, if we want to insert two rows, we need to select two rows. If we need to insert three multiple rows, we need to choose three rows, and so on.
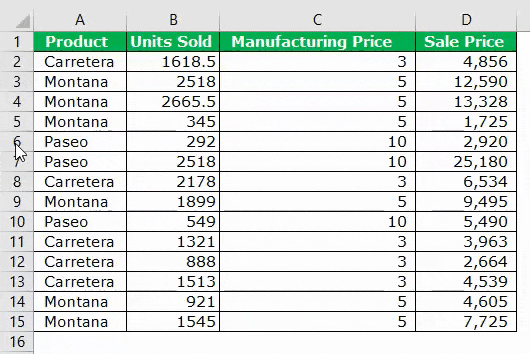
In the above image, we have selected three rows, and now we will right-click on the column header and click on “Insert.” It would insert three multiple rows in a single shot.
Method #2 – Using Excel Short Cut (Shift+Space Bar)
Below are the steps to insert rows in Excel using the Excel shortcut (Shift + Spacebar).
- We must first select the cell above which we want to insert the row.

- We must use the shortcut key to select the entire row instantly. The shortcut keyboard key is “Shift + Spacebar.”

- If we want to insert two to three rows, select those many rows by using the “Shift + Down Arrow” key. In the below image, we have chosen four rows.

- Now, we must click on another keyboard “Ctrl + “(plus key) shortcut key to insert a row in Excel.

Now we have inserted four multiple rows. Suppose we need to insert another Four rows; Click on Ctrl + if the rows are selected, or instead, we can use the key F4, which repeats the previous action in excel.


Method 3: Using the Name Box.
Suppose we need to insert 150 rows above the cell we have selected. It will take some time because we need to choose those many rows first and then insert them using the Excel shortcut.
Selecting 150 rows instantly is not possible in the above two methods. We can select those name box in excel.In Excel, the name box is located on the left side of the window and is used to give a name to a table or a cell. The name is usually the row character followed by the column number, such as cell A1.read more
- Step 1: Select the cell above we need to insert rows.
- Step 2: We must mention the row range on the name box. We have mentioned 5:155 because we have to insert 150 rows in this case.
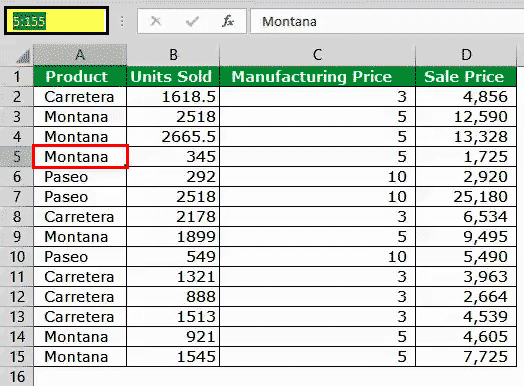
- Step 3: After typing the range, hit the enter key; this will select the cells from 5:155 instantly.
- Step 4: Once the range is selected, we must use the “Ctrl +” shortcut key to insert a row in Excel. It will insert 150 rows in just a click.
Alternative Shortcut Key to Insert Row in Excel: ALT + H + I + R is another shortcut key to insert a row in Excel.

Method 4: Using the Copy & Paste Method
Microsoft Excel is so flexible. For example, can you believe we can insert rows by copy-paste?
Yes! You heard it right. We can insert rows just by copying and pasting another blank row.
- Step 1: Select the blank row and copy.

- Step 2: Now select the cell above you want to insert rows.
- Step 3: Once the desired cell is selected, select the number of rows you wish to insert and right-click and choose Insert Copied Cells.

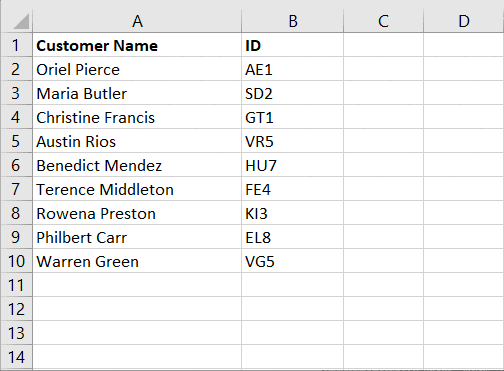
Case Study: I have data from A1: A10, as shown in the below image.
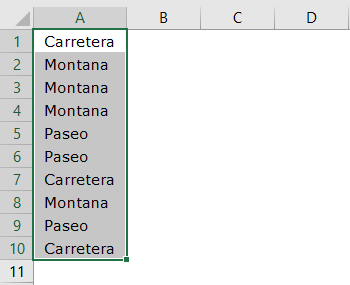
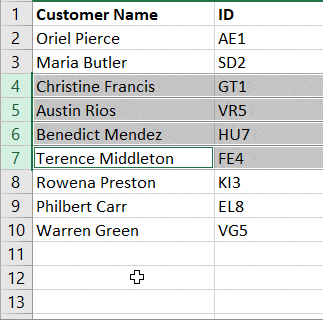
We want to insert one blank row after every row, as shown in the below image.
Alternative Coolest Technique
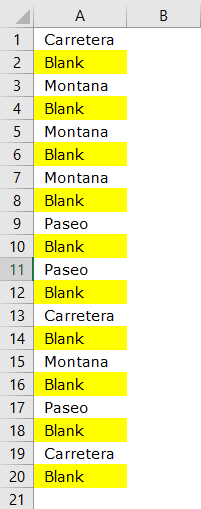
In the above example, we have only ten rows. What if we have to do it for 100 cells? It will take a lot of time. However, we have the coolest technique you have ever seen.
Follow the below steps to learn.
- Step 1: First, Insert serial numbers next to the data.
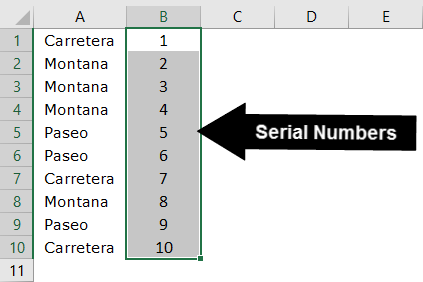
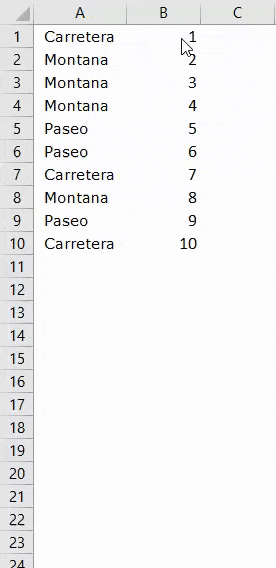
- Step 2: Copy those serial numbers and paste them after the last serial number.
- Step 3: Now, select the entire data, including serial numbers, and press Alt + D + S.
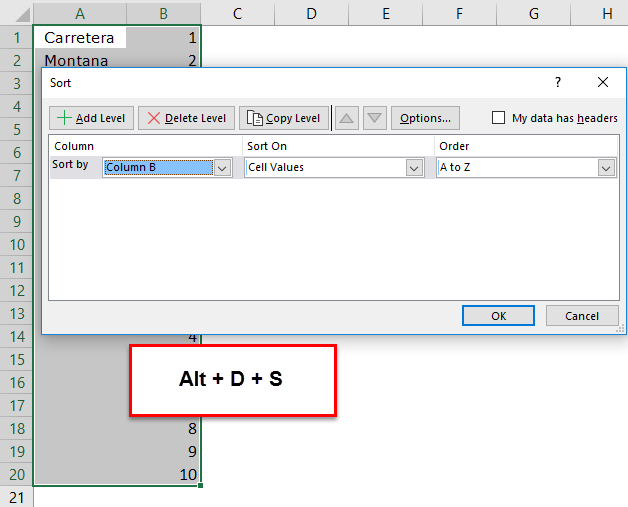
- Step 4: Select the second column from the dropdown list and ensure the smallest to highest is selected.

- Step 5: Now, click on the Ok. This would instantly insert the blank row after every row.
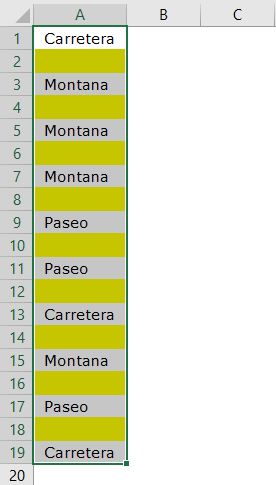
Amazing. Probably the coolest and the most intelligent technique you have learned to date.
Things to Remember
- The shortcut key to insert a row in excel is “Alt + H + I + R, Ctrl +.”
- We must always insert new rows after selecting the entire row (s) first. Otherwise, there are chances that the data may shuffle.
Recommended Articles
This article is a guide to Insert Multiple Rows in Excel. Here, we learn to insert multiple rows in Excel using Excel insert shortcuts, Excel examples, and downloadable Excel templates. You may also look at these useful functions in Excel: –
- Count Rows in ExcelThere are numerous ways to count rows in Excel using the appropriate formula, whether they are data rows, empty rows, or rows containing numerical/text values. Depending on the circumstance, you can use the COUNTA, COUNT, COUNTBLANK, or COUNTIF functions.read more
- VBA Insert RowTo insert rows we use worksheet method with the insert command to insert a row, we also provide a row reference where we want to insert another row similar to the columns.read more
- Copy Paste in VBAIn VBA, we use the copy method with range property to copy a value from one cell to another. To paste the value, we use the worksheet function paste exceptional or paste method.read more
- Insert Row Shortcut in ExcelThe insertion of an excel row is simply the addition of a new (blank) row to the worksheet. The insertion of a row is eased with the help of shortcuts.read more
- Break Links in ExcelIn the excel worksheet, there are two different methods to break external links. The first method is to copy and paste as a value method, and the second method is to go to the DATA tab, click Edit Links, and choose the break the link option.read more
In the last few decades, Microsoft has grown by leaps and bounds and so are its fabulous products. Microsoft Excel is one such product that has grown immensely. It has wonderful features and options to make your tasks easier. But one feature that it lacks is the ability to insert multiple rows. The default insert option that Excel has allows you to insert only one row at a time.
This can be very annoying in cases where you have to insert multiple rows in your spreadsheet. And this is what I am going to write today. In this post, I will present a few ways which allow you to insert multiple rows.
Method 1 – By making use of the repeat functionality of excel:
This is the simplest way to insert multiple rows in your excel spreadsheet. In this method, we will first add one row manually to the excel sheet then repeat that action multiple times. Follow the below steps to use this method:
- Open your spreadsheet, and first of all insert one row to your excel sheet manually.
- Then simply repeatedly press the “F4” key on your keyboard, till the required number of rows are inserted.
- This will repeat your last action and the rows will be added.
Method 2 – By using the insert functionality:
In this method, we will use a hidden feature that excel offers to insert multiple rows to your sheet. Follow the below steps to use this method:
- Open your spreadsheet and select the number of rows that you want to insert to your sheet. It doesn’t matter if the rows are empty but they must include the place where you want to perform the insert.

- Now simply right-click anywhere in the previously selected range and select the ‘Insert’ option.
- Now excel will ask you whether to shift the cells down or shift them to right. Select the option ‘Shift Cells Down’ and multiple cells will be inserted in the location.
Method 3 – By using the insert copied cells functionality:
In this method, we are going to take the advantage of the “Insert Copied Cells” functionality that excel has. Follow the below steps to use this method:
- First of all select multiple rows in your spreadsheet, by multiple I mean they should be equal to the number of rows that you want to insert.
- Next, copy these rows and scroll to the place where you want to insert multiple rows.

- Right-click and select the option ‘Insert Copied Cells’ and this will insert multiple rows at that place.
Method 4 – Programmatically inserting multiple rows in excel:
Although this method is a bit complex than the first three, still this can be used if you are more inclined towards the coding side. Follow the below steps to use this method:
- Navigate to the ‘View’ tab on the top ribbon, click on the ‘Macros’ button.
- Now type the name for the macro say “Insert_Lines” (without quotes) and hit the create button.
- Next, a VBA editor will be opened, simply paste the below macro code after the first line.
Sub Insert_Lines()
Dim CurrentSheet As Object
' Loop through all selected sheets.
For Each CurrentSheet In ActiveWindow.SelectedSheets
' Insert 5 rows at top of each sheet.
CurrentSheet.Range("A20:A69").EntireRow.Insert
Next CurrentSheet
End Sub

- Now comes the important thing, in the above macro the range is (“A20:A69”). The first parameter i.e. A20 tells the position from where you wish to insert the rows and the second parameter .i.e. A69 is the number of rows to be inserted added with the start position and subtracted by 1 (for instance: If you want to insert 50 rows starting from A20 then the second parameter of the range should be (50+20-1), so the range will be (“A20:A69”))
- After adding the code you can press the “F5” key and the code will insert the required rows.
- This macro is referenced from the Microsoft article: http://support.microsoft.com/kb/291305
So, these were the few methods to insert multiple rows in excel. If you know some other ways then feel free to comment below.
Updated: 07/31/2022 by
Below is information about how to add and remove a cell, column, or row in a Microsoft Excel spreadsheet.
Adding a cell
Note
When adding a new cell, data around the cell is moved down or to the right depending on how it’s shifted. If there is data in adjacent cells that line up with the selected cell, it becomes unaligned. In some situations, it may be better to add a new column or add a new row instead of a new cell.
To add a new individual cell to an Excel spreadsheet, follow the steps below.
- Select the cell of where you want to insert a new cell by clicking the cell once with the mouse.
- Right-click the cell of where you want to insert a new cell.
- In the right-click menu that appears, select Insert.
- Choose either Shift cells right or Shift cells down depending on how you want to affect the data around the cells.
Removing a cell
Note
When removing a cell, data around the cell is moved up or to the left depending on how it’s shifted. If there’s data in adjacent cells that line up with the selected cell, it becomes unaligned.
To remove a cell from an Excel spreadsheet, follow the steps below.
- Right-click the cell you want to remove.
- In the pop-up menu that appears, select Delete.
- Choose Shift cells left or Shift cells up, depending on how you want to affect the data around the cells.
Adding a row
Excel 2007 and later
- Select the cell where you want to add a row. For example, to add a row on the ‘3’ row, select the A3 cell or any other cell in row 3.
- On the Home tab in the Ribbon menu, click Insert and select Insert Sheet Rows. You can also right-click the selected cell, select Insert, then select the Entire row option.
Tip
If you want to add multiple rows at once, highlight more than one row, then click Insert and select Insert Sheet Rows. For example, if you wanted to add four rows beginning at row 3, highlight row 3 and the three rows following it. Do this by clicking and dragging your mouse on the number 3, 4, 5, and 6. Then click Insert, and select Insert Sheet Rows.
Excel 2003 and earlier
- Select the cell where you want to add a row. For example, to add a row on the ‘3’ row, select the A3 cell or any other cell in row 3.
- In the menu bar, click Insert and select Rows. This option won’t be available if you’re highlighting columns and not rows.
Tip
If you want to add multiple rows at once, highlight more than one row and then click Insert and select Rows. For example, to add four rows beginning at row 3, highlight row 3 and the three rows following it. Do this by clicking and dragging your mouse on the number 3, 4, 5, and 6. Then, click Insert, and select Rows.
Removing a row
Excel 2007 and later
- Highlight the row you want to delete.
- On the Home tab in the Ribbon menu, click Delete and select Delete Sheet Rows. You can also right-click the highlighted row and select Delete.
Using the steps above, delete the row and move the rows under the deleted row up. If you want to delete the contents of the row, press Delete on the keyboard.
Excel 2003 and earlier
- Highlight the row you want to delete.
- In the menu bar, click Edit and select Delete. You can also right-click with your mouse on the highlighted row and select Delete.
Using the above steps, delete the row and move the rows under the deleted row up. If you want to delete the contents of the row, press Delete on the keyboard.
Adding a column
Excel 2007 and later
- Select the cell where you want to add a column. For example, to add a column on the ‘C’ column, select the C1 cell or any other cell in column C.
- On the Home tab in the Ribbon menu, click Insert and select Insert Sheet Columns. You can also right-click the selected cell, select Insert, then select the Entire column option.
Tip
If you want to add multiple columns at once, highlight more than one column, click Insert and select Insert Sheet Columns. For example, if you want to add four rows on column C, highlight the C column. Then, additionally highlight the three columns to the right, by clicking and dragging on the C, D, E, and F letters. Alternatively, with column C highlighted, hold Shift and click the F column header. Then click Insert and select Insert Sheet Column.
Excel 2003 and earlier
- Select the cell where you want to add a column. For example, to add a column on the ‘C’ column, select the C1 cell or any other cell in column C.
- In the menu bar, click Insert and select Columns. This option is not available if you’re highlighting rows and not columns.
Tip
If you want to add multiple columns at once, highlight more than one column, click Insert and select Columns. For example, if you want to add four rows on column C, highlight the C column. Then, additionally highlight the three columns to the right, by clicking and dragging on the C, D, E, and F letters. Alternatively, with column C highlighted, hold Shift and click the F column header. Then click Insert and select Column.
Removing a column
Excel 2007 and later
- Highlight the column or columns you want to delete.
- On the Home tab in the Ribbon menu, click Delete and select Delete Sheet Columns. You can also right-click the highlighted column and select Delete.
Using the steps above, delete the column and move the columns to the right over to the left. If you want to delete the contents of the column, press Delete on the keyboard.
Excel 2003 and earlier
- Highlight the column or columns you want to delete.
- In the menu bar, click Edit and select Delete. You can also right-click with your mouse on the highlighted column and select Delete.
Using the steps above, delete the column and move the columns to the right over to the left. If you want to delete the contents of the column, press Delete on the keyboard.

Excel Add Rows Shortcut (Table of Contents)
- Introduction to Add Rows in Excel Shortcut
- Shortcut Methods of Adding Rows in Excel
Introduction to Add Rows in Excel Shortcut
Excel is all but nothing without its cells, rows, and columns. Isn’t it right? You couldn’t do anything without these three aspects of Excel as they define the layout, structure whatever you call it; for Excel. One of these three major aspects is Excel Rows. We should be well aware of how to add rows in Excel in case we needed those to add. Shortcuts will reduce time and increases productivity as well. We will teach you a way through this article about how to add rows in Excel. What is the shortcut to do so as well?
How to Add Rows in Excel using Shortcut?
Adding or deleting rows as well as columns in Excel is a day to day task for anyone who works on the tool. It would be great if we know the shortcut to do so, since having an idea of how to add rows in Excel with a shortcut, we may be able to save the time, which can be utilized for any other productivity measure as well as the task will be completed quickly due to the reduced time bounds.
There are two shortcuts in Excel to add Rows in Excel. If the keyboard you are using has a number pad on the rightmost side of it, you may use the Ctrl button and “+” button together to add a row/s in Excel.
If your keyboard doesn’t have that number pad and you are worried about how to add a row in Excel, don’t worry; there is another shortcut key for such cases. You can press the Shift button, Ctrl button and “=” button simultaneously to insert a row/s in Excel worksheet.
In this article, we will walk you through some shortcut methods of adding rows in Excel.
Shortcut Methods of Adding Rows in Excel
We will discuss some shortcut methods of adding rows in Excel.
You can download this Add Rows in Excel Shortcut Template here – Add Rows in Excel Shortcut Template
Method #1 – Insert Row in Excel
Consider an example shown below where we have a list of the employee with their First Name, Last Name and Salary details in three different columns. See the screenshot below:

Now, to insert a row, we first need to navigate towards a cell. Suppose we wanted to add a row after the 4th cell. Move towards the 4th cell of the Excel worksheet.

Now, right-click on the cell selected (i.e. 4th cell), and then you’ll see a series of options as shown in the screenshot below:

You could see a series of options under the pane that opens up as soon as you right-click on the selected cell. Out of all those options, choose Insert… option to be able to insert a row in the given sheet before the 4th cell.

A new window named as Insert will open up with series of options, as shown in the screenshot below. Click on the OK button and see what happens.

If you press the OK key with the current option “Shift cells down”, You’ll be seeing cells 4th and below to that are shifted below by one position, and a new blank cell is appearing as a 4th cell. See the screenshot below:

This is not the ideal way, though; we are not getting an entire blank row on the 4th position of the sheet. This is because we have chosen the option of “Shift cells down”. Instead of that, if you select the option as “Entire row”, you’ll be able to insert an entirely new row in the 4th position.

See the screenshot below, where the entire row is added on the 4th position when you choose the “Entire row” option under the Insert window.

Now, after we have successfully added a row at the 4th position, what if we wanted to add multiple blank cells? Do we need to repeat the procedure again and again? Isn’t it going to be a time-consuming task?
Well, off course, it will be a time-consuming job if you repeat the procedure again and again. You, however, can eliminate this task by some single keystrokes.
Just select the blank cell you just inserted and press F4 to add one more blank row above that cell. This way, you can insert multiple rows at the same time using a single keyboard shortcut.

Method #2 – Shortcut to Add a Row in Excel
In this example, we will look at the shortcut method of adding rows in Excel. This method saves your time which leads to improved productivity.
Step 1: Select the entire row above which you wanted to add a new blank row. This can be done with a keyboard shortcut Shift + Space bar. Select the fifth row by navigating towards A5 and press the Shift + Space button.

Step 2: Now, press Shift, Ctrl, and Plus sign key together to add a new blank row before the 5th row selected.

Step 3: Now, you can press F4 to add more blank rows. Whatever number of rows you want to add, press F4 that much time.

Here, we tried to add one blank row using a keyboard shortcut and then using F4 to increase the number of blank rows. Is there any other way to add multiple rows in a single shot? Yes, there absolutely is a way to do so.
Step 4: Select the number of rows that you wanted to add blank rows for. Select three rows as shown in the screenshot below. You can use the Shift + Space bar to select the number of rows.

Step 5: Now, the same way we deed in step 3, use Shift, Ctrl, and Plus sign to add three blank rows straight in the given sheet.

These are few shortcuts to add blank rows in Excel using keyboard keystrokes. Let’s wrap this article with some points to be remembered.
Things to Remember
- If your keyboard has a number pad on the right-hand side, you can use Ctrl + (Plus Sign) to add the rows. However, if there is no number pad, you need to press Shift + Ctrl + (Plus Sign) through your keyboard.
- F4 keyboard button helps you to repeat the action of adding rows in Excel. Given that a row is already added.
- To add multiple rows in a single shot, you need to select multiple rows and press the keyboard shortcut.
Recommended Articles
This has been a guide to Add Rows in Excel Shortcut. Here we discuss How to Add Rows in Excel Shortcut along with practical examples and downloadable excel template. You can also go through our other suggested articles –
- Excel Freeze Rows
- ROWS Function in Excel
- Excel Columns to Rows
- VBA Insert Row
Home > Microsoft Excel > How to Insert Multiple Rows in Excel? The 4 Best Methods
Note: This guide on how to insert multiple rows in Excel is suitable for all Excel users.
Have you ever wondered how to insert multiple rows in Excel in one go? In this tutorial, I am going to explain how to do just that.
Also, I am going to talk about some lesser-known tricks and shortcuts about Excel rows.
Related:
How to Autofit Excel Cells? 3 Best Methods
How to Shade Every Other Row in Excel? (5 Best Methods)
How to Superscript in Excel? (9 Best Methods)
I am confident that, by the end of this guide, you will be able to handle Excel rows like a pro.
I’ll cover:
- Why Insert Multiple Rows in Excel?
- How to Insert Multiple Rows in Excel?
- Excel Insert Row Shortcut
- Excel Insert Row Shortcut for Tables
- How to Add a Row in-between Rows Multiple Times in Excel?
Why Insert Multiple Rows in Excel?
Many times, you will come across situations where you need to insert new rows of data into your spreadsheet. This will become strenuous and time-consuming even while using the Excel insert row shortcut.
That’s when these techniques will come in handy, especially when you have too many important tasks on your plate. All the things I am going to cover will help you save time and use Excel effectively.
How to Insert Multiple Rows in Excel?
The easiest way to insert multiple rows in Excel is to use the Insert menu options. Follow these steps to do this:
Step 1: Select the rows where you want to insert the new blank rows. To easily do this, just select the first few cells and
use the shortcut Shift + Space to select entire rows.

Step 2: Click on the Insert icon in the Home tab. Another way to access the Insert icon is by
right-clicking on the selection.


Excel will insert blank rows in place of the rows you just selected.
Step 3: Now that you have the empty rows ready, fill in the relevant data inside them to
complete the spreadsheet.
Also Read:
How to Use the Excel Fill Handle Easily? (Top 3 Uses with Examples)
How to Make a Line Graph in Excel? 4 Best Line Graph Examples
How to Group Worksheets in Excel? (In 3 Simple Steps)
Excel Insert Row Shortcut
The best way to fastly add multiple rows is to use keyboard shortcuts. They are:
Step 1: Click and Select the Row cells where you want to add the new rows. Use Shift+Space.
This will select the entire rows.
Step 2: Press Alt+I
Step 3: Press Alt+R
That’s it. Excel will add multiple rows of blank data in the selected location. It is simple yet very effective.
Do you want a simpler alternative shortcut?
Just select the rows where you want to add new rows and click Ctrl plus “+”.

Note: For some reason, this “+” has to be only from the keypad on your keyboard, for this to work properly.
It cannot get simpler than this, isn’t it?
Excel Insert Row Shortcut for Tables
Sometimes, you may need to add multiple rows, not for all columns but for a select data range.
For example, in this case, I have a data range, which needs new rows to be added inside. But the problem here is that I have a separate set of data that is placed in an adjacent place on the worksheet.
Now, If I add new columns for the entire worksheet range, it will affect the neighbouring data set as well. To avoid this, you need to convert your data range into a table before adding the rows.
To do this, select the data range where you want to add multiple new rows and press “Ctrl+T”. This will convert your normal data into a table.
Now, use Alt+H+I+A to add multiple rows at the place of your choice. The Ctrl plus “+” option also works here.

How to Add a Row in-between Rows Multiple Times in Excel?
Let’s say, for example, I have a spreadsheet where I need to insert a row in between every two rows.
To do this easily just select entire rows by clicking on the row number with “Ctrl” simultaneously.
Then, simply click on the Insert button under the Home tab.
That’s it! Now Excel adds one empty row in between all the selected rows automatically.
But, what if you need to add more than one row in between every two rows?
To do this you will need an additional column.
In this additional column, assign serial numbers to all the rows in your data set.

Next, copy the entire set of serial numbers and paste it at the end of the same column as many times as the number of rows you want to add.

Now, go to Sort and sort your data using the additional column in ascending order. You have successfully added more than one row in between every two rows.

You can delete the additional column if needed.
Suggested Reads:
How to Extract an Excel Substring? – 6 Best Methods
How to Split Cells in Excel? 3 Easy Methods
Easily Make a Bullet Chart in Excel—2 Examples
Closing Thoughts
These are all the different methods to insert multiple rows in Excel. If you have any questions about this or any other Excel feature, let us know in the comments. We are always happy to help.
If you need more high-quality Excel guides, please check out our free Excel resources centre.
Simon Sez IT has been teaching Excel for over ten years. For a low, monthly fee you can get access to 100+ IT training courses. Click here for advanced Excel courses with in-depth training modules.

Adam Lacey

Adam Lacey is an Excel enthusiast and online learning expert. He combines these two passions at Simon Sez IT where he wears a number of different hats.When Adam isn’t fretting about site traffic or Pivot Tables, you’ll find him on the tennis court or in the kitchen cooking up a storm.