
В Excel 5 впервые была реализована поддержка нового макроязыка Visual Basic for Applications (VBA). Каждая копия Excel, начиная с 1993 года, содержит копию языка VBA, в явном виде не представленную на рабочих листах. VBA позволяет выполнять действия, которые обычно реализуются в Excel, но делает это намного быстрее и безукоризненно.
Если вам доводилось прежде сталкиваться с VBA-программами, то вы знаете, что очень часто они позволяют с помощью всего одного щелчка получать результаты, на которые в случае применения обычных средств Excel уходит несколько часов, а то и дней. Не стоит пугаться сложностей VBA, это ничуть не сложнее чем эмулятор psp. В 90% случаев программный код генерируется благодаря функции записи макросов, и только самые эффективные VBA-приложения пишутся вручную. В примерах раздела «Использование VBA для создания сводных таблиц» вы познакомитесь с нелегкой работой настоящего VBA-программиста.
По умолчанию VBA в Excel 2010 отключен. Прежде чем начать его использовать, нужно активизировать его в диалоговом окне Центр управления безопасностью (Trust Center). Выполните следующие действия.
- Выберите вкладку Файл (File) для перехода в окно представления Backstage.
- В находящейся слева навигационной панели щелкните на кнопке Параметры (Options). На экране появится диалоговое окно Параметры Excel (Excel Options).
- В диалоговом окне Параметры Excel выберите категорию Настройка ленты (Customize Ribbon).
- В находящемся справа списке отображается перечень основных вкладок Excel. По умолчанию флажок для вкладки Разработчик (Developer) не установлен. Установите его, после чего вкладка Разработчик отобразится на ленте. Щелкните на кнопке ОК для закрытия окна Параметры Excel.
- Щелкните на кнопке Безопасность макросов. На экране появится диалоговое окно Центр управления безопаность, в котором можно выбрать одну из четырех настроек, задающих уровень безопасности при работе с макросами. Названия этих настроек изменились по сравнению с названиями, применяемыми в версиях Excel 97 — Excel 2003. Соответствующие объяснения можно найти при описании следующего шага.
- Выберите один из следующих переключателей.
- Отключить все макросы с уведомлением (Disable all macros with notification). Эта настройка эквивалентна среднему уровню безопасности макросов в Excel 2003. При открытии рабочей книги, содержащей макросы, на экране появится сообщение о том, что в файле имеются макросы. Если вы хотите, чтобы эти макросы выполнялись, щелкните на кнопке Параметры (Options) и установите флажок Включить это содержимое (Enable). Это позволит VBA выполнять макросы, но вам придется явным образом разрешать их запуск при загрузке Excel.
- Включить все макросы (Enable all macros). Эта настройка эквивалентна низкому уровню защиты макросов в Excel 2003. Поскольку она разрешает выполнение абсолютно всех макросов, содержащихся в рабочей книге (в том числе и зловредных), разработчики из Microsoft настоятельно не рекомендуют ее использовать.
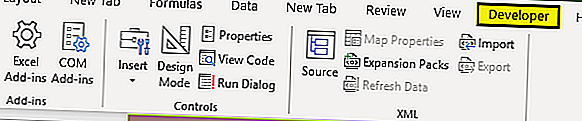
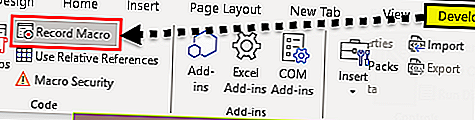
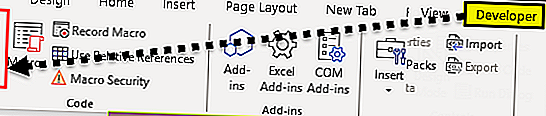
5. Выберите вкладку ленты Разработчик. Нам понадобится группа команд Код (Code), в состав которой входят кнопки Visual Basic Editor, Макросы (Macros), Запись макроса (Macro Recorder) и Безопасность макросов (Macro Security) (рис. 12.1).

Рис. 12.1. Доступ к инструментам VBA реализуется через вкладку Разработчик
Отображение вкладки «Разработчик»
- На вкладке файл выберите Параметры> Настройка ленты.
- В разделе Настройка ленты в списке Основные вкладки установите флажок Разработчик.
Как добавить режим разработчика в Excel?
Вкладка Разработчик в Excel
- Щелкните правой кнопкой мыши в любом месте на Ленте и нажмите Customize the Ribbon (Настроить ленту).
- С правой стороны открывшегося диалогового окна под надписью Customize the Ribbon (Настроить ленту) при необходимости выберите Main Tabs (Основные вкладки) .
- Поставьте галочку в ячейке Developer (Разработчик).
Как включить панель разработчика в Excel 2007?
Отображение вкладки «Разработчик» на ленте Microsoft Office Excel 2007/2010: – нажмите кнопку Office –> Параметры Excel; – в открывшемся диалоговом окне Параметры Excel в меню (слева) выберите Основные; – в разделе Основные параметры работы с Excel установите флажок Показывать вкладку «Разработчик» на ленте –> OK.
Как открыть VBA в Excel?
Вставляем код VBA в книгу Excel
- Открываем рабочую книгу в Excel.
- Нажатием Alt+F11 вызываем окно редактора Visual Basic.
- На панели Project-VBAProject кликаем правой кнопкой мыши по имени рабочей книги (в левой верхней части окна редактора) и в контекстном меню выбираем Insert > Module.
Как включить режим конструктора в Excel 2016?
На вкладке Разработчик в группе элементы управления включите Режим конструктора.
…
Если вкладка Разработчик недоступна, отобразите ее:
- Откройте вкладку Файл и выберите пункт Параметры.
- В раскрывающемся списке настроить ленту выберите Основные вкладки.
- Установите флажок Разработчик.
Как добавить кнопку в Excel?
Добавление кнопки (элемент управления формы)
- На вкладке разработчик в группе элементы управления нажмите кнопку Вставить, а затем в разделе элементы управления формынажмите кнопку .
- Щелкните на листе место, где должен быть расположен левый верхний угол кнопки. …
- Назначьте кнопку макроса, а затем нажмите кнопку ОК.
Где находится разработчик в Excel 2010?
Microsoft Office Excel 2010, 2013, 2016
- Откройте меню «Файл» — «Параметры» — «Настройка ленты».
- В списке «Основные вкладки» установите флажок напротив пункта «Разработчик».
- Нажмите «ОК», чтобы подтвердить свое решение. Инструменты разрабочика появятся в ленте основных вкладок Excel.
Почему нет вкладки Разработчик в Excel?
Вкладка » разработчик » не отображается по умолчанию, но ее можно добавить на ленту. В меню Word выберите пункт Параметры. Выберите элемент Лента и панель инструментов , > настроить ленту > Основные вкладки. Установите флажок разработчик и нажмите кнопку сохранить.
Как включить VBA в Excel 2007?
Excel
- Нажмите кнопку Microsoft Office. , а затем — Параметры Excel.
- Выберите Центр управления безопасностью > Параметры центра управления безопасностью > Параметры макросов.
- Выберите нужные параметры. Отключить все макросы без уведомления. Выберите этот параметр, если не доверяете макросам.
Как писать макросы в Excel?
Чтобы записать макрос, следуйте инструкциям ниже.
- На вкладке Разработчик в группе Код нажмите кнопку Запись макроса. …
- В поле Имя макроса укажите имя макроса. …
- Чтобы назначить сочетание клавиш для запуска макроса, в поле Сочетание клавиш введите любую строчную или прописную букву.
Где находятся элементы управления в Excel?
Чтобы добавить список в Excel 2007 и более поздних версий, откройте вкладку разработчик , нажмите кнопку Вставить в группе элементы управления , а затем в разделе элементы управления формывыберите пункт форма списка (элемент управления) .
Где сохраняются файлы Excel?
Как и в предыдущих версиях программы, файлы Microsoft Excel можно сохранять на локальном компьютере. При желании документ можно сохранить в облачном хранилище OneDrive, а также экспортировать или открыть доступ напрямую из Excel. Служба OneDrive прежде называлась SkyDrive.
Где Автосохраненные файлы Эксель?
— Зайдите в Файл — Параметры программы, вкладка Сохранение и посмотрите, куда сохраняются файлы — на скриншоте виден путь к нужной папке. Как правило, это папка на диске С.
Вкладка разработчика в Excel
Вкладка «Разработчик» в Excel используется для генерации макросов, создания приложений VBA, проектирования форм и импорта или экспорта XML. По умолчанию вкладка разработчика отключена в Excel, поэтому ее необходимо включить в меню параметров в Excel.
Давайте углубимся и рассмотрим различные варианты, предлагаемые на вкладке «Разработчик».
Как добавить вкладку разработчика в Excel?
- Шаг 1. Откройте новый лист Excel и перейдите к файлу, перейдите к параметрам.

- Шаг 2. После нажатия «Параметры» выберите «Настроить ленту» слева и выберите «Основные вкладки» справа, затем установите флажок «Разработчик» и нажмите кнопку «ОК».

- Шаг 3. Вкладка разработчика появится в файле Excel
Как писать программы VBA с помощью вкладки разработчика?
Вкладку разработчика в Excel можно использовать для написания программ VBA, как показано ниже —
Вы можете скачать этот шаблон Excel для вкладки разработчика здесь — шаблон для вкладки разработчика в Excel
Пример №1 — Написание простого кода для отображения «Привет, добро пожаловать в VBA»
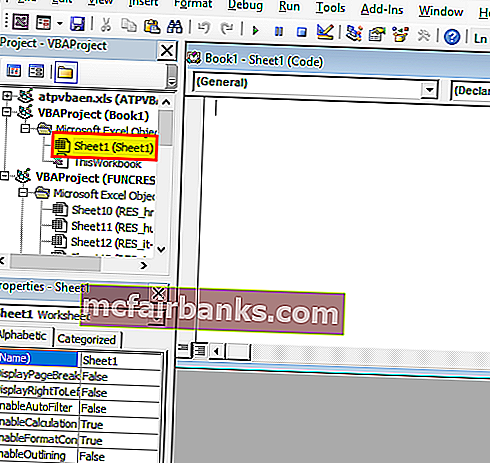
Перейдите на вкладку разработчика и выберите «Visual Basic», появится новое окно.
Дважды щелкните Sheet1 (Sheet1), и справа появится пустой документ или панель.
Напишите следующий код и нажмите кнопку «Выполнить», появится всплывающее окно с надписью «Привет, добро пожаловать в VBA».
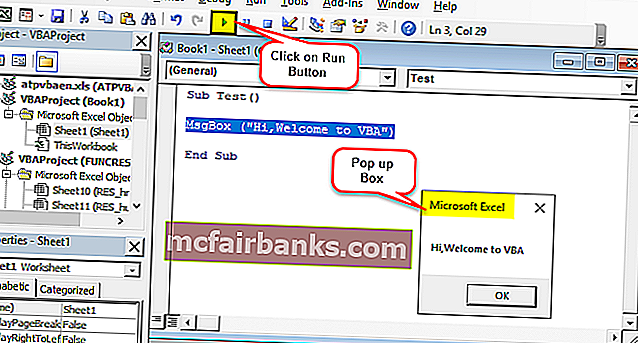
Пояснение к коду:
Sub и End Sub используются как процедуры или, скажем, основная часть программы.
« Msgbox » — это функциональная функция в пакете VBA, которая отображает все, что в нем написано, например, здесь («Привет, добро пожаловать в VBA»)
Чтобы сохранить приведенный выше код, сохраните его как файл .xlsm, чтобы сохранить код макроса.
Пример # 2 — Функция нажатия кнопки
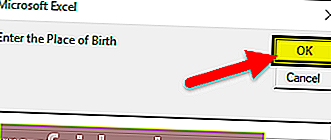
Эта конкретная функция позволяет любому запускать код одним нажатием кнопки, и для лучшего понимания давайте представим иллюстрацию, где человек динамически вводит имя и место рождения, которые будут отображаться в качестве выходных данных.
Перейдите на вкладку «Разработчик» и нажмите «Радиокнопки» в Excel и выберите «Кнопка (управление формой)»
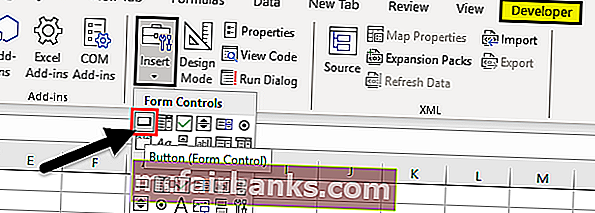
Перетащите его в любое место формы, появится следующее диалоговое окно и переименует имя макроса.
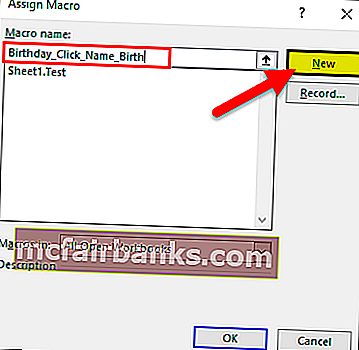
Нажмите кнопку «Создать», и появится следующая кодовая страница.
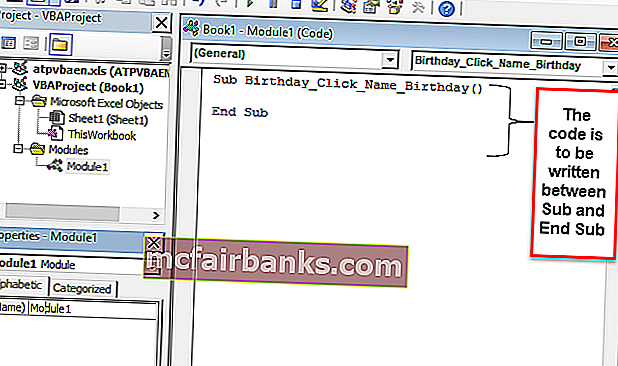
Кодовая часть и объяснение
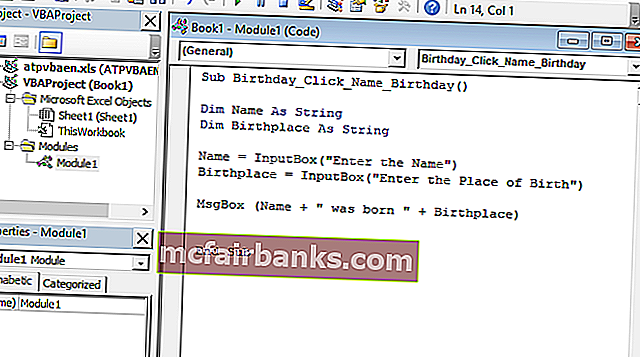
- Функция « Dim » используется для объявления переменной, которая может быть строковой, числовой и т. Д. (Здесь Имя и Место рождения — переменные, объявленные как строка)
- «InputBox» — это функциональная функция в VBA, в которой пользователя просят ввести
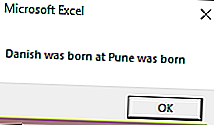
- « Msgbox » — это функциональная возможность в пакете VBA, которая отображает все, что в нем написано.
Теперь закройте окно кодовой страницы
Щелкните правой кнопкой мыши по кнопке и выберите редактировать текст в Excel, где была создана кнопка, и переименуйте его в «Name_Birth»

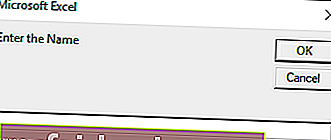
Нажмите на кнопку и введите имя и место рождения.
Появятся два запроса для имени и рождения (введите имя и место рождения, например: Дриш и Пуна)
После ввода имени появится следующий вывод
Сохраните файл как файл .xlsm
Как записать макрос на вкладке разработчика?
Он лучше всего подходит, когда нужно выполнять задачу постоянно и вы хотите сэкономить время как на повторяющейся работе, так и на написании кода.
Итак, вот предыдущий пример, который я взял ранее. Предположим, кто-то хочет раскрасить столбец, в котором есть формулы, но для каждого файла. Итак, что можно сделать, это записать работу, сделав ее сначала вручную, а затем запустить ее для других файлов.
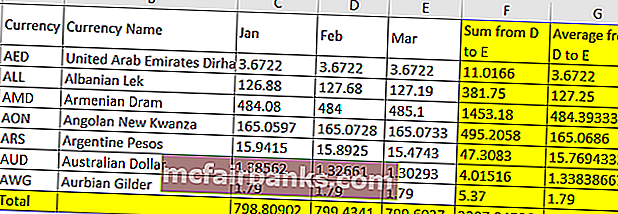
Предположим, у нас есть данные, как показано ниже
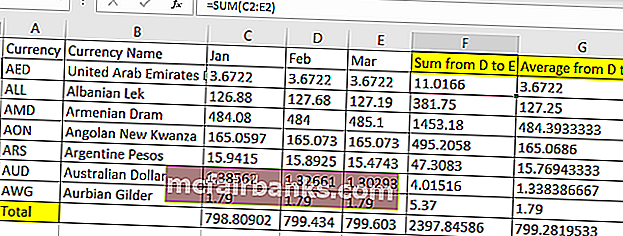
Итак, здесь мы должны окрасить желтым цветом столбцы F, G и итоговую сумму строки желтым цветом, поскольку они являются столбцом и строками формулы.
Итак, перед окраской эти желтые идут на вкладку разработчика.
Нажмите на Запись макроса в Excel.
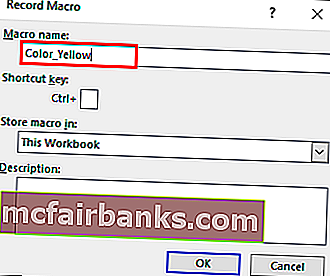
После нажатия на кнопку «Запись макроса» появится диалоговое окно, в котором его можно переименовать в Color_Yellow.
Цвет столбцов F, G и итоговой строки желтым
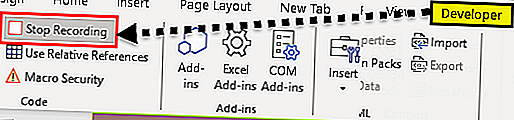
После раскраски переходим во вкладку Разработчик
Нажмите Остановить запись.
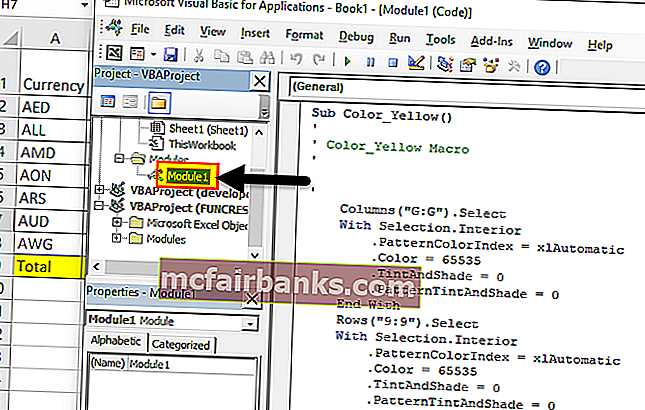
Перейдите на вкладку Разработчик в Excel и Visual Basic
Выбрать модуль
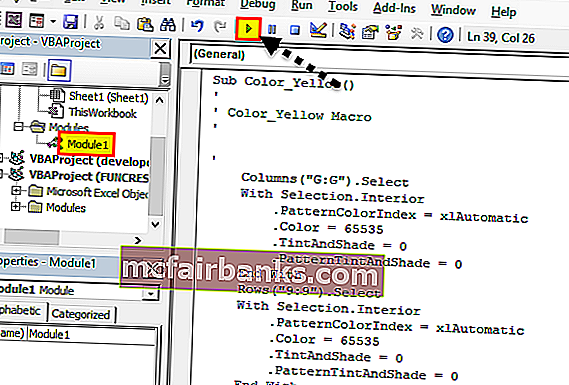
В следующий раз, когда кто-то захочет повторить задачу, можно нажать кнопку (Выполнить макрос), скопировав и вставив тот же код в новый лист Excel, используя ссылку Написание простого кода для отображения
Как обеспечить безопасность макросов с помощью вкладки разработчика?
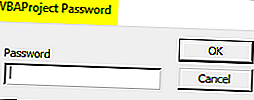
При необходимости можно включить макросы, защищенные паролем
Перейдите на вкладку Разработчик
Открыть Visual Basic
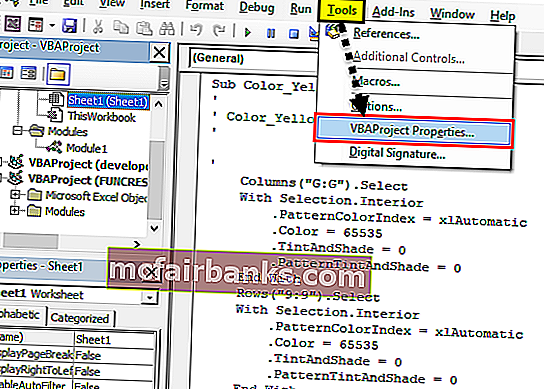
Откройте макрос, для кода которого требуется активация пароля (например: мы берем макрос Color_Yellow, как в приведенном выше примере)
Выберите Инструменты и свойства VBAProject.
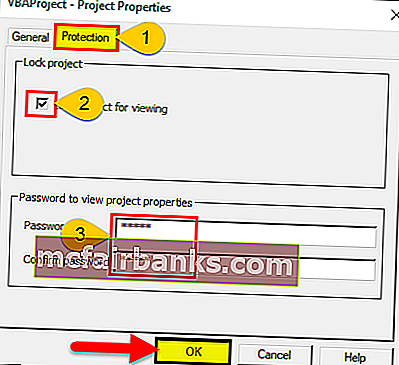
Появится диалоговое окно
Выберите вкладку Защита
Проверьте проект блокировки для просмотра
Введите нужный пароль, подтвердите его и нажмите ОК.
Сохраните его как файл .xlsm при сохранении и закройте
Откройте файл и повторите шаги 1,2 и 3.
Он запросит пароль и введите пароль
Теперь сможем увидеть код
То, что нужно запомнить
- Это встроенная вкладка в Excel
- Легко автоматизировать все с помощью записи макроса
- Лучшее в этом — подсказки времени выполнения или подсказки пользователя, которые могут быть предоставлены посредством нажатия кнопки в VBA.
- Можно также создавать формы или базовый пользовательский интерфейс в VBA, см. Ссылки для тех же
Некоторые приложения пакета Microsoft Office, такие как Word, Excel, Access, Outlook, позволяют использовать для решения пользовательских задач язык программирования Visual Basic for Applications (VBA).
Для того чтобы использовать возможности VBA, макросы, процедуры и надстройки, написанные на этом языке программирования, необходимо чтобы компонент Visual Basic для приложений был установлен вместе с приложениями пакета Microsoft Office.
Как проверить установлен ли Visual Basic для приложений?
Самый простой способ проверить наличие либо отсутствие установленного VBA это попробовать его запустить. Запустить VBA можно сочетанием клавиш Alt+F11 на клавиатуре, либо кнопкой «Visual Basic» на вкладке «Разработчик». По умолчанию вкладка «Разработчик» отключена во всех приложениях пакета Microsoft Office, поэтому предварительно ее нужно отобразить в настройках ленты.
Итак, если VBA установлен, то нажатие горячих клавиш либо кнопки «Visual Basic» на ленте приложения приводит к появлению окна редактора Visual Basic на экране монитора. Выглядит редактор примерно так, как показано на изображении ниже.

В случае, если окно редактора не появилось, то компонент Visual Basic для приложений необходимо установить.
Как установить Visual Basic для приложений?
Чтобы установить компонент пакета Visual Basic for Applications, необходимо нажать кнопку Пуск, зайти в Панель управления/Программы и компоненты, выбрать программу Microsoft Office и нажать кнопку «Изменить», либо запустить установочный файл Setup.exe.

Далее выбрать опцию «Добавить или удалить компоненты», в параметрах установки выбрать компонент Visual Basic для приложений и доустановить его.

Другие материалы по теме:
In this Article
- Opening the Visual Basic Editor
- To enable the Developer Ribbon
- Understanding the VBE Screen
- Inserting a module or form into your code
- Removing a Module or Form from the Project Explorer
- The Properties Window
- The Code Window
- Understanding the Code
- Sub Procedures
- Function Procedures
- Creating a new Procedure
- Writing Code that is easy to understand and navigate
- Adding Comments
- Indenting
- UpperCase vs LowerCase
- AutoComplete
- Error trapping and Debugging
- Syntax errors
- Compilation Errors
- Runtime Errors
- Logical Errors
- On Error Go To
- On Error Resume Next
This tutorial will show you how to open and program in the Visual Basic Editor in VBA.
Opening the Visual Basic Editor
There are a few ways to access the Visual Basic Editor (VBE) in Excel.
Press Alt + F11 on your keyboard.
OR
Click View > Macros > View Macros. From here you can Edit an existing macro or Create a new one. Either option opens up the VB Editor.

OR
Developer > Visual Basic
Note: If you don’t see the Developer Ribbon, you’ll need to enable it.
To enable the Developer Ribbon
Click on the File tab in the Ribbon, and go down to Options. In the Customize Ribbon options, tick the Developer check box. This is switched off by default so you will need to switch it on to see the tab on the ribbon.
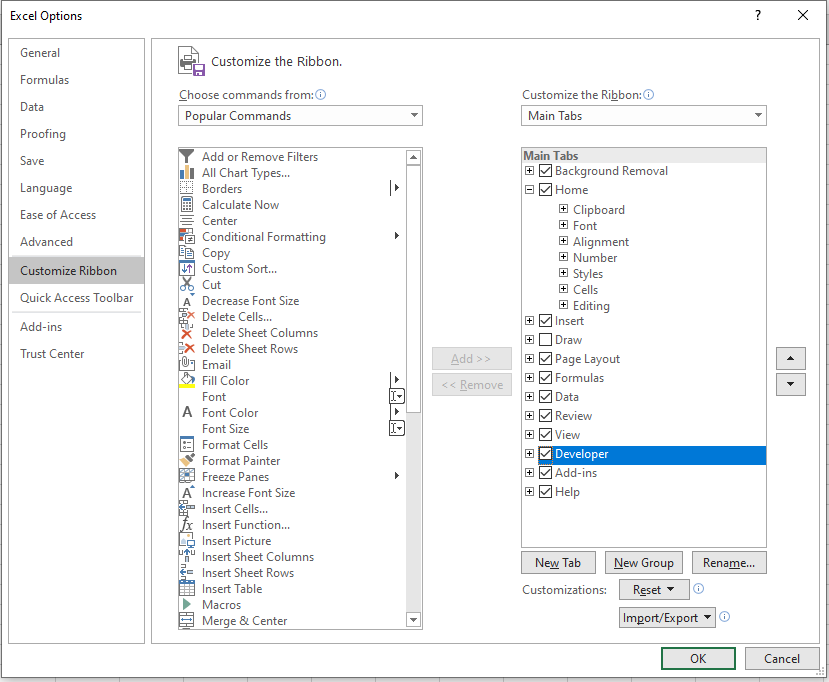
Click OK.
The Developer tab will appear on the main ribbon. Click on Visual Basic at the start of the ribbon to access the Visual Basic Editor.

Understanding the VBE Screen
The VBE Screen is shown in the graphic below.
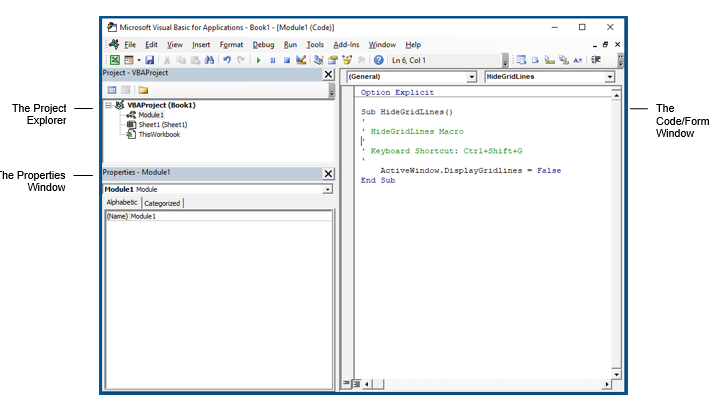
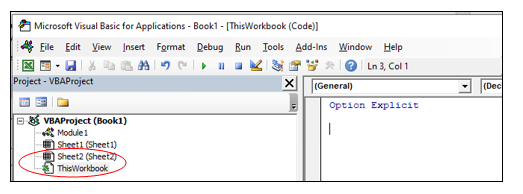
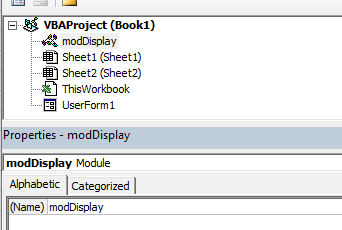
The Project Explorer
The Project Explorer enables you to see how the Project in which you are working is organized. You can see how many modules and forms are stored in the project, and can navigate between these modules and forms. A module is where the code in your workbook is stored, when you record a macro, it will be stored in a standard module – which will by default be named ‘Module1’.
Each of the worksheets in your Excel file also has module behind it, as does the workbook itself. When you insert a new sheet into the workbook via the main Excel screen, you will see an additional sheet module appear in the Project Explorer.
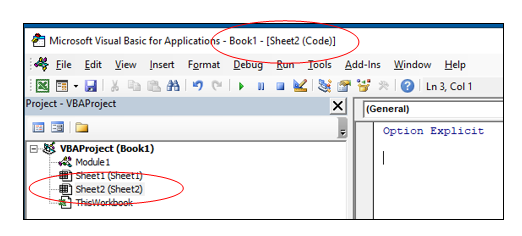
Double-click on a module to move to the code for that module.
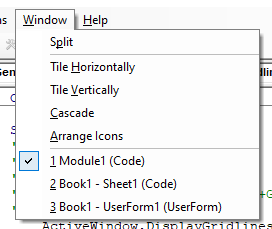
You can also click on the Window menu on the toolbar and select the module there to move to the code for that module.
Type of Modules
The modules are organized into 5 different types.
- Standard modules – most of your code will go into this type of module. When you record a macro, it gets put into a standard module. When you write a general procedure to be used throughout your workbook, it also normally goes into a standard module.
- Workbook modules – this module holds the code the is unique to that individual workbook. Most of the code in these type of modules are known as EVENTS. An event can occur when a workbook is opened or closed for example. The module can also contain code that is written by yourself and used by the events.
- Sheet modules – this module holds the code that is unique to that individual sheet. They can occur when a sheet is clicked on for example (the Click Event), or when you change data in a cell. This module can also hold code that is written by yourself and called by the Events.
- Form modules – this is the module behind a custom form that you may create. For example you may create a form to hold details for an invoice, with an OK button, the code behind the button (the Click Event) contains the code that will run when the button is clicked.
- Class modules – this module is used to create objects at run time. Class module are used by Advanced VBA programmers and will be covered at a later stage.
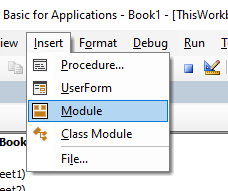
Inserting a module or form into your code
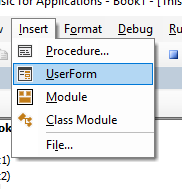
To insert a new module into your code, click on the Insert option on the menu bar, and click Module.
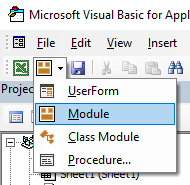
Or, click on the Insert Module button which you will find on the standard ribbon.
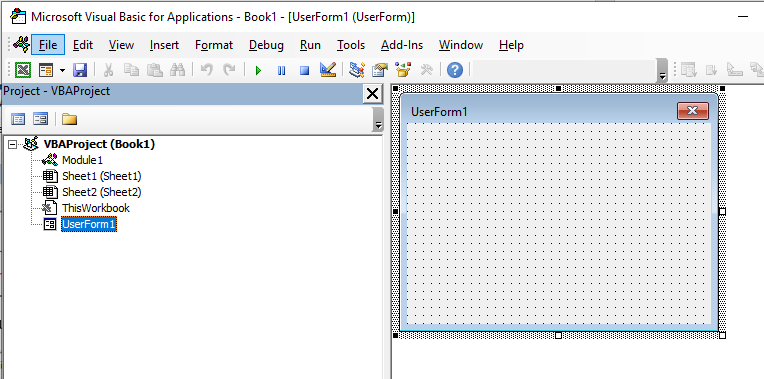
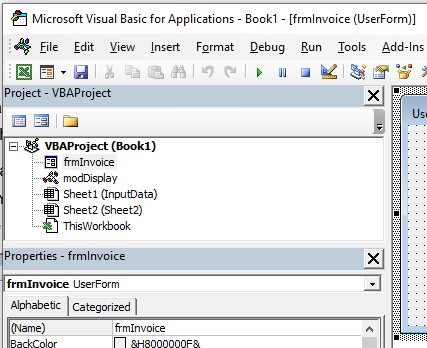
To insert a new user form into your code, select the UserForm option.
A new user form will appear in the Project Explorer and will be shown in the Code Window on the right.
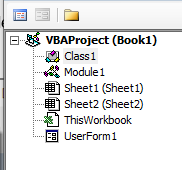
You can also insert a Class Module
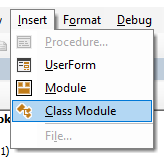
A class module is used to insert objects into your VBA project.
Removing a Module or Form from the Project Explorer
Right-click on the module or form you wish to remove to show the right click short cut menu.
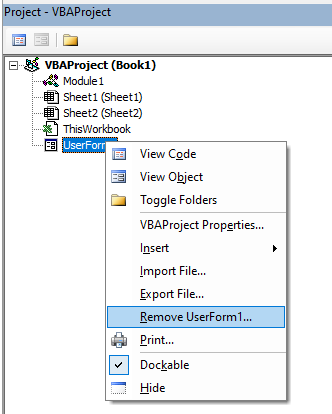
Click Remove (in this case UserForm1…)
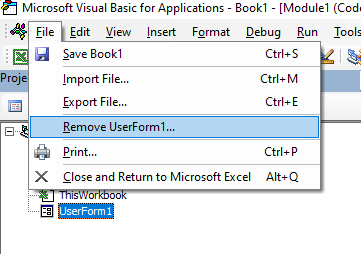
OR
Click on the File menu, and then click on Remove (UserForm1).
A warning box will appear asking if you want to Export the form or module before you remove it. Exporting the form or module enables you to save it as an individual file for use in a different Excel project at some other time.
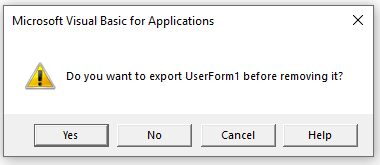
More often than not when you remove a module or form it is because you do not need it, so click No.
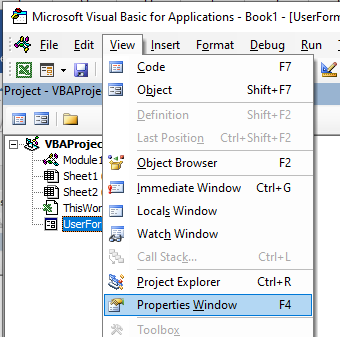
The Properties Window
You will see the properties window below the Project Explorer. You may need to switch this on.
Press F4 or click View, Properties Window.
The properties window enables you to see the properties for the particular module or form that is selected in the Project Explorer. When you are working in modules, you can use the properties window to change the name of the module. This is the only property available to a module. However, when you are working with forms, there will be far more properties available and the Properties window is then used extensively to control the behavior of forms and the controls contained in the form.
When you record a macro, it is automatically put into a standard module. The module will named ‘Module1’ and any code that is contained in that module is available to be used throughout your project. You should rename your module to something that is significant, that would make your code easy to find if you were to add multiple modules to the project.
You can also rename your forms.
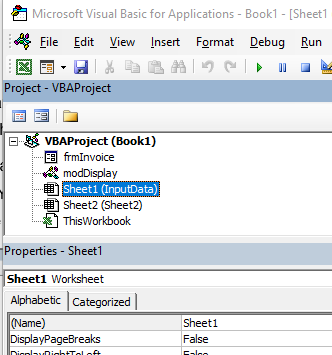
If you have renamed your sheet in Excel, the name of the sheet will show up as the name of the sheet in brackets after Sheet1.
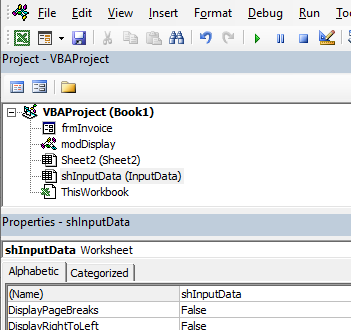
If you want to change the name of the module behind the sheet, you can change it in the same way you change the module and user form name – by changing the Name property in the Properties Window.
VBA Coding Made Easy
Stop searching for VBA code online. Learn more about AutoMacro — A VBA Code Builder that allows beginners to code procedures from scratch with minimal coding knowledge and with many time-saving features for all users!

Learn More
The Code Window
The code window shows you the sub procedures and functions that are contained in your modules – it shows you the actual code. When you record a macro, a sub procedure will be created for you. If you add a short cut key to the macro, it will show up as a comment in the macro to let you know what the short cut key is that you assigned to the macro.
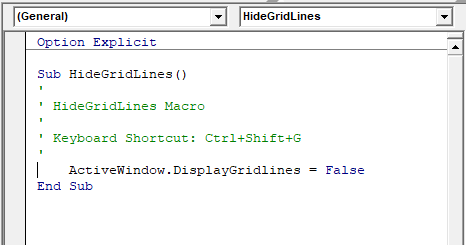
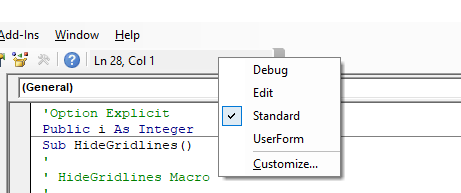
At the top of the code window are two combo boxes. These allow you to see which object (if any) within the Module that you might be working on, and which Procedure you might be working on.
In the example above, we are not working on any object – thus this is set to general, but we are working within the Gridlines procedure.
If we had more than one procedure in this module, we could use the combo box above to navigate to the other procedures.
Understanding the Code
There are 2 types of procedures – Sub procedures and Function procedures.
Sub Procedures
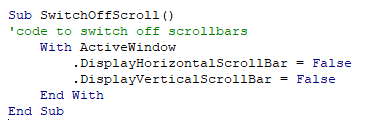
The macro recorder can only record Sub procedures. A Sub procedure does things. They perform actions such as formatting a table or creating a pivot table, or in the gridline example, changing the view settings of your active window. The majority of procedures written are Sub procedures. All macros are Sub procedures.
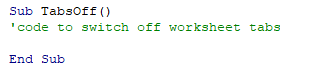
A sub procedure begins with a Sub statement and ends with an End Sub statement. The procedure name is always followed by parentheses.
Sub HideGridLines()
   ActiveWindow.DisplayGridlines  = False
End Sub
VBA Programming | Code Generator does work for you!
Function Procedures
A Function procedure returns a value. This value may be a single value, an array, a range of cells or an object. Functions usually perform some type of calculation. Functions in Excel can be used with the Function Wizard or they can be called from Sub Procedures.
Function Kilos(pounds as Double)
  Kilos = (pounds/2.2)
End Function
This function could be used within the Insert Function dialog box in Excel to convert Pounds to Kilograms.

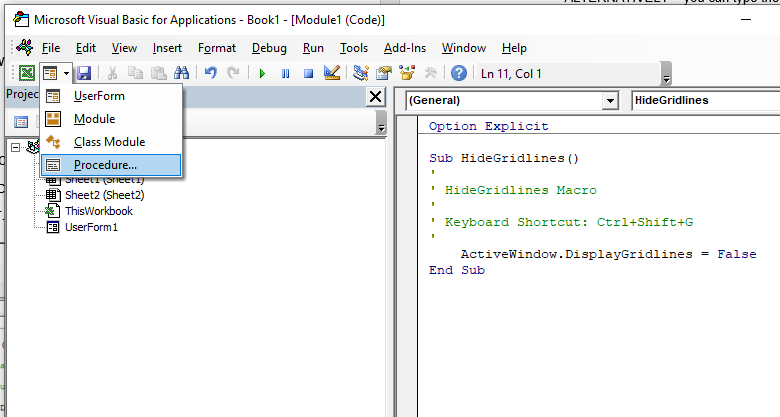
Creating a new Procedure
Before you create your new procedure, make sure you are in the module in which you wish to store the procedure. You can create a new procedure by clicking on the Insert menu, Procedure;
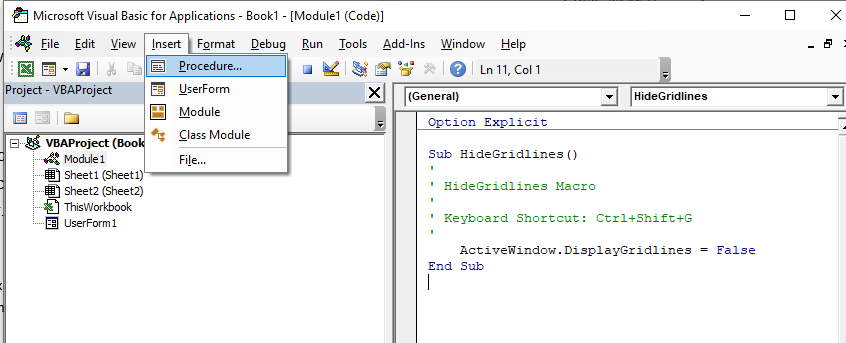
or you can click on the icon on the toolbar
The following dialog box will appear
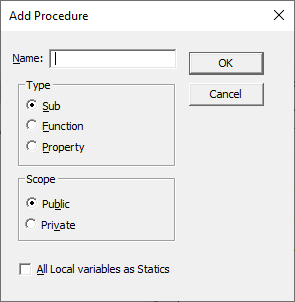
- Type the name of your new procedure in the name box – this must start with a letter of the alphabet and can contain letters and number and be a maximum of 64 characters.
- You can have a Sub procedure, a Function procedure or a Property procedure. (Properties are used in Class modules and set properties for ActiveX controls that you may have created).
- You can make the scope of the procedure either Public or Private. If the procedure is public (default), then it can be used by all the modules in the project while if the procedure is private, it will only be able to be used by this module.
- You can declare local variables in this procedure as Statics (this is to do with the Scope of the variable and makes a local procedure level variable public to the entire module). We will not use this option.
When you have filled in all the relevant details, click on OK.
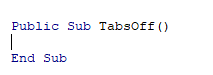
You then type your code between the Sub and End Sub statements.
ALTERNATIVELY – you can type the Sub and End Sub statements in your module exactly as it appears above. You do not need to put the word Public in front of the word sub – if this word is omitted, all procedures in the module are automatically assumed to be Public.
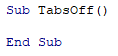
Then you type Sub and then the name of your procedure followed by parenthesis.
ie:
Sub test()
The End Sub statement will appear automatically.
Writing Code that is easy to understand and navigate
Get into the habit of putting in comments in your code in order to remind yourself at a later stage of the functionality of the code.
You can insert a comment in your code but typing an apostrophe on the keyboard or you can switch on the Edit toolbar, and use the comment button which appears on that toolbar.
Right-click on the toolbars.
Select Edit.
![]()
Click on the comment button to insert a comment into your code.
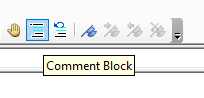
NOTE: You usually only use the comment block button when you have a few lines of code you wish to comment out (and not delete). It is easier for a single comment to use an apostrophe.
Indenting
A good habit to get into is to indent your code making it easy to read through the code and see the different parts of the code.

There can be many levels of indenting, depending on the logic of your code.
AutoMacro | Ultimate VBA Add-in | Click for Free Trial!
UpperCase vs LowerCase
VBA adjusts all code to Proper Case so if you type ALL IN UPPERCASE or all in lowercase it will Readjust Your Code To Be In Proper Case!
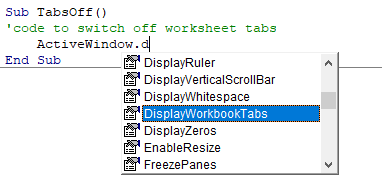
AutoComplete
When you adjust your code, you will notice that VBA tries to help you by suggesting the code that you can type. This is known as AutoComplete.
Error trapping and Debugging
There are 4 types of errors that can occur when you write VBA code – Syntax errors, Compilation errors, Runtime errors and Logical Errors.
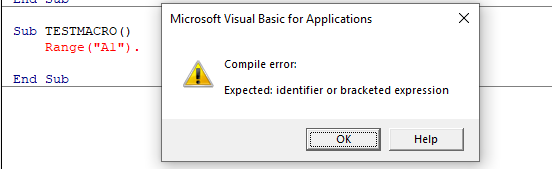
Syntax errors
These occur when you write the code incorrectly. This is largely prevented by VBA by having the Syntax check option switch on. This is normally on by default but if your is switch off, then switch it on by going to Tools, Options and click Auto Syntax Check.
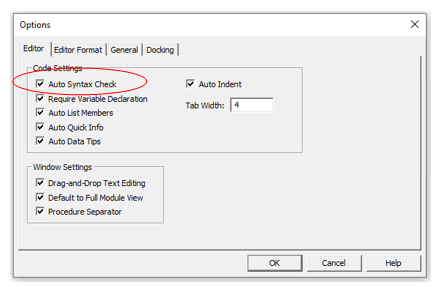
If you type the code incorrectly (for example excluding something that should be in the code), a message box will pop up while you are writing the code giving you the opportunity to amend the code.
AutoMacro | Ultimate VBA Add-in | Click for Free Trial!
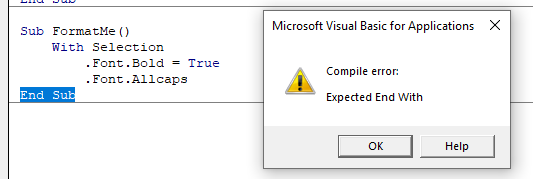
Compilation Errors
These occur when something is missing from the code that prevents the code from running. The error does not come up when you write the code, but it occurs when you try and run the code.
Runtime Errors
These occur when you run the code, and the syntax and compilation is correct, but something else occurs to prevent the code from running correctly.
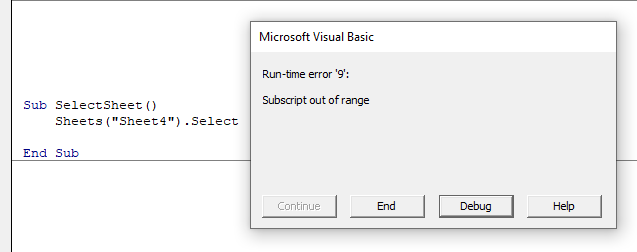
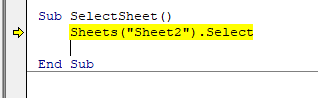
In this case, Sheet4 does not exist. This error message is more useful than the compile error messages as it gives you the opportunity to Debug the code and see why it is not working.
Click Debug. The code will stop at the error and highlight the error in yellow enabling you to correct your error.
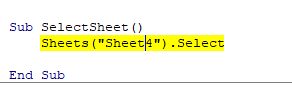
Amend Sheet4 to Sheet2 (as Sheet 2 exists and Sheet 4 does not exist).
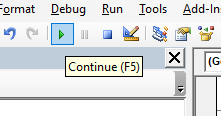
Press F5 or click on the Continue button on the toolbar.
Logical Errors
These are the most difficult to find. In their case, the code is written correctly but the actual logic of the code is flawed, so you may not get the result that you want from the code. For logical errors, error trapping is essential.
There are 2 types of error traps
On Error Go To
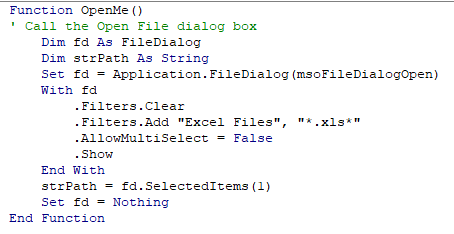
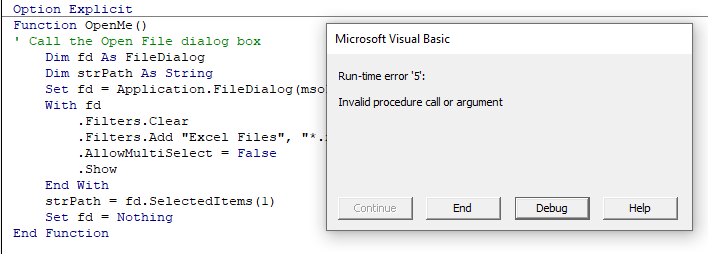
The following code is to open the File Open Dialog box – it will give us an error if the user clicks Cancel.
When you run the code the File Open dialog box appears.
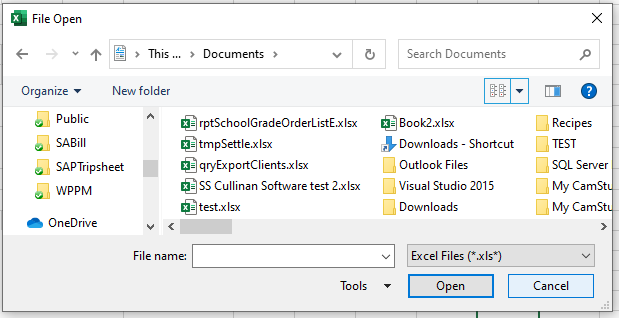
When you then click cancel, the error will occur.
The following Error trap will continue the code to the Exit Function of the code, and return message.
This makes use of On Error GoTo to exit the function.
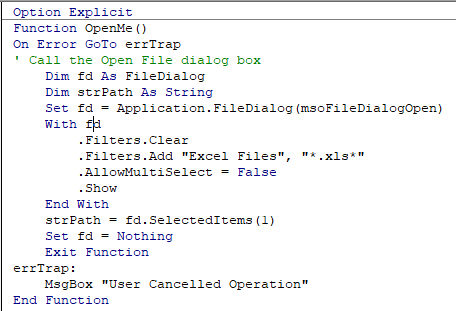
When you run the code and click cancel, the message box will appear.

On Error Resume Next
If you put the On Error Resume Next Statement into your code, the line that contains the error will be ignored and the code will continue.
For example, if the user clicks Cancel in the code below, the code will not give you a run-time error, it will just end without the code doing anything further.
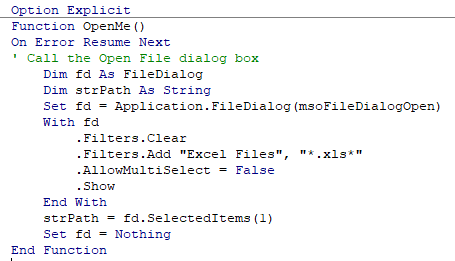
There are times when this is very useful but it can also be very dangerous in some circumstances as it does not return a message as to why you obtained an error.