
|
9 / 9 / 1 Регистрация: 20.12.2010 Сообщений: 192 |
|
|
1 |
|
|
09.01.2011, 12:25. Показов 79873. Ответов 21
Товарищи, приветствую, практически закончил один из своих первых не комерческих, но достаточно ответственных проектов. Но встал, что называется, на предпоследней ступени — это реализация отправки содержимого ричтекстбокса (а туда выводятся сугубо сублимированные данные, типа резултьты расчетов формул, которые собственно фискируются у меня в разных текстбоксах.) в эксель. Видел ряд обсуждений на эту тему в формуе, однако возникли следующего рода вопросы: Мне нужно чтобы при нажатии на кнопку, запускалась обработка следующей процедуры. 0. Создавался новый файл эксель с определенными полями 1. Как сделать так, чтобы в определенные ячейки с названиями, я закатал нужную инфу. 2. Реализовать заполнение поля дата/тайм, чтобы при открытии файла было видно когда была выполнена обработка. 3. Сохранение файла в определенной папке. Процедура должна создавать каждый раз новый файл. Тоесть пункт 0 обязательно должен выполняться по новой. Очень жду советов корифеев. Заранее благодарен.
0 |

|
Programming Эксперт 94731 / 64177 / 26122 Регистрация: 12.04.2006 Сообщений: 116,782 |
09.01.2011, 12:25 |
|
21 |
|
Unril 821 / 712 / 110 Регистрация: 06.10.2010 Сообщений: 825 Записей в блоге: 1 |
||||
|
09.01.2011, 14:53 |
2 |
|||
|
РешениеДобавляем сборку Microsoft.Office.Interop.Excel.dll.
Автоматизация Microsoft Excel в Microsoft Visual C# .NET
8 |
 Сообщение было отмечено как решение
|
9 / 9 / 1 Регистрация: 20.12.2010 Сообщений: 192 |
|
|
10.01.2011, 01:34 [ТС] |
3 |
|
Елыыыы зеленые Unril, спасибо за подробнейший ответ. Все по полочкам. Благодарствую. Буду колдовать дальше!!!! Добавлено через 2 часа 39 минут The type or namespace name ‘Office’ does not exist in the namespace ‘Microsoft’ (are you missing an assembly reference?) C:UsersАдминистраторDocumentsVisual Studio 2008ProjectsexceltryexceltryForm1.cs
0 |
|
25 / 14 / 3 Регистрация: 01.12.2010 Сообщений: 69 |
|
|
10.01.2011, 17:53 |
5 |
|
Есть неплохой класс для создания файлов эксель, добавления в ячейки текста , картинок, слияния ячеек и тд. Я пробовал — удобно
5 |
")
|
9 / 9 / 1 Регистрация: 20.12.2010 Сообщений: 192 |
|
|
10.01.2011, 21:32 [ТС] |
6 |
|
Ну вот именно это я и делал. Ссылка была подключена, в окне референсис, она фигурировала. Однако при попытке запустить приложение, она подчеркивала Office и выдавала выше озвученную ошибку. VS у меня 2008.
0 |
|
Zilberman 9 / 9 / 1 Регистрация: 20.12.2010 Сообщений: 192 |
||||||||
|
12.01.2011, 10:33 [ТС] |
7 |
|||||||
|
Все народ, выручайте, мой мозг потек в сапоги. Вроде только только разобрался во всем этом колоброде под названием работае с эксель. Использован старый формат, либо библиотека имеет неверный тип. (Исключение из HRESULT: 0x80028018 (TYPE_E_INVDATAREAD))
Сил моих уже нет. Я уже забил на основной проект и сделал примитив типа такого, чтобы в подробностях разобраться.
Удавалось только открыть файл эксель, но при попытке воткнуть туда листы и книги возникало это дебильное сообщение. Версия мс офиса 2003
0 |
|
Zilberman 9 / 9 / 1 Регистрация: 20.12.2010 Сообщений: 192 |
||||
|
17.01.2011, 20:53 [ТС] |
8 |
|||
|
Народ помогите плиз на конкретном примерчике. Мне нужно чтобы по нажатию на кнопочку осуществлялось: Основной принцип реализации я конечно знаю, единственное что не могу описать обращение к нужным ячейкам. Вот пример того как я начал а вот как описать далее обращение в этом файле к конкретной ячейке я не знаю.
Помогите плиз я уже все вроде перечитал по этой дурной теме.
0 |
|
821 / 712 / 110 Регистрация: 06.10.2010 Сообщений: 825 Записей в блоге: 1 |
|
|
17.01.2011, 21:02 |
9 |
|
worksheet.Range[ «A6» ].Value = textData2.Text; Я же писал в примере.
0 |

|
Zilberman 9 / 9 / 1 Регистрация: 20.12.2010 Сообщений: 192 |
||||
|
18.01.2011, 13:48 [ТС] |
10 |
|||
|
Увжаемый Unril, подставляя
тему после моего кода который я описал выше. он ругается на worksheet. Я так понимаю мне его в моем конкретном коде где-то декларировать надо, прежде чем описывать его методы и свойства.
0 |
 (
(|
27 / 24 / 1 Регистрация: 26.07.2011 Сообщений: 144 |
|
|
17.10.2011, 09:21 |
11 |
|
using Excel = Microsoft.Office.Interop.Excel; как эта строка будет выглядеть в Visual C++ подскажите пожалуйста, а то я уже задолбался бороться с конфликтом пространств имен.
0 |
|
127 / 127 / 8 Регистрация: 24.11.2010 Сообщений: 237 |
|
|
17.10.2011, 09:31 |
12 |
|
Посмотри в сторону вот этой библиотеки
0 |
|
27 / 24 / 1 Регистрация: 26.07.2011 Сообщений: 144 |
|
|
17.10.2011, 09:34 |
13 |
|
Там на С#
0 |
|
127 / 127 / 8 Регистрация: 24.11.2010 Сообщений: 237 |
|
|
17.10.2011, 09:36 |
14 |
|
там в папке лежит прога, с помощью которой из нужного тебе excel файла, генерирует код. кототрый нужен чтобы его создать Добавлено через 54 секунды Добавлено через 56 секунд
0 |
|
27 / 24 / 1 Регистрация: 26.07.2011 Сообщений: 144 |
|
|
17.10.2011, 09:37 |
15 |
|
Братец, мне на С++ надо это перевести)
0 |
|
127 / 127 / 8 Регистрация: 24.11.2010 Сообщений: 237 |
|
|
17.10.2011, 09:38 |
16 |
|
к сожалению пример не могу скинуть, т.к. использую в одном проекте ее Добавлено через 58 секунд
0 |
|
27 / 24 / 1 Регистрация: 26.07.2011 Сообщений: 144 |
|
|
17.10.2011, 09:44 |
17 |
|
Там не могут ответить на этот вопрос
0 |
|
127 / 127 / 8 Регистрация: 24.11.2010 Сообщений: 237 |
|
|
17.10.2011, 09:46 |
18 |
|
поищи что нибудь про то как использовать библиотеки на C# в приложениях на c++! наоборот я точно знаю что можно использовать
0 |
|
opi 8 / 8 / 2 Регистрация: 09.11.2010 Сообщений: 69 |
||||
|
11.05.2012, 19:00 |
19 |
|||
|
Добрый день. Возникла проблема с экспортом данных из ListView в эксель. Использую такой алгоритм, на который везде натыкаюсь на зарубежных форумах, хотя вроде и на наших встречал.
Этот код всё копирует, но есть одно но… после экспорта данных в эксель первый SubItem дублируется в конце записей. Бред какой-то если честно. Как от него избавиться? И еще один вопрос. Я воспользовался этой прогой, которую предоставил galexser. Но где и как в коде, что написан выше, записать форматирование из этой программы. В С# работаю в один из первых разов, поэтому прошу разъяснить по-подробней.
0 |
|
unijcoder 2 / 2 / 5 Регистрация: 08.01.2012 Сообщений: 132 |
||||
|
27.12.2016, 19:13 |
20 |
|||
|
У меня другая проблема. При экспорте из датагрид открывается файл экзель,где все числа в текстовом формате. Как сделать чтобы были в числовом сразу?
0 |
- Export Data to Excel Using
C# - Export Data From Array to Excel Using
C# - Export Data From DataTable to Excel Using
C# - Export Data From JSON to Excel Using
C#

This tutorial will teach how to export data to an Excel file in C#.
Export Data to Excel Using C#
Adding a reference to build an Excel file and exporting it is necessary to move on with this project.
Add the Reference Package
For different operations of excel, we’ll add the ExcelMapper package. To do that, follow the below steps:
-
Open Visual Studio, create a Console Application and name it.
-
Right-click on the Solution Explorer panel and select Manage NuGet Packages.
-
Now click on the Browse option, search for
ExcelMapper, and install it.

After adding the package, we’ll write the code of an example program. In the below example, we’ll use random data from students.
Example:
-
To begin, import the following libraries:
using System; using System.Collections.Generic; using System.Linq; using System.Text; using System.Threading.Tasks; using Ganss.Excel; -
Now create a
Studentclass havingnameandmarksdata members.public class Student { public String name { get; set; } public double marks { get; set; } } -
Create another class named
Programand create theMain()method in that class.public class Program { public static void Main(string[] args) { } } -
In the
Main()method, we’ll create aList<>type object of theStudentclass.var s = new List<Student> { } -
This object will be populated with some random
Studentdata as shown below:var s = new List<Student> { new Student{name="M.Zeeshan",marks= 94.0 }, new Student{name="Shani",marks= 84.0 }, new Student{name="Saada g",marks= 74.0 }, new Student{name="Haseeba",marks= 34.0 }, }; -
Then, create an
ExcelMapperobject namedmaper.ExcelMapper maper = new ExcelMapper(); -
To save the data we just created, we’ll create a sample file in the required path or directory.
var newFile = @"D:sample.xlsx"; -
Lastly, we’ll save the file using ExcelMapper’s
maper.Save()function.maper.Save(newFile,s,"ShaniData",true);
Complete Source Code:
using System;
using System.Collections.Generic;
using System.Linq;
using System.Text;
using System.Threading.Tasks;
using Ganss.Excel;
namespace DatatoExcelbyZeeshan {
public class Program {
public static void Main(string[] args) {
var s = new List<Student> {
new Student{name="M.Zeeshan",marks= 94.0 },
new Student{name="Shani",marks= 84.0 },
new Student{name="Saada g",marks= 74.0 },
new Student{name="Haseeba",marks= 34.0 },
};
ExcelMapper maper = new ExcelMapper();
var newFile = @"D:sample.xlsx";
maper.Save(newFile,s,"ShaniData",true);
Console.ReadKey();
}
}
public class Student {
  public String name { get; set; }
  public double marks { get; set; }
}
}
You’ll get the following output in the sample.xlsx file:

Export Data From Array to Excel Using C#
Let’s have an example to understand it practically.
Add the Reference Package
For different operations of excel, we’ll add the ExcelMapper package. To do that, follow the below steps:
-
First, open Visual Studio, create a Console Application and name it.
-
Right-click on the Solution Explorer panel and select Manage NuGet Packages.
-
Now click on the Browse option, search for
Spire.Xls, and install it.

Example:
-
To begin, import the following libraries:
using System; using System.Collections.Generic; using System.Linq; using System.Text; using System.Threading.Tasks; using Spire.Xls; -
Now, create a new instance of
Workbookand give it the namewb.Workbook wb = new Workbook(); -
Include a new
Worksheetand give it the namews.Worksheet ws = wb.Worksheets.Add("ShaniArray"); -
Make a new array and give it the name
ProgramSubjectResults, then add some data.string[,] ProgramSubjectResults = new string[,]{ {"Name", "City", "Gpa", "Language"}, {"Zeeshan", "ISB", "3.7", "Flutter Development"}, {"Saad Jaan", "RWP", "4.0", "Full Stack"}, {"Haseeba", "FATA", "3.53", "Andriod Development"} }; -
To include the array on the
Worksheet, begin with the cell.ws.InsertArray(ProgramSubjectResults,2,1); ws.AllocatedRange.AutoFitColumns(); -
Finally, give the array you just created a name and save it as an Excel file.
wb.SaveToFile(@"D:ArraytoExcel.xlsx", ExcelVersion.Version2016);
Complete Source Code:
using System;
using System.Collections.Generic;
using System.Linq;
using System.Text;
using System.Threading.Tasks;
using Spire.Xls;
namespace ExportArraytoExcelbyZeeshan {
class Program {
static void Main(string[] args) {
Workbook wb = new Workbook();
wb.Worksheets.Clear();
Worksheet ws = wb.Worksheets.Add("ShaniArray");
string[,] ProgramSubjectResults = new string[,]{
  {"Name", "City", "Gpa", "Language"},
  {"Zeeshan", "ISB", "3.7", "Flutter Development"},
  {"Saad Jaan", "RWP", "4.0", "Full Stack"},
  {"Haseeba", "FATA", "3.53", "Andriod Development"}
};
ws.InsertArray(ProgramSubjectResults, 2, 1);
ws.AllocatedRange.AutoFitColumns();
wb.SaveToFile(@"D:ArraytoExcel.xlsx", ExcelVersion.Version2016);
}
}
}
Output:

Export Data From DataTable to Excel Using C#
Let’s see how this can be done using the following example.
Add the Reference Package
For exporting DataTable to Excel, we’ll add the ExcelMapper package. To do that, follow the steps we discussed before.
Example:
-
To begin, import the following libraries:
using System; using System.Collections.Generic; using System.Linq; using System.Text; using System.Threading.Tasks; using System.Data; using Spire.Xls; -
Now, create a new instance of
Workbookand give it the namewb.Workbook wb = new Workbook(); wb.Worksheets.Clear(); -
Include a new
Worksheetinstance and give it the namews.Worksheet ws = wb.Worksheets.Add("DataTableToExcel"); -
Construct an object of type
DataTableand give it the namedt.DataTable dt = new DataTable(); -
Add
Roll Number,Student Name, andSectionsas columns.dt.Columns.Add("Roll Number", typeof(String)); dt.Columns.Add("Student Name", typeof(String)); dt.Columns.Add("Section", typeof(String)); -
Now we need to create an object of the
DataRowtype and give it the namedtr.DataRow dtr = dt.NewRow(); -
Insert data into the
DataRowcolumn as shown below.dtr[0] = "130-Arid-3227"; dtr[1] = "Muhammad Zeeshan"; dtr[2] = "Bs(IT)8A"; dt.Rows.Add(dtr); dtr = dt.NewRow(); dtr[0] = "123-Arid-3156"; dtr[1] = "Bubby Shah"; dtr[2] = "Bs(AI)7C"; dt.Rows.Add(dtr); dtr = dt.NewRow(); -
Write the
DataTablecolumn in the spreadsheet we created.ws.InsertDataTable(dt, true, 1, 1, true); -
Finally, give the document a name and save it as an Excel file.
wb.SaveToFile(@"C:DataTableToExcel.xlsx", ExcelVersion.Version2016);
Complete Source Code:
using System;
using System.Collections.Generic;
using System.Linq;
using System.Text;
using System.Threading.Tasks;
using System.Data;
using Spire.Xls;
namespace ExportDataTableToExcelByZeeshan {
class Program {
static void Main(string[] args) {
Workbook wb = new Workbook();
wb.Worksheets.Clear();
Worksheet ws = wb.Worksheets.Add("DataTableToExcel");
DataTable dt = new DataTable();
dt.Columns.Add("Roll Number", typeof(String));
dt.Columns.Add("Student Name", typeof(String));
dt.Columns.Add("Section", typeof(String));
DataRow dtr = dt.NewRow();
dtr[0] = "130-Arid-3227";
dtr[1] = "Muhammad Zeeshan";
dtr[2] = "Bs(IT)8A";
dt.Rows.Add(dtr);
dtr = dt.NewRow();
dtr[0] = "123-Arid-3156";
dtr[1] = "Bubby Shah";
dtr[2] = "Bs(AI)7C";
dt.Rows.Add(dtr);
dtr = dt.NewRow();
ws.InsertDataTable(dt, true, 1, 1, true);
wb.SaveToFile(@"C:DataTableToExcel.xlsx", ExcelVersion.Version2016);
}
}
}
Output:

Export Data From JSON to Excel Using C#
The example below will help us understand how to export JSON data to Excel using C# practically.
Add the Reference Package
For the Json operations of Excel, we’ll add the GemBox.Spreadsheet and Newtonsoft.Json packages. To do that, follow the below steps:
-
First, open Visual Studio, create a Console Application and name it.
-
Right-click on the Solution Explorer panel and select Manage NuGet Packages.
-
Now click on the Browse option, search for
GemBox.SpreadsheetandNewtonsoft.Jsonand install it.


Example:
-
To begin, import the following libraries:
using System; using System.Collections.Generic; using GemBox.Spreadsheet; using Newtonsoft.Json; -
Before using any other class from the
GemBox.Spreadsheetpackage, it is necessary to initialize the license using theSpreadsheetInfo.SetLicense()function.SpreadsheetInfo.SetLicense("FREE-LIMITED-KEY"); -
Now, create a JSON file with the name
JsonDataand fill it with theStudentsdata.string JsonData = @"{ ""0"": { ""Name"": ""Muhammad Zeeshan"", ""Roll"": ""3227"", ""GPA"": 3.11, ""Fyp"": ""Garden Guide System"" }, ""1"" : { ""Name"": ""Bubby Shah"", ""Roll"": ""3265"", ""GPA"": 2.9, ""Fyp"": ""Football Field Management"" }, ""2"" : { ""Name"": ""Haseeb-Ur-Rehman"", ""Roll"": ""3156"", ""GPA"": 3.9, ""Fyp"": ""Plants Recognition"" } }"; -
We’ll deserialize the JSON string after defining the JSON file.
Dictionary<string, Student> shani = JsonConvert.DeserializeObject<Dictionary<string, Student>>(JsonData); -
Create a new worksheet in Excel and name it
ws. After that, create the header values for the worksheet.ExcelWorksheet ws = wb.Worksheets.Add("ShaniJSON" +""); ws.Cells[0, 0].Value = "Student Name"; ws.Cells[0, 1].Value = "Roll No"; ws.Cells[0, 2].Value = "GPA"; ws.Cells[0, 3].Value = "FYP"; -
After the worksheet has been created, we’ll write the deserialized data into the worksheet.
int row = 0; foreach (Student user in shani.Values) { ws.Cells[++row, 0].Value = user.Fname; ws.Cells[row, 1].Value = user.Roll; ws.Cells[row, 2].Value = user.Gpa; ws.Cells[row, 3].Value = user.Fyp; } -
In the last step, we will save the file as an Excel file in the specified directory.
wb.Save(@"D:JSON TO Excel by Zeeshan.xlsx");
Complete Source Code:
using System;
using System.Collections.Generic;
using GemBox.Spreadsheet;
using Newtonsoft.Json;
namespace JsontoExcelByZeeshan {
class Program {
static void Main(string[] args) {
SpreadsheetInfo.SetLicense("FREE-LIMITED-KEY");
string JsonData = @"{
  ""0"": {
	""Name"": ""Muhammad Zeeshan"",
	""Roll"": ""3227"",
	""GPA"": 3.11,
	""Fyp"": ""Garden Guide System""
	},
  ""1"" : {
	""Name"": ""Bubby Shah"",
	""Roll"": ""3265"",
	""GPA"": 2.9,
	""Fyp"": ""Football Field Management""
  },
  ""2"" : {
	""Name"": ""Haseeb-Ur-Rehman"",
	""Roll"": ""3156"",
	""GPA"": 3.9,
	""Fyp"": ""Plants Recognition""
	}
  }";
Dictionary<string, Student> shani = JsonConvert.DeserializeObject<Dictionary<string, Student>>(JsonData);
ExcelFile wb = new ExcelFile();
ExcelWorksheet ws = wb.Worksheets.Add("ShaniJSON" +"");
ws.Cells[0, 0].Value = "Student Name";
ws.Cells[0, 1].Value = "Roll No";
ws.Cells[0, 2].Value = "GPA";
ws.Cells[0, 3].Value = "FYP";
int row = 0;
foreach (Student user in shani.Values) {
  ws.Cells[++row, 0].Value = user.Fname;
  ws.Cells[row, 1].Value = user.Roll;
  ws.Cells[row, 2].Value = user.Gpa;
  ws.Cells[row, 3].Value = user.Fyp;
}
wb.Save(@"D:JSON TO Excel by Zeeshan.xlsx");
}
}
class Student {
[JsonProperty("Name")]
public string Fname { get; set; }
[JsonProperty("Roll")]
public string Roll { get; set; }
[JsonProperty("GPA")]
public float Gpa { get; set; }
[JsonProperty("Fyp")]
public string Fyp { get; set; }
}
}
Output:

Давайте научимся быстро и просто создавать и записывать файлы Excel с помощью visual studio c#. Наше самое простое приложение Windows Forms будет брать из текстбокса текст и заносить его в первую ячейку. Статья написана специально для Сергея =).
Начать необходимо с подключения библиотеки Microsoft.Office.Interop.Excel. Выглядеть это должно так:

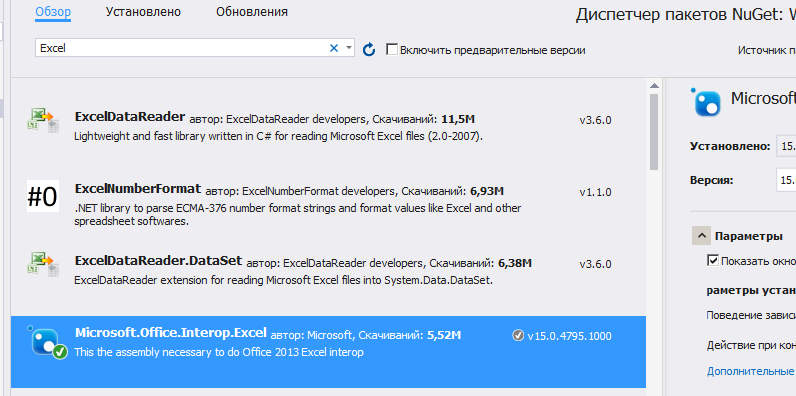
Если у вас при открытии обозревателя решений – Ссылки – правая кнопка – Добавить ссылку – Сборки – в списке нет Microsoft.Office.Interop.Excel, то добавьте её через Nuget. Проект – управление пакетами NuGet – в строке поиска Excel:
Теперь создайте новый проект Windows Forms и на форму закиньте текстбокс и кнопку. На кнопки кликните два раза, откроется исходный код. В самом верху допишите следующее:
using Excel = Microsoft.Office.Interop.Excel;
А в методе button1_Click замените так:
private void button1_Click(object sender, EventArgs e)
        {
            string fileName = "D:\temp\test.xls";

            try
            {
                var excel = new Excel.Application();

                var workBooks = excel.Workbooks;
                var workBook = workBooks.Add();
                var workSheet = (Excel.Worksheet)excel.ActiveSheet;

                workSheet.Cells[1, "A"] = textBox1.Text;

                workBook.SaveAs(fileName);
                workBook.Close();
            }
            catch (Exception ex) {
                MessageBox.Show("Ошибка: "+ ex.ToString());
            }

            MessageBox.Show("Файл "+ Path.GetFileName (fileName) + " записан успешно!");

        }
Вот, собственно говоря и все. Текст из текстбокса запишется в ячейку A1. Обратите внимание, что папка temp на диске уже должна существовать.
Дополнение. Прочитать первую ячейку
Это тоже просто:
 string fileName = "D:\temp\test.xls";

Excel.Application xlApp = new Excel.Application();
Excel.Workbook xlWorkbook = xlApp.Workbooks.Open(fileName, 0, true, 5, "", "", true, Excel.XlPlatform.xlWindows, "t", false, false, 0, true, 1, 0);
Excel._Worksheet xlWorksheet = (Excel._Worksheet)xlWorkbook.Sheets[1];
Excel.Range xlRange = xlWorksheet.UsedRange;

string temp = (string)(xlRange.Cells[1, 1] as Excel.Range).Value2;// 1 1 - адрес 1-й ячейки
MessageBox.Show(temp);

Автор этого материала — я — Пахолков Юрий. Я оказываю услуги по написанию программ на языках Java, C++, C# (а также консультирую по ним) и созданию сайтов. Работаю с сайтами на CMS OpenCart, WordPress, ModX и самописными. Кроме этого, работаю напрямую с JavaScript, PHP, CSS, HTML — то есть могу доработать ваш сайт или помочь с веб-программированием. Пишите сюда.
![]() заметки, си шарп, excel
заметки, си шарп, excel
what is DataGridView?
The control provides a powerful and flexible way to display data in a tabular format. You can use the DataGridView control to show read-only views of a small amount of data, or you can scale it to show editable views of very large sets of data. You can extend the DataGridView control in a number of ways to build custom behaviors into your applications.
For example, you can programmatically specify your own sorting algorithms, and you can create your own types of cells. You can easily customize the appearance of the DataGridView control by choosing among several properties. Many types of data stores can be used as a data source, or the DataGridView control can operate with no data source bound to it.
what is Excel?
Excel is a spreadsheet program from Microsoft and a component of its Office product group for business applications. Microsoft Excel enables users to format, organize and calculate data in a spreadsheet by organizing data using software like Excel, data analysts and other users can make information easier to view as data is added or changed.
Excel contains a large number of boxes called cells that are ordered in rows and columns. Data is placed in these cells. Excel is a part of the Microsoft Office and Office 365 suites and is compatible with other applications in the Office suite. The spreadsheet software is available for Windows, macOS, Android, and iOS platforms.
DataGridView to excel c#
in this article, I will explain with an example, how to export DataGridView data to an Excel file using C#.DataGridView cannot be exported directly to an Excel file and hence need to generate a DataTable dt and export the DataTable to an Excel file. The DataTable will be exported to a formatted Excel file using the ClosedXml library which is a wrapper of OpenXml.for this tutorial, I have already created the database and all the data is in datagridview.
Step # 1: Create Visual Studio Project:
Open Visual Studio. I am using Visual Studio 2019.

Click on Create New Project.
Now, Select Windows Form App from Template, and Press Next, Following Window will appear. Write Project Name. I have written exporting datagridview to excel.
Now, Click Next, Following WIndow will appear.
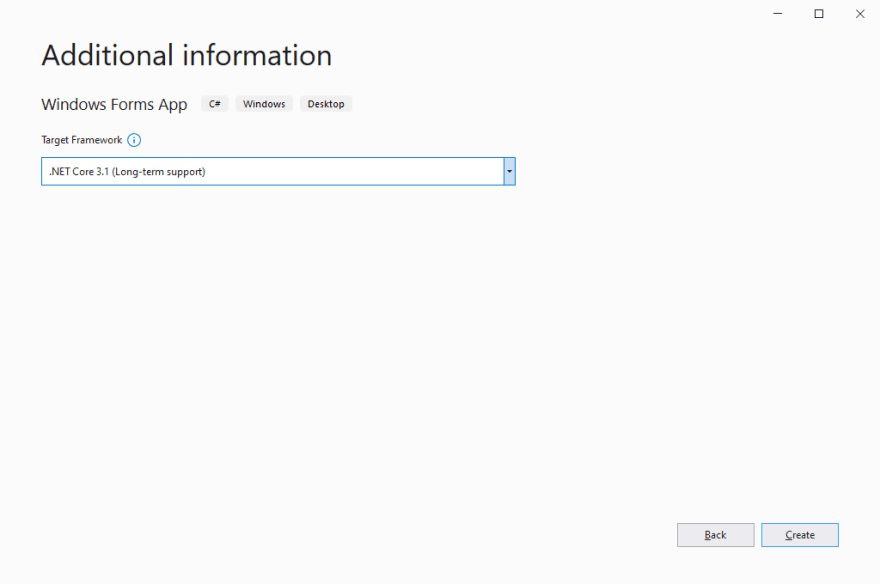
Select .Net Core 3.1 from Dropdown Menu. Click on the «Create» Button, Project will be created.
Step # 2: Install Nuget Package DocumentFormat.OpenXml and ClosedXml Libraries
for this, we need a document open XML sdk and closedXMl library. You can download the libraries using the following download locations.https://github.com/ClosedXML/ClosedXML
Step # 3: Design Window Forms and writes code

The design form will look like this I have created a windows form and connected that form with the database and all the data is loaded into the windows forms application.
Importing data to datagridview.
You will need to import the following namespaces before starting the code.

DataGridView
Inside the Form Load event, the DataGridView is populated with records from the table.

Export DataGridView to Excel
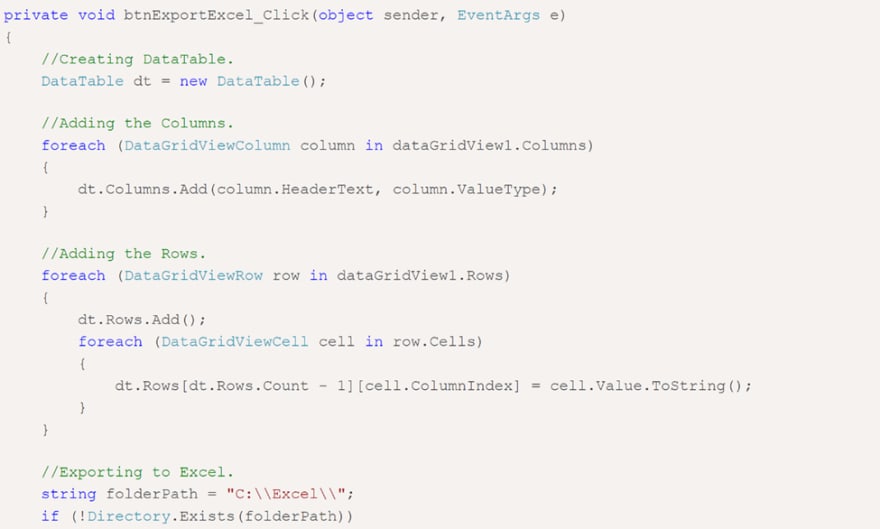
Inside the Button Click event handler, first, a DataTable is created with columns same as that of the DataGridView, and a loop is executed over the DataGridView rows and all the data is added to the DataTable.Then a Workbook object is created to which the DataTable is added as Worksheet using the Add method which accepts DataTable and the name of the Sheet as parameters.
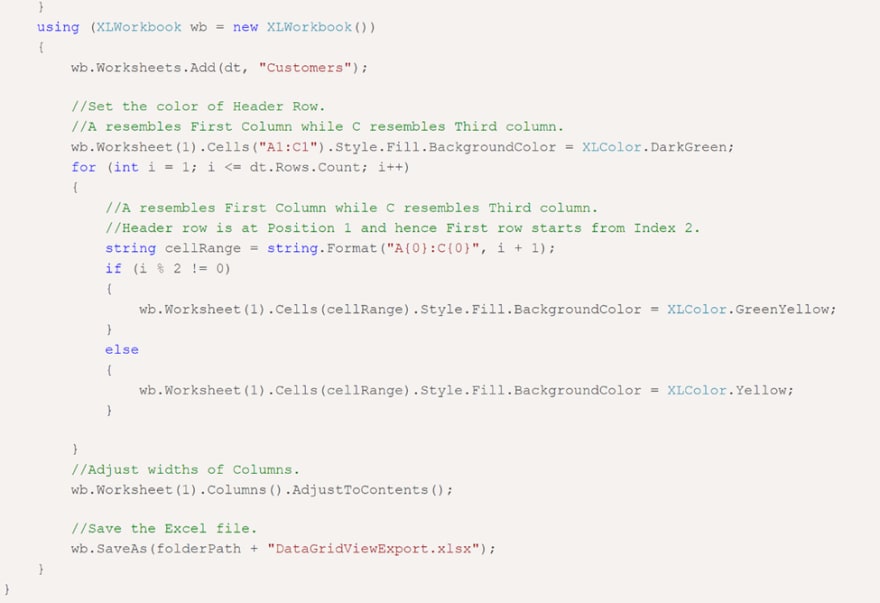
Once the DataTable is added as a Worksheet to the Workbook, the formatting is done by first setting the Header row background color and then applying background colors to the rows and the alternating rows of the Excel file.
Finally, the export data to and export data WorkBook is saved to the specified location on the disk. we can use that workbook as a normal excel documents or workbook. we can also create or fill and export large excel files and normal excel sheets and we can set the filename as well to set the name we have to set the name of the project and then save the name of the file as a string.
Before you write source code, you must add a reference to the Microsoft Excel object library. Right-click on your project and select Add Reference menu. After that go to the COM tab and select and add Microsoft Excel 12.0 object library. Now here is my Button click event handler where I create Excel object sender or object obj and documents, get data from DataGridView, and add rows and columns to the document.
Export data source code sample
Excel files
after writing the complete source code when we press the export data button the excel file will be generate and when we open the excel file we will get a look like this. all the data of database will be in excel file
This is the completion of the guide. I hope it was easy for you to follow and understand. So, what are you waiting for? 30 Days Free Trial You can obtain the License here and begin straightaway. If you are not yet an IronPDF customer, you can try 30-day free trial to check out their available features. If you buy the complete Iron Suite, you will get all 5 Products for the Price of 2. For further details about the licensing, please follow this link to Purchase the complete Package.
You can download the software product from this link.
Have you ever hear NPOI, a .NET library that can read/write Office formats without Microsoft Office installed. No COM+, no interop. Github Page
This is my Excel Export class
/*
 * User: TMPCSigit aswzen@gmail.com
 * Date: 25/11/2019
 * Time: 11:28
 *
 */
using System;
using System.IO;
using System.Text.RegularExpressions;
using System.Windows.Forms;

using NPOI.HSSF.UserModel;
using NPOI.SS.UserModel;
using NPOI.XSSF.UserModel;

namespace Employee_Manager
{
    public static class ExportHelper
    {
        public static void WriteCell( ISheet sheet, int columnIndex, int rowIndex, string value )
        {
            var row = sheet.GetRow( rowIndex ) ?? sheet.CreateRow( rowIndex );
            var cell = row.GetCell( columnIndex ) ?? row.CreateCell( columnIndex );

            cell.SetCellValue( value );
        }
        public static void WriteCell( ISheet sheet, int columnIndex, int rowIndex, double value )
        {
            var row = sheet.GetRow( rowIndex ) ?? sheet.CreateRow( rowIndex );
            var cell = row.GetCell( columnIndex ) ?? row.CreateCell( columnIndex );

            cell.SetCellValue( value );
        }
        public static void WriteCell( ISheet sheet, int columnIndex, int rowIndex, DateTime value )
        {
            var row = sheet.GetRow( rowIndex ) ?? sheet.CreateRow( rowIndex );
            var cell = row.GetCell( columnIndex ) ?? row.CreateCell( columnIndex );

            cell.SetCellValue( value );
        }
        public static void WriteStyle( ISheet sheet, int columnIndex, int rowIndex, ICellStyle style )
        {
            var row = sheet.GetRow( rowIndex ) ?? sheet.CreateRow( rowIndex );
            var cell = row.GetCell( columnIndex ) ?? row.CreateCell( columnIndex );

            cell.CellStyle = style;
        }

        public static IWorkbook CreateNewBook( string filePath )
        {
            IWorkbook book;
            var extension = Path.GetExtension( filePath );

            // HSSF => Microsoft Excel(xls形式)(excel 97-2003)
            // XSSF => Office Open XML Workbook形式(xlsx形式)(excel 2007以降)
            if( extension == ".xls" ) {
                book = new HSSFWorkbook();
            }
            else if( extension == ".xlsx" ) {
                book = new XSSFWorkbook();
            }
            else {
                throw new ApplicationException( "CreateNewBook: invalid extension" );
            }

            return book;
        }
        public static void createXls(DataGridView dg){
            try {
                string filePath = "";
                SaveFileDialog sfd = new SaveFileDialog();
                sfd.Filter = "Excel XLS (*.xls)|*.xls";
                sfd.FileName = "Export.xls";
                if (sfd.ShowDialog() == DialogResult.OK)
                {
                    filePath = sfd.FileName;
                    var book = CreateNewBook( filePath );
                    book.CreateSheet( "Employee" );
                    var sheet = book.GetSheet( "Employee" );
                    int columnCount = dg.ColumnCount;
                    string columnNames = "";
                    string[] output = new string[dg.RowCount + 1];
                    for (int i = 0; i < columnCount; i++)
                    {
                        WriteCell( sheet, i, 0, SplitCamelCase(dg.Columns[i].Name.ToString()) );
                    }
                    for (int i = 0; i < dg.RowCount; i++)
                    {
                        for (int j = 0; j < columnCount; j++)
                        {
                            var celData =  dg.Rows[i].Cells[j].Value;
                            if(celData == "" || celData == null){
                                celData = "-";
                            }
                            if(celData.ToString() == "System.Drawing.Bitmap"){
                                celData = "Ada";
                            }
                            WriteCell( sheet, j, i+1, celData.ToString() );
                        }
                    }
                    var style = book.CreateCellStyle();
                    style.DataFormat = book.CreateDataFormat().GetFormat( "yyyy/mm/dd" );
                    WriteStyle( sheet, 0, 4, style );
                    using( var fs = new FileStream( filePath, FileMode.Create ) ) {
                        book.Write( fs );
                    }
                }
            }
            catch( Exception ex ) {
                Console.WriteLine( ex );
            }
        }
        public static string SplitCamelCase(string input)
        {
            return Regex.Replace(input, "(?<=[a-z])([A-Z])", " $1", RegexOptions.Compiled);
        }
    }
}