Всем привет. Написал отдельный модуль (класс), вроде работает. Прикладываю в спойлер.
Ну и пример использования. Если кто найдет ошибку, с радостью приму комментарии
| Код |
|---|
Set act = New WordGenerator With act .template_add "courtиск.docx" 'Добавили шаблон в папке templates проекта .template_add "С:претензия.docx" 'добавили шаблон абсолютного пути .dialog = True 'И этого нам мало, мы спрашиваем юзера, чтобы тоже указал шаблоны .multiselect = True 'да и пусть еще мог бы выбрать сразу несколько в диалоговом окне .closeafter = True 'Юзер не хочет редактировать готовый файл, закрываем его .marker = "Иванов 2017" 'а это припишется к каждому создаваемому файлу .SetSaveFolder = "Все по Иванову" 'а это папка, куда будет складываться все с этого объекта .pair_add "ФИО", "Иванов Иван Иванович" 'парочка пар на замену, можно и сотню .pair_add "[должность]", "директор" .Start 'запускаем процесс, смотрим как открываются ворд файлики, 'производятся замены. сохраняется и закрывается, результат ищем в папках End With |
|
Скрытый текст |
|---|
- Категория: Excel
- Опубликовано: 18 июня 2020
- Просмотров: 12547
Исходный код из видео
Sub main()
Dim wdApp As Object
Dim wdDoc As Object

HomeDir$ = ThisWorkbook.Path
Set wdApp = CreateObject("Word.Application")
i% = 2
Do
If Cells(i%, 1).Value = "" Then Exit Do
If Cells(i%, 1).Value <> "" Then

NPP$ = Cells(i%, 1).Text
ID$ = Cells(i%, 2).Text
Adress$ = Cells(i%, 3).Text
SN$ = Cells(i%, 4).Text

DataC$ = Date

FileCopy HomeDir$ + "template.doc", HomeDir$ + "" + NPP$ + "_" + ID$ + "_" + DataC$ + ".doc"
Set wdDoc = wdApp.Documents.Open(HomeDir$ + "" + NPP$ + "_" + ID$ + "_" + DataC$ + ".doc")

wdDoc.Range.Find.Execute FindText:="&date", ReplaceWith:=DataC$

wdDoc.Range.Find.Execute FindText:="&id", ReplaceWith:=ID$
wdDoc.Range.Find.Execute FindText:="&adress", ReplaceWith:=Adress$
wdDoc.Range.Find.Execute FindText:="&sn", ReplaceWith:=SN$

wdDoc.Save
wdDoc.Close
End If

i% = i% + 1
Loop
wdApp.Quit
MsgBox "Готово!"

End Sub
Исходный код из видео — скачать архив с файлами
ZIP архив с файлами
Рекомендуем смотреть видео в полноэкранном режиме, в настойках качества выбирайте 1080 HD, не забывайте подписываться на канал в YouTube, там Вы найдете много интересного видео, которое выходит достаточно часто. Приятного просмотра!
С уважением, авторы сайта Компьютерапия
Понравилось? Поделись этим видео с друзьями!
Понравилась статья? Поделитесь ею с друзьями и напишите отзыв в комментариях!
|
12 / 7 / 5 Регистрация: 27.02.2015 Сообщений: 94 |
|
|
1 |
|
|
12.05.2018, 13:09. Показов 4953. Ответов 5
Собственно, задача следующая Составить программу, позволяющую заполнять стандартные заявления Дайте наводку в нужном направлении, заранее спасибо.
0 |

|
2630 / 1636 / 744 Регистрация: 23.03.2015 Сообщений: 5,142 |
|
|
12.05.2018, 13:15 |
2 |
|
noz0o, Приложите ворд документ с заявлением… Добавлено через 2 минуты
0 |
|
12 / 7 / 5 Регистрация: 27.02.2015 Сообщений: 94 |
|
|
12.05.2018, 14:06 [ТС] |
3 |
|
Конкретного примера нет, есть только данное тз
0 |

|
2630 / 1636 / 744 Регистрация: 23.03.2015 Сообщений: 5,142 |
|
|
13.05.2018, 08:45 |
4 |
|
Решениеnoz0o, 1) Создайте в докумете закладки -это места , куда будут вставляться слова из формы. 2) Просмотрите приложенный файл — по такому же принципу можно и создать форму с нужными полями.. Удачи.
1 |
 Сообщение было отмечено noz0o как решение
|
12 / 7 / 5 Регистрация: 27.02.2015 Сообщений: 94 |
|
|
13.05.2018, 18:44 [ТС] |
5 |
|
Большое спасибо!
0 |
|
0 / 0 / 0 Регистрация: 13.05.2018 Сообщений: 86 |
|
|
13.05.2018, 19:45 |
6 |
|
noz0o, А, вообще, поищи информацию по рассылкам в Word.
0 |
Продолжаем серию заметок по теме автоматизации документов.
Сегодня я расскажу, как добавить к вашим документам специальную форму, с помощью которой можно легко и просто вводить данные в документ. Введенные в форму данные адресата по нажатию кнопки на форме будут автоматически внесены в документ.
Предполагается, что у вас есть готовый шаблон документа, например, письма. В качестве образца можно использовать подготовленный мною шаблон официального письма вымышленной организации.
Использование шаблона необходимо, ведь на его основе вы в дальнейшем будете создавать свои документы.
Распакуйте файл из архива и поместите его в папку с шаблонами редактора Word. Как правило, эта папка находится по адресу: C:Documents and SettingsИМЯ_ПОЛЬЗОВАТЕЛЯApplication DataMicrosoftШаблоны.
Итак, шаблон документа у нас есть, открыт и готов к изменению. В первую очередь нам необходимо добавить закладки в те позиции в документе, куда вы собираетесь вставлять данные из формы. Как правило, письмо должно содержать фамилию, имя и отчество адресата, наименование организации адресата, полный почтовый адрес и приветствие.
Исходя из этого мы добавим в документ следующие закладки:
- name
- company
- address
- date
- salutation
Обратите внимание, реквизитов адресата, которые должно содержать письмо, на самом деле может быть много, а закладок мы определили всего пять. Это логично, так как в дальнейшем мы будем подставлять несколько реквизитов к одной закладке (например, адрес, который будет состоять из индекса, названия города, области, улицы).
После добавления закладок (и если у вас включен режим отображения меток закладок), наш документ будет выглядеть примерно как на рисунке ниже (щелкните по картинке для ее увеличения):

Эти метки закладок после нажатия кнопки «Внести данные» будут заменены на конкретные тексты.
Не забывайте сохранять сделанные вами изменения в шаблоне на всякий «пожарный» случай.
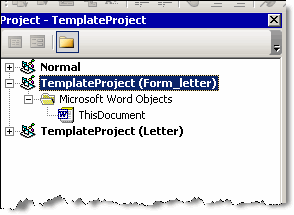
На втором шаге мы создадим специальную форму с текстовыми полями, которая будет открываться при создании каждого нового документа на основе вашего шаблона письма. Кратко расскажу, как добавить в шаблон форму.
- Откройте редактор Visual Basic с помощью сочетания клавиш «Alt»+«F11». Убедитесь, что в окне проектов выделен ваш шаблон:
- В меню Insert выберите команду UserForm. В окне проектов будет создан новый объект Forms с пустой формой или просто добавлен в проект модуль userForm.
- Разместите на форме необходимые элементы. Например, как на рисунке ниже:
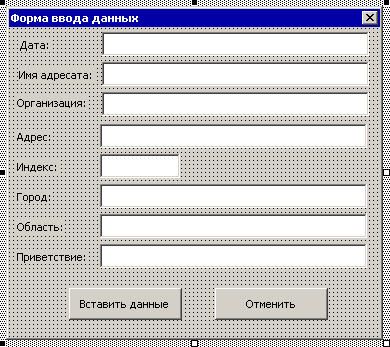
Текстовые поля (со стандартными именами TextBox1) были мною переименованы с учетом их назначения. Обратите внимание в нижеприведенном коде, как они теперь называются.
Третий шаг — написание кода для элементов нашей формы.
- В меню Insert выберите команду Module. В окне проектов будет создан новый модуль Module1. Дважды щелкните по модулю и перейдите в окно редактирования кода. Вставьте следующий код:
- Перейдите на модуль UserForm1. Переименуйте его в MyForm.
- Нажмите клавишу «F7» и в окне редактора кода вставьте следующий код (содержит процедуры для действий с элементами формы):
- Ниже этого кода вставьте следующий код:
- Сохраните проект и попробуйте создать на основе вашего шаблона новый документ. Введите необходимые данные в поля формы и нажмите кнопку «Внести данные».
Sub AutoNew()
Dim oF As MyForm
Set oF = New MyForm
oF.Show
Set oF = Nothing
End Sub
Этот код запускает форму каждый раз при создании нового документа на основе вашего шаблона.
Private Sub CommandButton1_Click()
'Действия формы по нажатию кнопки "Ввести данные"
Dim bm As Bookmarks
Dim rng As Word.Range
Dim addr As String
Dim sText As String
Dim sResult1 As String
Dim sResult2 As String
Dim arName() As String
Set bm = ActiveDocument.Bookmarks
sText = Me.tbName.Text  'присваиваем переменной текст из текстового поля "Имя адресата"
arName = Split(sText)   'создаем массив из отдельных слов, вместе составляющих ФИО адресата
'Действия с полем "Дата"
With Me.tbDate
   If Not IsDate(.Text) Then  'если данные введены не в формате даты, то
      MsgBox "В поле ""Дата"" неверно введены данные."   'выводим сообщение
      .Text = Format(Now, "dd MMMM yyyy") 'автоматически заполняем поле текущей датой
      .SetFocus   'фокус на поле "Дата"
      .SelStart = 0  '
      .SelLength = Len(.Text) 'выделяем весь текст в поле, начиная с левого края
      Exit Sub
   Else
      Set rng = bm("date").Range 'присваиваем переменной rng ссылку на закладку "date"
      rng.Text = .Text & " г."   'определяем новый текст закладки
      bm.Add "date", rng   'заменяем закладку
   End If
End With
Set rng = bm("name").Range 'присваиваем переменной rng ссылку на закладку "name"
sResult1 = arName(0) & " " 'присваиваем переменной значение первого слова из поля "Имя адресата" и добавляем пробел
sResult1 = sResult1 & Left(arName(1), 1) & ". " 'добавляем к первому слову первую букву Имени и точку
sResult1 = sResult1 & Left(arName(2), 1) & "."  'добавляем первую букву Отчества и точку
rng.Text = sResult1  'определяем новый текст закладки
bm.Add "name", rng   'заменяем закладку
Set rng = bm("company").Range 'присваиваем переменной rng ссылку на закладку "company"
rng.Text = Me.tbCompany  'определяем новый текст закладки
bm.Add "company", rng   'заменяем закладку
If Len(sText) > 0 Then  'если в поле "Имя адресата" есть какие-то символы, то
    sText = sResult1 & vbCr   'присваиваем переменной текст закладки "name" и переводим строку
End If
If Len(Me.tbCompany.Text) > 0 Then  'если в поле "Организация" есть какие-то символы, то
   Me.tbCompany.Text = Me.tbCompany.Text & vbCr   'присваиваем переменной текст из поля и переводим строку
End If
If Len(Me.tbAddress.Text) > 0 Then  'если в поле "Адрес" есть какие-то символы, то
   Me.tbAddress.Text = Me.tbAddress.Text   'присваиваем переменной текст из поля
End If
If Len(Me.tbIndex.Text) > 0 Then 'если в поле "Индекс" есть какие-то символы, то
   Me.tbIndex.Text = Me.tbIndex.Text & ","    'присваиваем переменной текст из поля и добавляем запятую
End If
If Len(Me.tbCity.Text) > 0 Then  'если в поле "Город" есть какие-то символы, то
   Me.tbCity.Text = Me.tbCity.Text & "," 'присваиваем переменной текст из поля и добавляем запятую
End If
If Len(Me.tbOblast.Text) > 0 Then   'если в поле "Область" есть какие-то символы, то
   Me.tbOblast.Text = Me.tbOblast.Text & "," 'присваиваем переменной текст из поля и добавляем запятую
End If
'присваиваем переменной фрагментов текста из полей "Индекс", "Город", "Область" и "Адрес"
addr = Me.tbIndex.Text & " " & Me.tbCity.Text & " " & Me.tbOblast.Text & " " & Me.tbAddress.Text
Set rng = bm("address").Range 'присваиваем переменной rng ссылку на закладку "address"
rng.Text = addr   'определяем новый текст закладки из переменной addr
bm.Add "address", rng   'заменяем закладку
Set rng = bm("salutation").Range 'присваиваем переменной rng ссылку на закладку "salutation"
rng.Text = Me.tbSalutation.Text  'определяем новый текст закладки
bm.Add "salutation", rng   'заменяем закладку
Unload Me   'Закрываем форму
ActiveDocument.Range.Fields.Update  'Обновляем все поля в документе
End Sub
Private Sub CommandButton2_Click()
'Выход из формы и закрытие окна документа при нажатии кнопки "Отменить"
On Error GoTo ErrLabel
Unload Me    'Закрываем форму
ActiveDocument.Close  'Закрываем текущий документ
ErrLabel:
End Sub
Private Sub tbIndex_Exit(ByVal Cancel As MSForms.ReturnBoolean)
'Устанавливаем правила заполнения поля "Индекс"
With Me.tbIndex
   If Not IsNumeric(.Text) Or Len(.Text) <> 6 Then 'если в поле "Индекс" данные не цифры и меньше 6, то
      MsgBox "Ошибка!" & " " & "Введите 6 цифр индекса города или района." 'выводим сообщение
      Cancel = True  'возвращаемся к полю
      .Text = ""  'очищаем поле
      .SetFocus
   End If
End With
End Sub
Private Sub tbName_Exit(ByVal Cancel As MSForms.ReturnBoolean)
'При выходе из поля "Имя адресата" его имя подставляется в поле "Приветствие"
sText = Me.tbName.Text
arName = Split(sText)
sResult2 = arName(1) & " "
sResult2 = sResult2 & arName(2)
Me.tbSalutation = "Уважаемый " & sResult2 & "!"
End Sub
Private Sub UserForm_Initialize()
Me.tbDate = Format(Now, "dd MMMM yyyy")
With Me.tbName
   .Text = "Фамилия Имя Отчество"
   .SetFocus
   .SelStart = 0
   .SelLength = Len(.Text)
End With
End Sub
Вы можете скачать уже готовый шаблон письма и подредактировать его под свои нужды.
В этом шаблоне есть небольшой недостаток: в текстовые поля нужно вводить информацию в правильном формате и регистре, иначе в итоговом письме придется вручную править недочеты.
Образцом для шапки шаблона послужила картинка из шаблона городского письма редактора Word 2007.
Образцом кода для данного макроса и формы послужила заметка Gregory Maxey Address a Letter Using as UserForm.
Using Excel VBA to create Microsoft Word documents
In these examples, we generate Microsoft Word Documents with various formatting features using
the Microsoft Excel VBA scripting language. These techniques can have many useful applications.
For instance if you have a list of data like a price or product list in Excel that you want to present
in a formatted Word Document, these techniques can prove useful.
In these examples, we assume the reader has at least basic knowledge of VBA, so we will not
go over basics of creating and running scripts. This code has been tested on Microsoft Word and Excel
2007. Some changes may be required for other versions of Word and Excel.
Writing to Word
Inserting a Table of Contents
Inserting Tabs
Inserting Tables
Inserting Bullet List
more on Inserting Tables
Multiple Features
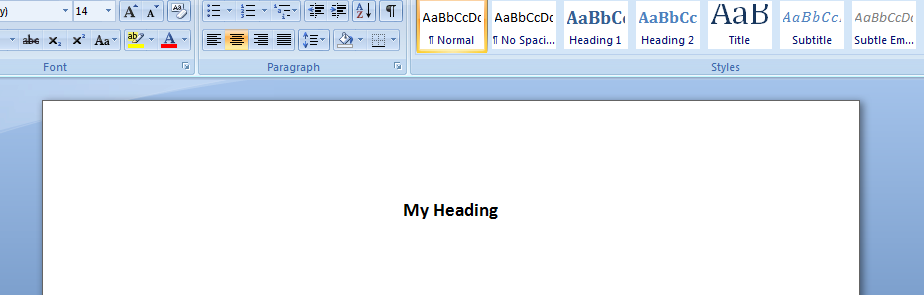
Function that demonstrates VBA writing to a Microsoft Word document
The following code illustrates the use of VBA Word.Application object and related properties.
In this example, we create a new Word Document add some text.
    'In Tools > References, add reference to "Microsoft Word XX.X Object Library" before running.

    'Early Binding
    Dim wdApp As Word.Application
    Set wdApp = New Word.Application

    'Alternatively, we can use Late Binding
    'Dim wdApp As Object
    'Set wdApp = CreateObject("word.Application")

    With wdApp
        .Visible = True
        .Activate
        .Documents.Add

        With .Selection
            .ParagraphFormat.Alignment = wdAlignParagraphCenter
            .Font.Bold = True
            .Font.Name = "arial"
            .Font.Size = 14
            .TypeText ("My Heading")
            .TypeParagraph
        End With
    End With
Some VBA Vocabulary
ParagraphFormat
Represents all the formatting for a paragraph.
output in MS Word:
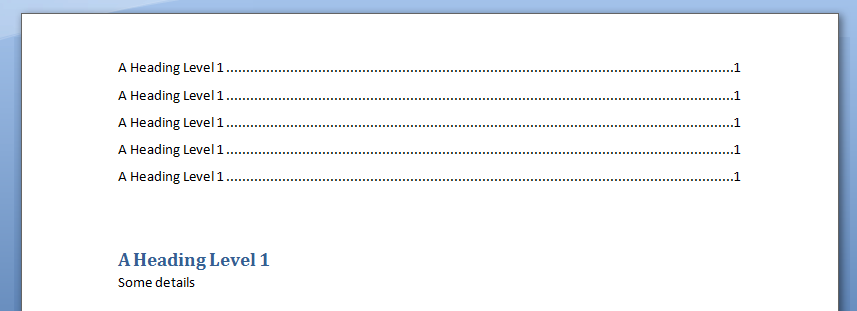
Inserting a Table of Contents into Word Document using Excel VBA
In this example, we generate a Table of Contents into a Word Document using Excel VBA
Sub sAddTableOfContents()

    Dim wdApp As Word.Application
    Set wdApp = New Word.Application

    'Alternatively, we can use Late Binding
    'Dim wdApp As Object
    'Set wdApp = CreateObject("word.Application")

    Dim wdDoc As Word.Document
    Set wdDoc = wdApp.Documents.Add

    ' Note we define a Word.range, as the default range wouled be an Excel range!
    Dim myWordRange As Word.range
    Dim Counter As Integer

    wdApp.Visible = True
    wdApp.Activate

    'Insert Some Headers
    With wdApp
        For Counter = 1 To 5
            .Selection.TypeParagraph
            .Selection.Style = "Heading 1"
            .Selection.TypeText "A Heading Level 1"
            .Selection.TypeParagraph
            .Selection.TypeText "Some details"
        Next
    End With

    ' We want to put table of contents at the top of the page
	Set myWordRange = wdApp.ActiveDocument.range(0, 0)

    wdApp.ActiveDocument.TablesOfContents.Add _
     range:=myWordRange, _
     UseFields:=False, _
     UseHeadingStyles:=True, _
     LowerHeadingLevel:=3, _
     UpperHeadingLevel:=1

End Sub
Some VBA Vocabulary
ActiveDocument.TablesOfContents.Add
The TablesOfContents property to return the TablesOfContents collection.
Use the Add method to add a table of contents to a document.
Some TablesOfContents Parameters
Range The range where you want the table of contents to appear. The table of contents replaces the range, if the range isn’t collapsed.
UseHeadingStyles True to use built-in heading styles to create the table of contents. The default value is True.
UpperHeadingLevel The starting heading level for the table of contents. Corresponds to the starting value used with the o switch for a Table of Contents (TOC) field. The default value is 1.
LowerHeadingLevel The ending heading level for the table of contents. Corresponds to the ending value used with the o switch for a Table of Contents (TOC) field. The default value is 9.
output Word Table in MS Word:
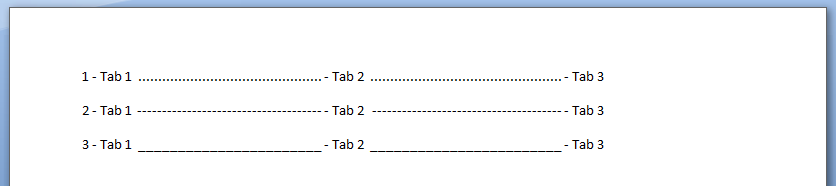
Write Microsoft Word Tabs
A function that writes tabbed content to a Microsoft Word Document. Note in each iteration, we change the
value of the leader character (characters that are inserted in the otherwise blank area created by the tab).
Public Sub sWriteMicrosoftTabs()

    'In Tools > References, add reference to "Microsoft Word XX.X Object Library" before running.

    'Early Binding
    Dim wdApp As Word.Application
    Set wdApp = New Word.Application

    'Alternatively, we can use Late Binding
    'Dim wdApp As Object
    'Set wdApp = CreateObject("word.Application")

    With wdApp
        .Visible = True
        .Activate
        .Documents.Add

        For Counter = 1 To 3
            .Selection.TypeText Text:=Counter & " - Tab 1 "

            ' position to 2.5 inches
            .Selection.Paragraphs.TabStops.Add Position:=Application.InchesToPoints(2.5), _
                Leader:=Counter, Alignment:=wdAlignTabLeft

            .Selection.TypeText Text:=vbTab & " - Tab 2 "

            ' position to 5 inches
            .Selection.Paragraphs.TabStops.Add Position:=Application.InchesToPoints(5), _
                Leader:=Counter, Alignment:=wdAlignTabLeft

            .Selection.TypeText Text:=vbTab & " - Tab 3 "

            .Selection.TypeParagraph
        Next Counter

    End With
End Sub
Some VBA Vocabulary
.TabStops.Add Use the TabStops property to return the TabStops collection. In the example above,
nprogram adds a tab stop positioned at 0, 2.5 and 5 inches.
output in MS Word:
Write Microsoft Word Tables
In this example, we generate a Microsoft Table using Excel VBA
Sub sWriteMSWordTable ()

    'In Tools > References, add reference to "Microsoft Word XX.X Object Library" before running.

    'Early Binding
    Dim wdApp As Word.Application
    Set wdApp = New Word.Application

    'Alternatively, we can use Late Binding
    'Dim wdApp As Object
    'Set wdApp = CreateObject("word.Application")

    With wdApp
        .Visible = True
        .Activate
        .Documents.Add

        With .Selection

            .Tables.Add _
                    Range:=wdApp.Selection.Range, _
                    NumRows:=1, NumColumns:=3, _
                    DefaultTableBehavior:=wdWord9TableBehavior, _
                    AutoFitBehavior:=wdAutoFitContent

            For counter = 1 To 12
                .TypeText Text:="Cell " & counter
                If counter <> 12 Then
                    .MoveRight Unit:=wdCell
                End If
            Next

        End With

    End With

End Sub
Some VBA vocabulary
Table.AddTable object that represents a new, blank table added to a document.
Table.Add properties
Range The range where you want the table to appear. The table replaces the range, if the range isn’t collapsed.
NumRows The number of rows you want to include in the table.
NumColumns The number of columns you want to include in the table.
DefaultTableBehavior Sets a value that specifies whether Microsoft Word automatically resizes cells in tables to fit the cells� contents (AutoFit). Can be either of the following constants: wdWord8TableBehavior (AutoFit disabled) or wdWord9TableBehavior (AutoFit enabled). The default constant is wdWord8TableBehavior.
AutoFitBehavior Sets the AutoFit rules for how Word sizes tables. Can be one of the WdAutoFitBehavior constants.
output in MS Word:

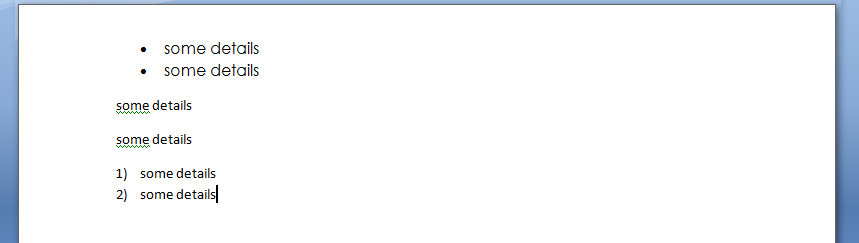
Write Microsoft Word bullet list
In this example, we write with bullet list and outline numbers with Excel VBA
    'In Tools > References, add reference to "Microsoft Word XX.X Object Library" before running.

    'Early Binding
    Dim wdApp As Word.Application
    Set wdApp = New Word.Application

    'Alternatively, we can use Late Binding
    'Dim wdApp As Object
    'Set wdApp = CreateObject("word.Application")

    With wdApp
        .Visible = True
        .Activate
        .Documents.Add
        ' turn on bullets
        .ListGalleries(wdBulletGallery).ListTemplates(1).Name = ""
        .Selection.Range.ListFormat.ApplyListTemplate ListTemplate:=.ListGalleries(wdBulletGallery).ListTemplates(1), _
            continuepreviouslist:=False, applyto:=wdListApplyToWholeList, defaultlistbehavior:=wdWord9ListBehavior

        With .Selection
            .ParagraphFormat.Alignment = wdAlignParagraphLeft
            .Font.Bold = False
            .Font.Name = "Century Gothic"
            .Font.Size = 12
            .TypeText ("some details")
            .TypeParagraph
            .TypeText ("some details")
            .TypeParagraph
        End With

        ' turn off bullets
        .Selection.Range.ListFormat.RemoveNumbers wdBulletGallery

        With .Selection
            .ParagraphFormat.Alignment = wdAlignParagraphLeft
            .TypeText ("some details")
            .TypeParagraph
            .TypeText ("some details")
            .TypeParagraph

        End With

        ' turn on outline numbers
        .ListGalleries(wdOutlineNumberGallery).ListTemplates(1).Name = ""
        .Selection.Range.ListFormat.ApplyListTemplate ListTemplate:=.ListGalleries(wdOutlineNumberGallery).ListTemplates(1), _
            continuepreviouslist:=False, applyto:=wdListApplyToWholeList, defaultlistbehavior:=wdWord9ListBehavior

        With .Selection
            .ParagraphFormat.Alignment = wdAlignParagraphLeft
            .TypeText ("some details")
            .TypeParagraph
            .TypeText ("some details")

        End With

    End With
output in MS Word:
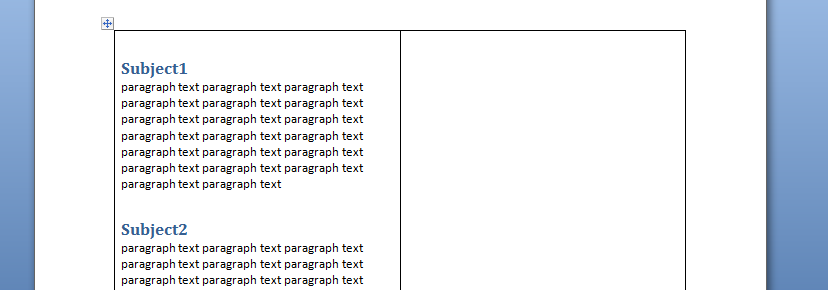
Another example of Writing Tables to Microsoft Word
In this example we will create a word document with 20 paragraphs. Each paragraph will have a header with a header style element
   'In Tools > References, add reference to "Microsoft Word XX.X Object Library" before running.
    Dim wdApp As Word.Application
    Dim wdDoc As Word.Document

    Set wdApp = New Word.Application
    wdApp.Visible = True


    Dim x As Integer
    Dim y As Integer

    wdApp.Visible = True
    wdApp.Activate
    wdApp.Documents.Add

    wdApp.ActiveDocument.Tables.Add Range:=wdApp.Selection.Range, NumRows:=2, NumColumns:= _
        2, DefaultTableBehavior:=wdWord9TableBehavior, AutoFitBehavior:= _
        wdAutoFitFixed

    With wdApp.Selection.Tables(1)
        If .Style <> "Table Grid" Then
            .Style = "Table Grid"
        End If
        .ApplyStyleHeadingRows = True
        .ApplyStyleLastRow = False
        .ApplyStyleFirstColumn = True
        .ApplyStyleLastColumn = False
        .ApplyStyleRowBands = True
        .ApplyStyleColumnBands = False
    End With

    With wdApp.Selection

        For x = 1 To 2
            ' set style name
            .Style = "Heading 1"
            .TypeText "Subject" & x
            .TypeParagraph
            .Style = "No Spacing"
            For y = 1 To 20
                .TypeText "paragraph text "
            Next y
            .TypeParagraph
        Next x

        ' new paragraph
        .TypeParagraph

        ' toggle bold on
        .Font.Bold = wdToggle
        .TypeText Text:="show some text in bold"
        .TypeParagraph

        'toggle bold off
        .Font.Bold = wdToggle
        .TypeText "show some text in regular front weight"
        .TypeParagraph


    End With
Some VBA vocabulary
TypeText
Inserts specified text at the beginning of the current selection. The selection is turned into an insertion point at the end of the inserted text.
If Options.ReplaceSelection = True then the original selection will be replaced. This behaves exactly the same as typing some text at the keyboard.
TypeParagraph
Insert a new blank paragraph. The selection is turned into an insertion point after the inserted paragraph mark. If Options.ReplaceSelection = True then the original selection will be replaced. This behaves exactly the same as pressing the Enter key.
output in MS Word:
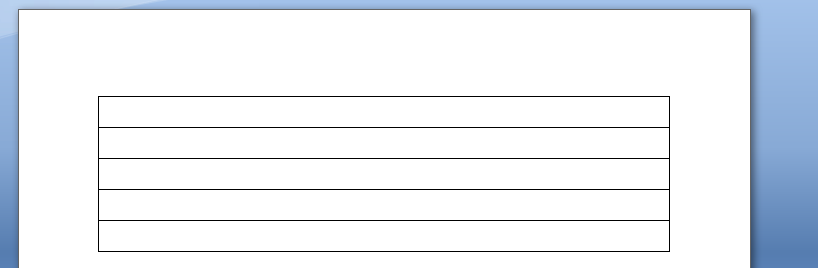
Generating a Word table with VBA
	'In Tools > References, add reference to "Microsoft Word XX.X Object Library" before running.

	Dim wdApp As Word.Application
	Dim wdDoc As Word.Document
	Dim r As Integer

	Set wdApp = CreateObject("Word.Application")
	wdApp.Visible = True

	Set wdDoc = wdApp.Documents.Add
	wdApp.Activate

	Dim wdTbl As Word.Table
	Set wdTbl = wdDoc.Tables.Add(Range:=wdDoc.Range, NumRows:=5, NumColumns:=1)

	With wdTbl

		.Borders(wdBorderTop).LineStyle = wdLineStyleSingle
		.Borders(wdBorderLeft).LineStyle = wdLineStyleSingle
		.Borders(wdBorderBottom).LineStyle = wdLineStyleSingle
		.Borders(wdBorderRight).LineStyle = wdLineStyleSingle
		.Borders(wdBorderHorizontal).LineStyle = wdLineStyleSingle
		.Borders(wdBorderVertical).LineStyle = wdLineStyleSingle

		For r = 1 To 5
			.Cell(r, 1).Range.Text = ActiveSheet.Cells(r, 1).Value
		Next r
	End With
output in MS Word:
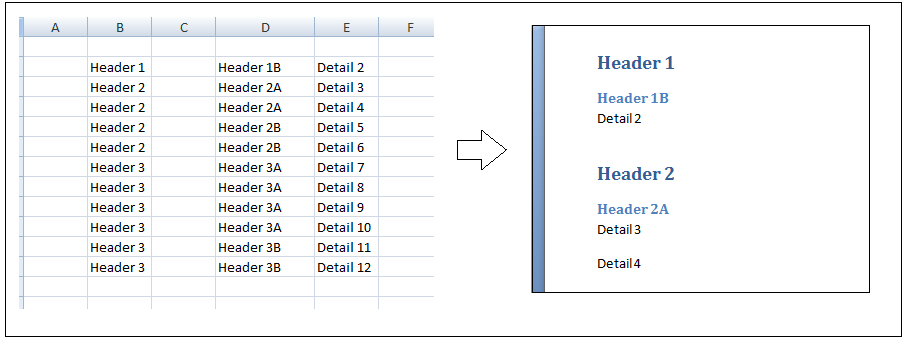
Option Explicit
Dim wdApp As Word.Application

Sub extractToWord()

   'In Tools > References, add reference to "Microsoft Word 12 Object Library" before running.

    Dim lastCell
    Dim rng As Range
    Dim row As Range
    Dim cell As Range
    Dim arrayOfColumns
    arrayOfColumns = Array("", "", "", "", "", "", "", "", "", "", "", "", "", "", "")
    Dim thisRow As Range
    Dim thisCell As Range
    Dim myStyle As String

    ' get last cell in column B
    lastCell = getLastCell()

    Set rng = Range("B2:H" & lastCell)

    'iterate through rows
    For Each thisRow In rng.Rows

        'iterate through cells in row row
        For Each thisCell In thisRow.Cells

            If thisCell.Value = arrayOfColumns(thisCell.Column) Or thisCell.Value = "" Then
            ' do nothing
                ''frWriteLine thisCell.Value, "Normal"
                ''frWriteLine arrayOfColumns(thisCell.Column), "Normal"
                  If thisCell.Value = arrayOfColumns(thisCell.Column) Or thisCell.Value = "" Then
                  End If

            Else
                myStyle = "Normal"
                Select Case thisCell.Column
                    Case 2
                        myStyle = "Heading 1"
                    Case 3
                        myStyle = "Heading 2"
                    Case 4
                        myStyle = "Heading 3"
                    Case Is > 5
                        myStyle = "Normal"

                End Select

                frWriteLine thisCell.Value, myStyle
            End If

        arrayOfColumns(thisCell.Column) = thisCell.Value

      Next thisCell
    Next thisRow

End Sub

Public Function getLastCell() As Integer

    Dim lastRowNumber As Long
    Dim lastRowString As String
    Dim lastRowAddress As String

    With ActiveSheet
        getLastCell = .Cells(.Rows.Count, 2).End(xlUp).row
    End With

End Function

Public Function frWriteLine(someData As Variant, myStyle As String)

    If wdApp Is Nothing Then

        Set wdApp = New Word.Application
        With wdApp
            .Visible = True
            .Activate
            .Documents.Add
        End With

    End If

    With wdApp

        With .Selection
            .ParagraphFormat.Alignment = wdAlignParagraphCenter
            .Style = myStyle
            .TypeText (someData)
            .TypeParagraph
        End With
    End With

End Function
output in MS Word: