
Содержание
- How to read merged excel cells with R
- 5 Answers 5
- Reading Data From Excel Files (xls|xlsx) into R
- Preleminary tasks
- Copying data from Excel and import into R
- On Windows system
- On Mac OSX system
- Importing Excel files into R using readxl package
- Installing and loading readxl package
- Using readxl package
- Importing Excel files using xlsx package
- Installing and loading xlsx package
- Using xlsx package
- Read more
- Summary
- Related articles
- Infos
- Recommended for You!
- Recommended for you
- Coursera — Online Courses and Specialization
- Data science
- Popular Courses Launched in 2020
- Trending Courses
- Books — Data Science
- Our Books
- Others
- Как импортировать файлы Excel в R (шаг за шагом)
- Пример: импорт файла Excel в R
- Дополнительные ресурсы
- R-bloggers
- R news and tutorials contributed by hundreds of R bloggers
- A million ways to connect R and Excel
How to read merged excel cells with R
Part of R Language Collective
I received hundreds of Excel sheets containing merged cells. Sender insists on using Excel and merging cells — nothing I can do about that. How do I read these using R? For example, a simplified version of the problem area of the input sheet might look something like this, where the merged cells (B2,B3,C2,C3) contain the word «X». The number of merged cells and their location in the sheet (and the value of «X») changes from sheet to sheet, and there may be more than one set of merged cells in the same sheet. The sheets are not actually in tabular format, and they contain other empty cells. I have successfully looped through all the files, cleaned up the whole mess, reshaped the result and obtained a tidy dataset (1 sheet instead of 736 Excel workbooks). The problem is, my solution so far ignores the information in the merged cells.
How can I read the Excel sheet into R so that the result looks like this, with the word «X»
5 Answers 5


If a VBA/R hybrid suits your purposes, here is a VBA macro which will unmerge all cells in a worksheet, while simultaneously filling all cells in the unmerged region with the corresponding value:
A simple test to show how it is called:
The sub UnMerged can be used as part of a larger program that e.g. iterates over all .xlsx files in a folder and all data-containing sheets in the files, unmerging them all and saving them as .csv files.
On Edit. Native VBA file handling is somewhat annoying. I tend to use the related scripting language VBScript if I need to iterate over multiple files. I’m not sure if your virtual Windows can handle VBScript. I would assume so since VBScript is a standard part of the Windows OS. If this is the case, see if the following works (after backing up the files just to be safe). Save the code as a simple text file with a .vbs extension in the folder that contains the Excel files that you want to modify. Then, simply click its icon. It will iterate over all .xlx and .xlsx files in the directory that contains the script and unmerge sheet 1 in each such file. I didn’t test it extensively and it contains no error-handling, but I did test it on a folder with three Excel files which each contained multiple merged regions and it ran as expected on my Windows machine. I don’t know if it will work on your Mac:
Источник
Reading Data From Excel Files (xls|xlsx) into R
Previously, we described the essentials of R programming and some best practices for preparing your data. We also provided quick start guides for reading and writing txt and csv files using R base functions as well as using a most modern R package named readr, which is faster (X10) than R base functions.
In this article, you’ll learn how to read data from Excel xls or xlsx file formats into R. This can be done either by:
- copying data from Excel
- using readxl package
- or using xlsx package

Preleminary tasks
Prepare your data as described here: Best practices for preparing your data
Copying data from Excel and import into R
On Windows system
Open the Excel file containing your data: select and copy the data (ctrl + c)
Type the R code below to import the copied data from the clipboard into R and store the data in a data frame (my_data):
On Mac OSX system
Select and copy the data (Cmd + c)
Use the function pipe(pbpaste) to import the data you’ve copied (with Cmd + c):
Importing Excel files into R using readxl package
The readxl package, developed by Hadley Wickham, can be used to easily import Excel files (xls|xlsx) into R without any external dependencies.
Installing and loading readxl package
Using readxl package
The readxl package comes with the function read_excel() to read xls and xlsx files
- Read both xls and xlsx files
The above R code, assumes that the file “my_file.xls” and “my_file.xlsx” is in your current working directory. To know your current working directory, type the function getwd() in R console.
- It’s also possible to choose a file interactively using the function file.choose(), which I recommend if you’re a beginner in R programming:
If you use the R code above in RStudio, you will be asked to choose a file.
- Specify sheet with a number or name
- Case of missing values: NA (not available). If NAs are represented by something (example: “—”) other than blank cells, set the na argument:
Importing Excel files using xlsx package
The xlsx package, a java-based solution, is one of the powerful R packages to read, write and format Excel files.
Installing and loading xlsx package
Using xlsx package
There are two main functions in xlsx package for reading both xls and xlsx Excel files: read.xlsx() and read.xlsx2() [faster on big files compared to read.xlsx function].
The simplified formats are:
- file: file path
- sheetIndex: the index of the sheet to be read
- header: a logical value. If TRUE, the first row is used as column names.
Example of usage:
Read more
Read more about for reading, writing and formatting Excel files:
Summary
Read Excel files using readxl package: read_excel(file.choose(), sheet = 1)
Related articles
- Previous chapters
- R programming basics
- Best practices in preparing data files for importing into R
- Reading data from txt|csv files: R base functions
- Fast Reading of Data From txt|csv Files into R: readr package
- Next chapters
- Exporting data from R
Infos
This analysis has been performed using R (ver. 3.2.3).
Enjoyed this article? I’d be very grateful if you’d help it spread by emailing it to a friend, or sharing it on Twitter, Facebook or Linked In.
Show me some love with the like buttons below. Thank you and please don’t forget to share and comment below!!
Avez vous aimé cet article? Je vous serais très reconnaissant si vous aidiez à sa diffusion en l’envoyant par courriel à un ami ou en le partageant sur Twitter, Facebook ou Linked In.
Montrez-moi un peu d’amour avec les like ci-dessous . Merci et n’oubliez pas, s’il vous plaît, de partager et de commenter ci-dessous!
Recommended for You!
Recommended for you
This section contains best data science and self-development resources to help you on your path.
Coursera — Online Courses and Specialization
Data science
- Course: Machine Learning: Master the Fundamentals by Standford
- Specialization: Data Science by Johns Hopkins University
- Specialization: Python for Everybody by University of Michigan
- Courses: Build Skills for a Top Job in any Industry by Coursera
- Specialization: Master Machine Learning Fundamentals by University of Washington
- Specialization: Statistics with R by Duke University
- Specialization: Software Development in R by Johns Hopkins University
- Specialization: Genomic Data Science by Johns Hopkins University
Popular Courses Launched in 2020
- Google IT Automation with Python by Google
- AI for Medicine by deeplearning.ai
- Epidemiology in Public Health Practice by Johns Hopkins University
- AWS Fundamentals by Amazon Web Services
Trending Courses
- The Science of Well-Being by Yale University
- Google IT Support Professional by Google
- Python for Everybody by University of Michigan
- IBM Data Science Professional Certificate by IBM
- Business Foundations by University of Pennsylvania
- Introduction to Psychology by Yale University
- Excel Skills for Business by Macquarie University
- Psychological First Aid by Johns Hopkins University
- Graphic Design by Cal Arts
Books — Data Science
Our Books
- Practical Guide to Cluster Analysis in R by A. Kassambara (Datanovia)
- Practical Guide To Principal Component Methods in R by A. Kassambara (Datanovia)
- Machine Learning Essentials: Practical Guide in R by A. Kassambara (Datanovia)
- R Graphics Essentials for Great Data Visualization by A. Kassambara (Datanovia)
- GGPlot2 Essentials for Great Data Visualization in R by A. Kassambara (Datanovia)
- Network Analysis and Visualization in R by A. Kassambara (Datanovia)
- Practical Statistics in R for Comparing Groups: Numerical Variables by A. Kassambara (Datanovia)
- Inter-Rater Reliability Essentials: Practical Guide in R by A. Kassambara (Datanovia)
Others
- R for Data Science: Import, Tidy, Transform, Visualize, and Model Data by Hadley Wickham & Garrett Grolemund
- Hands-On Machine Learning with Scikit-Learn, Keras, and TensorFlow: Concepts, Tools, and Techniques to Build Intelligent Systems by Aurelien Géron
- Practical Statistics for Data Scientists: 50 Essential Concepts by Peter Bruce & Andrew Bruce
- Hands-On Programming with R: Write Your Own Functions And Simulations by Garrett Grolemund & Hadley Wickham
- An Introduction to Statistical Learning: with Applications in R by Gareth James et al.
- Deep Learning with R by François Chollet & J.J. Allaire
- Deep Learning with Python by François Chollet
Want to Learn More on R Programming and Data Science?
Источник
Как импортировать файлы Excel в R (шаг за шагом)

Самый простой способ импортировать файл Excel в R — использовать функцию read_excel() из пакета readxl .
Эта функция использует следующий синтаксис:
read_excel (путь, лист = NULL)
- path: Путь к файлу xls/xlsx
- лист: Лист для чтения. Это может быть имя листа или положение листа. Если это не указано, читается первый лист.
В этом руководстве представлен пример использования этой функции для импорта файла Excel в R.
Пример: импорт файла Excel в R
Предположим, у меня есть файл Excel, сохраненный в следующем месте:
C:UsersБобРабочий столdata.xlsx
Файл содержит следующие данные:
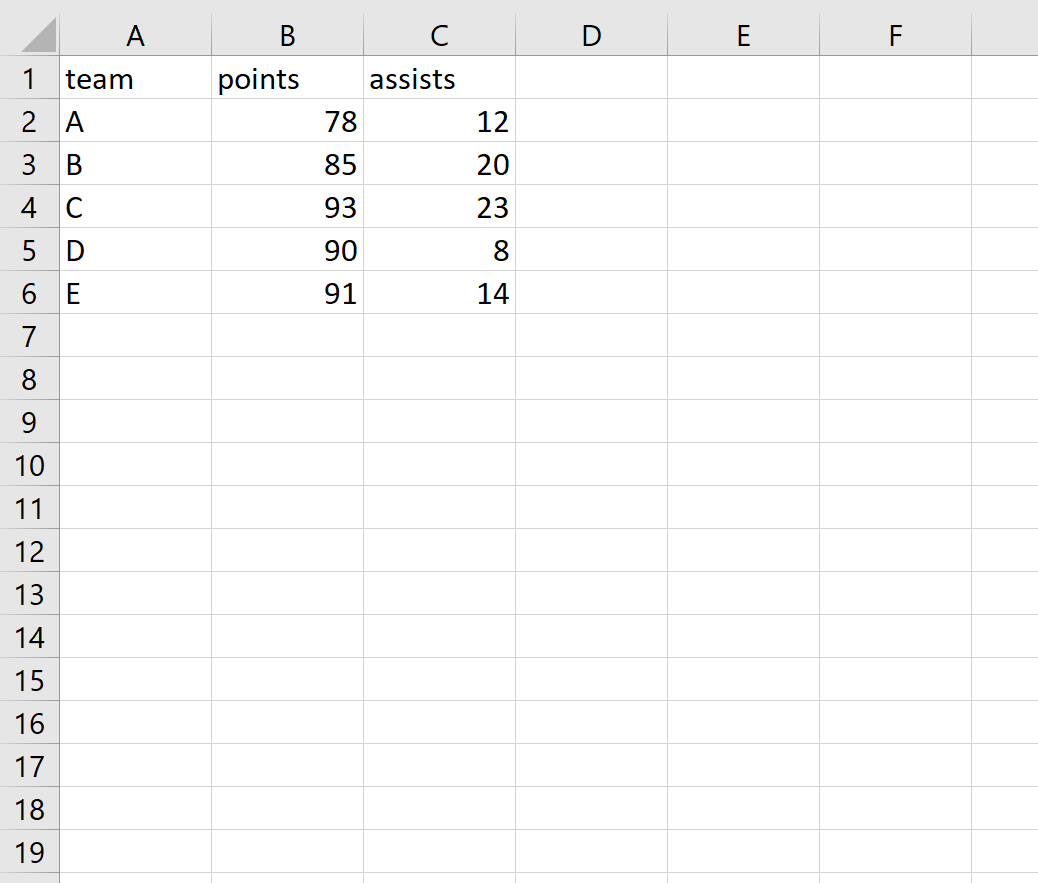
В следующем коде показано, как импортировать этот файл Excel в R:
Обратите внимание, что мы использовали двойную обратную косую черту () в пути к файлу, чтобы избежать следующей распространенной ошибки:
Мы можем использовать следующий код для быстрого просмотра данных:
Мы видим, что R импортировал файл Excel и автоматически определил, что команда является строковой переменной, а очки и передачи — числовыми переменными.
Дополнительные ресурсы
В следующих руководствах объясняется, как импортировать другие типы файлов в R:
Источник
R-bloggers
R news and tutorials contributed by hundreds of R bloggers
A million ways to connect R and Excel
Posted on February 11, 2014 by The R Trader in R bloggers | 0 Comments
In quantitative finance both R and Excel are the basis tools for any type of analysis. Whenever one has to use Excel in conjunction with R, there are many ways to approach the problem and many solutions. It depends on what you really want to do and the size of the dataset you’re dealing with. I list some possible connections in the table below.
| I want to… | R function/package |
|---|---|
| Read Excel spreadsheet in R | gdata RODBC XLConnect xlsx xlsReadWrite read.table(“clipboard”) RExcel |
| Read R output in Excel | write.table RExcel |
| Execute R code in VBA | Custom function RExcel |
| Execute R code from Excel spreadsheet | RExcel |
| Execute VBA code in R | Custom function |
| Fully integrate R and Excel | RExcel |
1 – Read Excel spreadsheet in R
- gdata: it requires you to install additional Perl libraries on Windows platforms but it’s very powerful.
- RODBC: This is reported for completeness only. It’s rather dated; there are better ways to interact with Excel nowadays.
- XLConnect: It might be slow for large dataset but very powerful otherwise.
- xlsx: Prefer the read.xlsx2() over read.xlsx(), it’s significantly faster for large dataset.
- xlsReadWrite: Available for Windows only. It’s rather fast but doesn’t support .xlsx files which is a serious drawback. It has been removed from CRAN lately.
- read.table(“clipboard”): It allows to copy data from Excel and read it directly in R. This is the quick and dirty R/Excel interaction but it’s very useful in some cases.
2 – Read R output in Excel
First create a csv output from an R data.frame then read this file in Excel. There is one function that you need to know it’s write.table. You might also want to consider: write.csv which uses “.” for the decimal point and a comma for the separator and write.csv2 which uses a comma for the decimal point and a semicolon for the separator.
3 – Execute R code in VBA
RExcel is from my perspective the best suited tool but there is at least one alternative. You can run a batch file within the VBA code. If R.exe is in your PATH, the general syntax for the batch file (.bat) is:
Here’s an example of how to integrate the batch file above within your VBA code.
4 — Execute R code from an Excel spreadsheet
Rexcel is the only tool I know for the task. Generally speaking once you installed RExcel you insert the excel code within a cell and execute from RExcel spreadsheet menu. See the RExcel references below for an example.
5 – Execute VBA code in R
This is something I came across but I never tested it myself. This is a two steps process. First write a VBscript wrapper that calls the VBA code. Second run the VBscript in R with the system or shell functions. The method is described in full details here.
6 – Fully integrate R and Excel
RExcel is a project developped by Thomas Baier and Erich Neuwirth, “making R accessible from Excel and allowing to use Excel as a frontend to R”. It allows communication in both directions: Excel to R and R to Excel and covers most of what is described above and more. I’m not going to put any example of RExcel use here as the topic is largely covered elsewhere but I will show you where to find the relevant information. There is a wiki for installing RExcel and an excellent tutorial available here. I also recommand the following two documents: RExcel – Using R from within Excel and High-Level Interface Between R and Excel. They both give an in-depth view of RExcel capabilities.
Источник
In this tutorial, we will learn how to work with Excel files in R statistical programming environment. It will provide an overview of how to use R to load xlsx files and write spreadsheets to Excel.
In the first section, we will go through, with examples, how to use R read an Excel file. More specifically, we are going to learn how to;
- read specific columns from a spreadsheet ,
- import multiple spreadsheets and combine them to one dataframe,
- read many Excel files,
- import Excel datasets using RStudio
Furthermore, in the last part we are going to focus on how to export dataframes to Excel files. More specifically, we are going to learn how to write;
- Excel files, rename the sheet
- to multiple sheets,
- multiple dataframes to a Excel file
How to Install R Packages
Now, before we continue with this Excel in R tutorial we are going to learn how to install the needed packages. In this post, we are going to use tidyverses readxl and the xlsx package to read xlsx files to dataframes.
Note, we are mainly using xlsx, in this post, because readxl cannot write Excel files, only import them into R.
# Install tidyverse
install.packages("tidyverse")

# or just readxl
install.packages("readxl")

# how to install xlsx
install.packages("xlsx")Code language: R (r)
Now, Tidyverse comes with a lot of useful packages. For example, using the package dplyr (part of Tidyverse) you can remove duplicates in R, and rename a column in R’s dataframe.
How to install RStudio
In the final example, we are going to read xlsx files in R using the interactive development environment RStudio. Now, RStudio is quite easy to install. In this post, we will cover two methods for installing RStudio.
Here’s two steps for installing RStudio:
- Download RStudio here
- Click on the installation file and follow the instructions
Now, there’s another option to get both R statistical programming environment and the great general-purpose language of Python. That is, to install the Anaconda Python distribution.
Note, RStudio is a great Integrated Development Environment for carrying out data visualization and analysis using R. RStudio is mainly for R but we can also use other programming languages ( e.g., Python). That is, we typically don’t use RStudio for importing xlsx files only.
How to Read Excel Files to R Dataframes
Can R read xlsx files? In this section, we are going to find out that the answer is, of course, “yes”. We are going to learn how to load Excel files using Tidyverse (e.g., readxl).
More specifically, in this section, we are going to learn how to read Excel files and spreadsheets to dataframes in R. In the read Excel examples we will read xlsx files from both the hard drive and URLs.
How to Import an Excel file in R using read_excel
First, we are going to load the r-package(s) we need. How do I load a package in R? It can be done either by using the library or require functions. In the next code chunk, we are going to load readxl so we can use the read_excel function to read Excel files into R dataframes.
require(readxl)Code language: R (r)If we look at the documentation for the function, read_excel, that we are going to use in this tutorial we can see that it takes a range of arguments.

Now it’s time to learn how to use read_excel to read in data from an Excel file. The easiest way to use this method is to pass the file name as a character. If we don’t pass any other parameters, such as sheet name, it will read the first sheet in the index. In the first example we are not going to use any parameters:
df <- read_excel("example_sheets2.xlsx")
head(df)Code language: R (r)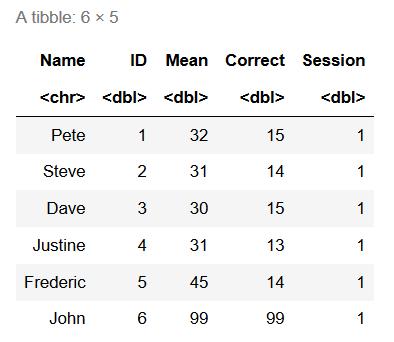
Here, the read_excel function reads the data from the Excel file into a tibble object. We can if we want to, change this tibble to a dataframe.
df <- as.data.frame(df)Code language: R (r)Now, after importing the data from the Excel file you can carry on with data manipulation if needed. It is, for instance, possible to remove a column, by name and index, with the R-package dplyr. Furthermore, if you installed tidyverse you will have a lot of tools that enable you to do descriptive statistics in R, and create scatter plots with ggplot2.
Importing an Excel File to R in Two Easy Steps:
Time needed: 1 minute.
Here’s a quick answer to the question how do I import Excel data into R?? Importing an Excel file into an R dataframe only requires two steps, given that we know the path, or URL, to the Excel file:
- Load the readxl package
First, you type library(readxl) in e.g. your R-script

- Import the XLSX file
Second, you can use read_excel function to load the .xlsx (or .xls) file


We now know how to easily load an Excel file in R and can continue with learning more about the read_excel function.
Reading Specific Columns using read_excel
In this section, we are going to learn how to read specific columns from an Excel file using R. Note, here we will also use the read.xlsx function from the package xlsx.
- How to use %in% in R: 7 Example Uses of the Operator
- Learn How to Transpose a Dataframe or Matrix in R with the t() Function
Loading Specific Columns using read_excel in R
In this section, we are going to learn how to read certain columns from an Excel sheet using R. Reading only some columns from an Excel sheet may be good if we, for instance, have large xlsx files and we don’t want to read all columns in the Excel file. When using readxl and the read_excel function we will use the range parameter together with cell_cols.
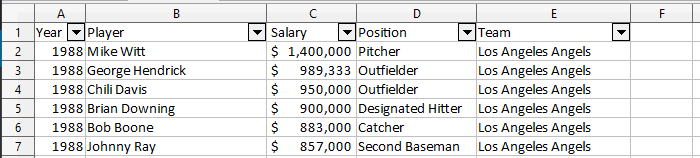
When using read.xlsx, to import Excel in R, we can use the parameter colIndex to select specific columns from the sheet. For example, if want to create a dataframe with the columns Player, Salary, and Position, we can accomplish this by adding 1, 3, and 4 in a vector:
require(xlsx)
cols <-  c(1, 2, 3)

df <- read.xlsx('MLBPlayerSalaries.xlsx',
                   sheetName='MLBPlayerSalaries', colIndex=cols)
head(df)Code language: R (r)
Handling Missing Data when we Import Excel File(s) in R
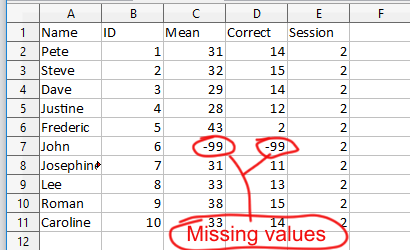
If someone has coded the data and used some kind of value to represent missing values in our dataset, we need to tell r, and the read_excel function, what these values are. In the next, R read Excel example, we are going to use the na parameter of the read_excel function. Here “-99” is what is codes as missing values.
Read Excel Example with Missing Data
In the example below, we are using the parameter na and we are putting in a character (i.e., “-99”):
df <- read_excel('SimData/example_sheets2.xlsx', 'Session2',
           na = '-99')

head(df, 6)Code language: R (r)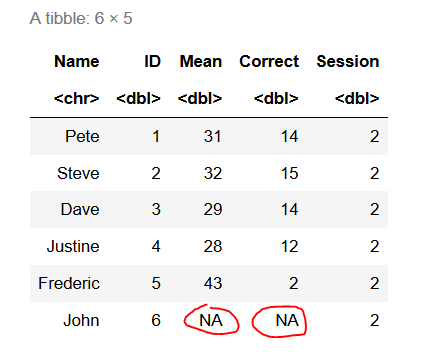
The example datasets we’ve used in the how to use R to read Excel files tutorial can be found here and here.
How to Skip Rows when Importing an xlsx File in R
In this section, we will learn how to skip rows when loading an Excel file into R. Here’s a link to the example xlsx file.
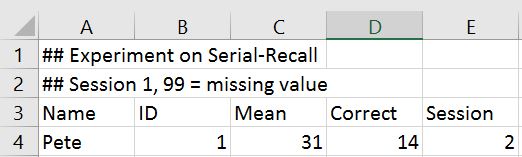
In the following, read xlsx in R examples we are going to use both read_excel and read.xlsx to read a specific sheet. Furthermore, we are also going to skip the first 2 rows in the Excel file.
Skip Rows using read_excel
Here, we will use the parameter sheet and put the characters ‘Session1’ to read the sheet named ‘Session1’. In a previous example, we just added the character ‘Session2’ to read that sheet.
Note, the first sheet will be read if we don’t use the sheet_name parameter. In this example, the important part is the parameter skiprow=2. We use this to skip the first two rows:
df <- read_excel('SimData/example_sheets.xlsx',
                 sheet='Session1', skip = 2)

head(df, 4)Code language: R (r)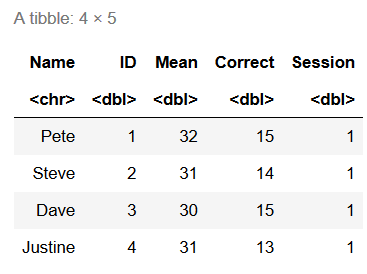
How to Skip Rows when Reading Excel Files in R using read.xlsx
When working with read.xlsx we use the startRow parameter to skip the first 2 rows in the Excel sheet.
df <- read.xlsx('SimData/example_sheets.xlsx',
                   sheetName='Session1', startRow=3)Code language: HTML, XML (xml)
Reading Multiple Excel Sheets in R
In this section of the R read excel tutorial, we are going to learn how to read multiple sheets into R dataframes.
There are two sheets: ‘Session1’, and ‘Session2, in the example xlsx file (example_sheets2.xlsx). In this file, each sheet has data from two experimental sessions.
We are now learning how to read multiple sheets using readxl. More specifically, we are going to read the sheets ‘Session1’ and ‘Session2’. First, we are going to use the function excel_sheets to print the sheet names:
xlsx_data <- "SimData/example_sheets.xlsx"

excel_sheets(path = xlsx_data)Code language: R (r)![]()
Now if we want to read all the existing sheets in an Excel document we create a variable, called sheet_names.
After we have created this variable we use the lapply function and loop through the list of sheets, use the read_excel function, and end up with the list of dataframes (excel_sheets):
sheet_names <- excel_sheets(path = xlsx_data)

excel_sheets <- lapply(sheet_names , function(x) read_excel(path = xlsx_data, sheet = x))

str(excel_sheets)Code language: R (r)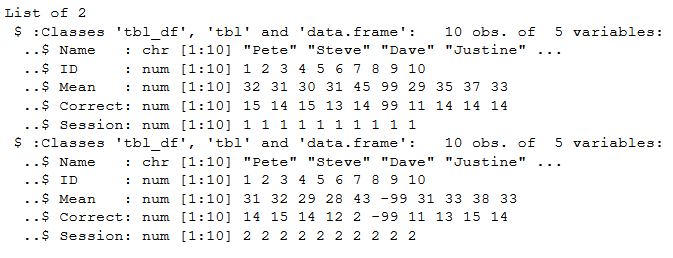
When working with Pandas read_excel w may want to join the data from all sheets (in this case sessions). Merging Pandas dataframes are quite easy. We just use the concat function and loop over the keys (i.e., sheets):
df <- do.call("rbind", excel_sheets)

head(df)Code language: R (r)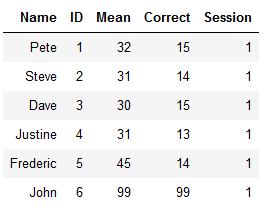
Again, there might be other tasks that we need to carry out. For instance, we can also create dummy variables in R.
Reading Many Excel Files in R
In this section of the R read excel tutorial, we will learn how to load many files into an R dataframe.
For example, in some cases, we may have a bunch of Excel files containing data from different experiments or experimental sessions. In the next example, we are going to work with read_excel, again, together with the lapply function.

However, this time we just have a character vector with the file names and then we also use the paste0 function to paste the subfolder where the files are.
xlsx_files <- c("example_concat.xlsx",
"example_concat1.xlsx",
"example_concat3.xlsx")
dataframes <- lapply(xlsx_files, function(x)
read_excel(path = paste0("simData/", x)))Code language: R (r)Finally, we use the do.call function, again, to bind the dataframes together to one. Note, if we want, we can also use, the bind_cols function from the r-package dplyr (part of tidyverse).
df <- do.call("rbind", dataframes)

tail(df)Code language: R (r)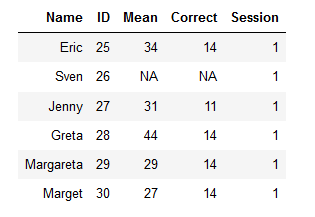
Note, if we want, we can also use, the bind_cols function from the r-package dplyr (part of tidyverse).
dplyr::bind_rows(dataframes)Code language: R (r)Reading all Files in a Directory in R
In this section, we are going to learn how to read all xlsx files in a directory. Knowing this may come in handy if we store every xlsx file in a folder and don’t want to create a character vector, like above, by hand. In the next example, we are going to use R’s Sys.glob function to get a character vector of all Excel files.
xlsx_files <- Sys.glob('./simData/*.xlsx')Code language: R (r)
After we have a character vector with all the file names that we want to import to R, we just use lapply and do.call (see previous code chunks).
Setting the Data type for data or columns
We can also, if we like, set the data type for the columns. Let’s use Pandas to read the example_sheets1.xlsx again. In the Pandas read_excel example below we use the dtype parameter to set the data type of some of the columns.
df <- read_excel('SimData/example_sheets2.xlsx',
                 col_types=c("text", "text", "numeric",
                            "numeric", "text"),
                   sheet='Session1')

str(df)Code language: R (r)
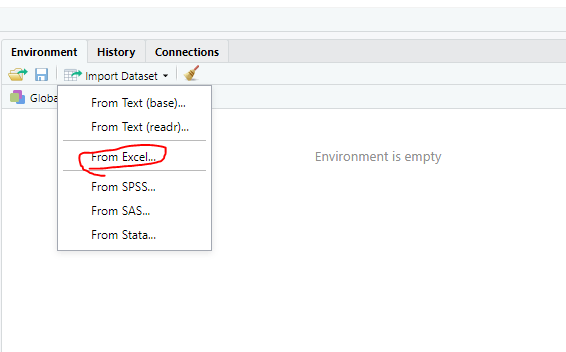
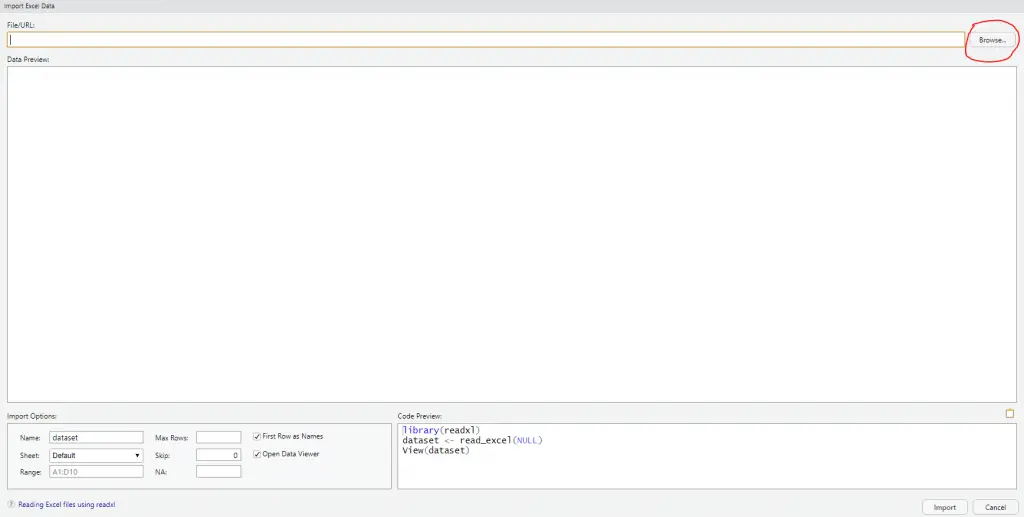
Importing Excel Files in RStudio
Before we continue this Excel in R tutorial, we are going to learn how to load xlsx files to R using RStudio. This is quite simple, open up RStudio, click on the Environment tab (right in the IDE), and then Import Dataset. That is, in this section, we will answer the question of how do I import an Excel file into RStudio?
Now we’ll get a dropdown menu and we can choose from different types of sources. As we are going to work with Excel files we choose “From Excel…”:
In the next step, we klick “Browse” and go to the folder where our Excel data is located.
Now we get some alternatives. For instance, we can change the name of the dataframe to “df”, if we want (see image below). Furthermore, before we import the Excel file in RStudio we can also specify how the missing values are coded as well as rows to skip.
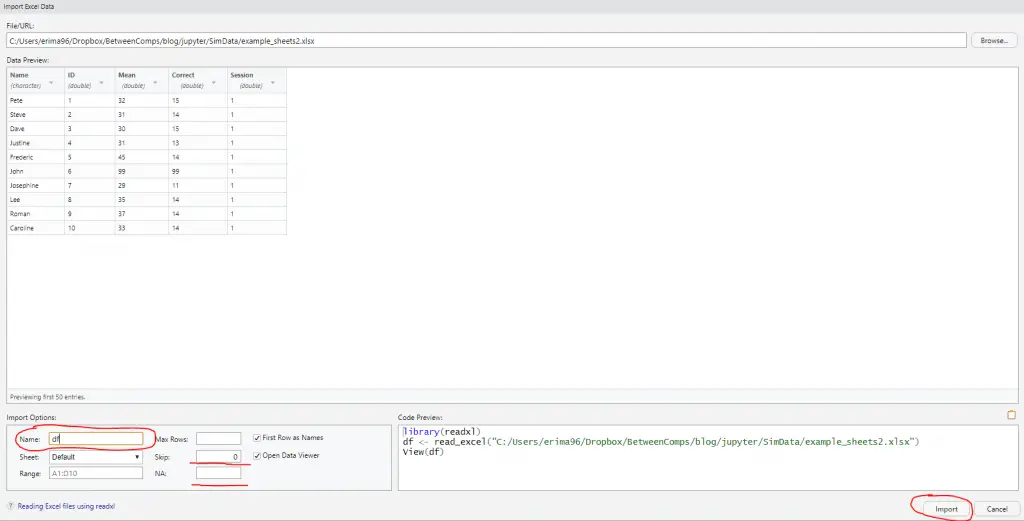
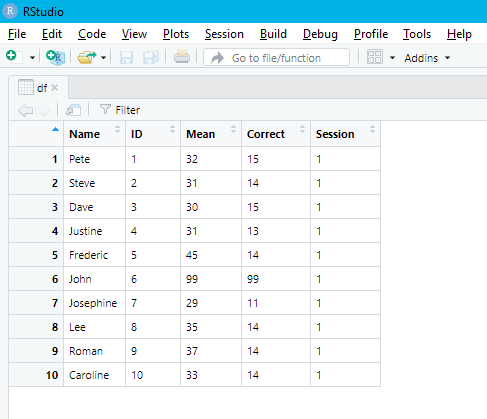
Finally, when we have set everything as we want we can hit the Import button in RStudio to read the datafile.
Writing R Dataframes to Excel
Excel files can, of course, be created in R. In this section, we will learn how to write an Excel file using R. As for now, we have to use the r-package xlsx to write .xlsx files. More specifically, to write to an Excel file we will use the write.xlsx function:

We will start by creating a dataframe with some variables.
df <- data.frame("Age" = c(21, 22, 20, 19, 18, 23), "Names" = c("Andreas", "George", "Steve",
                           "Sarah", "Joanna", "Hanna"))


str(df)Code language: R (r)
Now that we have a dataframe to write to xlsx we start by using the write.xlsx function from the xlsx package.
library(xlsx)
write.xlsx(df, 'names_ages.xlsx',
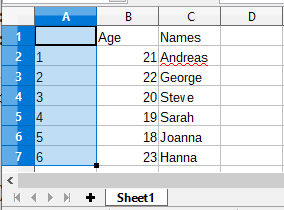
sheetName = "Sheet1"Code language: R (r)In the output below the effect of not using any parameters is evident. If we don’t use the parameter sheetName we get the default sheet name, ‘Sheet1’.
As can be noted in the image below, the Excel file has column (‘A’) containing numbers. These are the index from the dataframe.
In the next example we are going to give the sheet another name and we will set the row.names parameter to FALSE.
write.xlsx(df, 'names_ages.xlsx',
           sheetName = "Names and Ages",
          row.names=FALSE)Code language: R (r)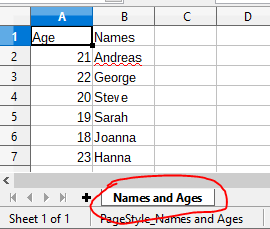
As can be seen, in the image above, we get a new sheet name and we don’t have the indexes as a column in the Excel sheet. Note, if you get the error ‘could not find function “write.xlsx”‘ it may be that you did not load the xlsx library.
Writing Multiple Pandas Dataframes to an Excel File:
In this section, we are going to learn how to write multiple dataframes to one Excel file. More specifically, we will use R and the xlsx package to write many dataframes to multiple sheets in an Excel file.
First, we start by creating three dataframes and add them to a list.
df1 <-data.frame('Names' = c('Andreas', 'George', 'Steve',
'Sarah', 'Joanna', 'Hanna'),
'Age' = c(21, 22, 20, 19, 18, 23))
df2 <- data.frame('Names' = c('Pete', 'Jordan', 'Gustaf',
'Sophie', 'Sally', 'Simone'),
'Age' = c(22, 21, 19, 19, 29, 21))
df3 <- data.frame('Names' = c('Ulrich', 'Donald', 'Jon',
'Jessica', 'Elisabeth', 'Diana'),
'Age' = c(21, 21, 20, 19, 19, 22))
dfs <- list(df1, df2, df3)Code language: R (r)Next, we are going to create a workbook using the createWorkbook function.
wb <- createWorkbook(type="xlsx")Code language: R (r)Finally, we are going to write a custom function that we are going to use together with the lapply function, later. In the code chunk below,
add_dataframes <- function(i){

    df = dfs[i]
    sheet_name = paste0("Sheet", i)
    sheet = createSheet(wb, sheet_name)

    addDataFrame(df, sheet=sheet, row.names=FALSE)
}Code language: R (r)
It’s time to use the lapply function with our custom R function. On the second row, in the code chunk below, we are writing the workbook to an xlsx file using the saveWorkbook function:
lapply(seq_along(dfs), function(x) multiple_dataframe(x))saveWorkbook(wb, 'multiple_Sheets.xlsx')Code language: R (r)Summary: How to Work With Excel Files in R
In this working with Excel in R tutorial we have learned how to:
- Read Excel files and Spreadsheets using read_excel and read.xlsx
- Load Excel files to dataframes:
- Import Excel sheets and skip rows
- Merging many sheets to a dataframe
- Reading many Excel files into one dataframe
- Load Excel files to dataframes:
- Write a dataframe to an Excel file
- Creating many dataframes and writing them to an Excel file with many sheets
How to Remove Read Only From Excel File: Step-by-Step (2023)
Read-Only Excel files are sensitive to changes.
It indicates that the file is for viewing purposes only and that any changes are discouraged. This means you cannot readily edit a Read-Only Excel file.
And, at times, the Read Only restrictions of an Excel file might become annoying. So you may want to get rid of them. 😑
The article below discusses several ways how you may remove the read-only settings from an Excel workbook.
Here is our free sample workbook for you to download and practice along with the guide.
What is read-only in Excel?
If you are an Excel user, you must’ve come across the ‘Read Only’ pop-up.
It appears as soon as an Excel file is launched and is used to warn the users that the file is for viewing purposes only.
And that any edits, amendments, or deletions should be avoided. However, if a file is marked as read-only, it is not impossible to edit.
You can still edit it by removing the read-only restrictions. There are many ways how you can do it and we’re going to explore them all.
How to change Excel file from read-only
Read-only pop-ups are very common (and sometimes, very annoying too).
There are two ways how can remove the read-only settings from an Excel file.
1. Edit Anyway
If your file is set to Read Only, it will show a pop-up or a notification when opened.
Click the ‘Edit Anyway’ button to remove the ‘Read Only’ settings.

Once you click this button, the pop-up is now removed.

Note how the [Read-Only] tag from the name of the file is also removed.
This means your Excel sheet now no more has a Read Only status and is editable.
2. Save As a new file
When you have a file with a Read-Only restriction, save it as follows.
- Go to File > Save As.

- This launches the ‘Save As’ dialog box.

- Click on the Tools > ‘General Options’ button.

- From the General options dialog box, uncheck the Read Only Restriction.

Click Okay, and you’re good to go.
- Select the location where you’d want the file to be saved.
- Launch the file from that location again. And it would no longer have the Read Only restriction. 🤩
Remove read-only on file protected by ‘Mark as final’
If a file is marked as final, it will show a pop-up upon being opened.

To Remove this read-only, click on Edit Anyway.

This removes the Read-Only settings. The file is now editable, and you can begin editing it.
Pro Tip!
How do you mark a file as final?
It’s easy. Go to File > Info > Protect > Protect Workbook > Mark as Final
Anyone who tries to open this Excel file would be shown a pop-up. The pop-up tells them that the file is read-only and editing is discouraged.
File property set to ‘Open as read-only recommended’
For some files, the properties have been set to ‘Open as read-only recommended’.
So can you not edit such files? You can.
1. The Edit Workbook Option:
- One way to remove the Read Only mode from such files is to launch the file.
- Excel gives a prompt upon opening the file.
- Select Enable editing from there to disable the Read Only mode.

2. The File Properties
- Another method could be to right-click the file (without having launched it).
- From the context menu that then launches, click on ‘Properties’.

- Go to General > Attributes > Uncheck the Read-Only button.

- Click Okay, and now launch the workbook.
- Excel would now not pose any Read Only restriction on launching the file.
Open file as read-only because of workbook protection
You must have heard of Password protected sheets or workbooks. Spreadsheets that contain confidential data often come together with password protection or read-only restrictions.
If you want your Excel files to be accessed only under the Read Only mode, do it here.
- Go to file > Info > Protect

- Go to Protect Workbook > Always Open Read Only.

- Save the change by pressing the Control key together with the S key.
Once these settings are applied, the workbook will be protected. Now, every time this workbook is accessed, it will give a Read Only prompt.
Viewers can view in under Read-Only mode unless enabled for editing.
How to make an Excel file read-only
Until now, we have seen several methods of disabling the Read Only mode from an Excel file.
Now is the time we see how you may enable the Read-Only settings for your Excel file.
- Open your Excel document.
- Go to File > Save As.

- This launches the ‘Save As’ dialog box.

- Click on the Tools > ‘General Options’ button

- From the General options dialog box, check the Read Only Restriction.

Click Okay, and you’re good to go.
- Select the location where you’d want the file to be saved.
- Launch the file from that location again.
- This time it will give back a user prompt that the file is Read Only.

The Read-Only settings only present the user with an option to open the file in Read-Only mode or not. And it only takes an ‘Edit Anyway’ button click to make the file editable.
Read-Only restriction doesn’t really help you protect your spreadsheet from editing.
That’s it – Now what?
Excel allows users to place many security settings in place to protect their Excel files.
While it gives a secure edge to the owner of the file, such settings might be annoying for the users.
The above article teaches you how to enable and disable ‘Read Only’ settings from a specific file, and a final marked file. We have covered almost all the possible ways how you may get rid of the Read Only restriction of an Excel file.
To learn more about this smart spreadsheet software, try learning some core Excel functions. These include the VLOOKUP, SUMIF, and IF functions.
My free 30-minutes email course is only a click away and will teach you these and many more functions in no time.
Kasper Langmann2023-01-19T12:22:01+00:00
Page load link
Given the proliferation of different ways to read an Excel file in R and the plethora of answers here, I thought I’d try to shed some light on which of the options mentioned here perform the best (in a few simple situations).
I myself have been using xlsx since I started using R, for inertia if nothing else, and I recently noticed there doesn’t seem to be any objective information about which package works better.
Any benchmarking exercise is fraught with difficulties as some packages are sure to handle certain situations better than others, and a waterfall of other caveats.
That said, I’m using a (reproducible) data set that I think is in a pretty common format (8 string fields, 3 numeric, 1 integer, 3 dates):
set.seed(51423)
data.frame(
  str1 = sample(sprintf("%010d", 1:NN)), #ID field 1
  str2 = sample(sprintf("%09d", 1:NN)),  #ID field 2
  #varying length string field--think names/addresses, etc.
  str3 =
    replicate(NN, paste0(sample(LETTERS, sample(10:30, 1L), TRUE),
                         collapse = "")),
  #factor-like string field with 50 "levels"
  str4 = sprintf("%05d", sample(sample(1e5, 50L), NN, TRUE)),
  #factor-like string field with 17 levels, varying length
  str5 =
    sample(replicate(17L, paste0(sample(LETTERS, sample(15:25, 1L), TRUE),
                                 collapse = "")), NN, TRUE),
  #lognormally distributed numeric
  num1 = round(exp(rnorm(NN, mean = 6.5, sd = 1.5)), 2L),
  #3 binary strings
  str6 = sample(c("Y","N"), NN, TRUE),
  str7 = sample(c("M","F"), NN, TRUE),
  str8 = sample(c("B","W"), NN, TRUE),
  #right-skewed integer
  int1 = ceiling(rexp(NN)),
  #dates by month
  dat1 =
    sample(seq(from = as.Date("2005-12-31"),
               to = as.Date("2015-12-31"), by = "month"),
           NN, TRUE),
  dat2 =
    sample(seq(from = as.Date("2005-12-31"),
               to = as.Date("2015-12-31"), by = "month"),
           NN, TRUE),
  num2 = round(exp(rnorm(NN, mean = 6, sd = 1.5)), 2L),
  #date by day
  dat3 =
    sample(seq(from = as.Date("2015-06-01"),
               to = as.Date("2015-07-15"), by = "day"),
           NN, TRUE),
  #lognormal numeric that can be positive or negative
  num3 =
    (-1) ^ sample(2, NN, TRUE) * round(exp(rnorm(NN, mean = 6, sd = 1.5)), 2L)
)
I then wrote this to csv and opened in LibreOffice and saved it as an .xlsx file, then benchmarked 4 of the packages mentioned in this thread: xlsx, openxlsx, readxl, and gdata, using the default options (I also tried a version of whether or not I specify column types, but this didn’t change the rankings).
I’m excluding RODBC because I’m on Linux; XLConnect because it seems its primary purpose is not reading in single Excel sheets but importing entire Excel workbooks, so to put its horse in the race on only its reading capabilities seems unfair; and xlsReadWrite because it is no longer compatible with my version of R (seems to have been phased out).
I then ran benchmarks with NN=1000L and NN=25000L (resetting the seed before each declaration of the data.frame above) to allow for differences with respect to Excel file size. gc is primarily for xlsx, which I’ve found at times can create memory clogs. Without further ado, here are the results I found:
1,000-Row Excel File
benchmark1k <-
  microbenchmark(times = 100L,
                 xlsx = {xlsx::read.xlsx2(fl, sheetIndex=1); invisible(gc())},
                 openxlsx = {openxlsx::read.xlsx(fl); invisible(gc())},
                 readxl = {readxl::read_excel(fl); invisible(gc())},
                 gdata = {gdata::read.xls(fl); invisible(gc())})

# Unit: milliseconds
#      expr       min        lq      mean    median        uq       max neval
#      xlsx  194.1958  199.2662  214.1512  201.9063  212.7563  354.0327   100
#  openxlsx  142.2074  142.9028  151.9127  143.7239  148.0940  255.0124   100
#    readxl  122.0238  122.8448  132.4021  123.6964  130.2881  214.5138   100
#     gdata 2004.4745 2042.0732 2087.8724 2062.5259 2116.7795 2425.6345   100
So readxl is the winner, with openxlsx competitive and gdata a clear loser. Taking each measure relative to the column minimum:
#       expr   min    lq  mean median    uq   max
# 1     xlsx  1.59  1.62  1.62   1.63  1.63  1.65
# 2 openxlsx  1.17  1.16  1.15   1.16  1.14  1.19
# 3   readxl  1.00  1.00  1.00   1.00  1.00  1.00
# 4    gdata 16.43 16.62 15.77  16.67 16.25 11.31
We see my own favorite, xlsx is 60% slower than readxl.
25,000-Row Excel File
Due to the amount of time it takes, I only did 20 repetitions on the larger file, otherwise the commands were identical. Here’s the raw data:
# Unit: milliseconds
#      expr        min         lq       mean     median         uq        max neval
#      xlsx  4451.9553  4539.4599  4738.6366  4762.1768  4941.2331  5091.0057    20
#  openxlsx   962.1579   981.0613   988.5006   986.1091   992.6017  1040.4158    20
#    readxl   341.0006   344.8904   347.0779   346.4518   348.9273   360.1808    20
#     gdata 43860.4013 44375.6340 44848.7797 44991.2208 45251.4441 45652.0826    20
Here’s the relative data:
#       expr    min     lq   mean median     uq    max
# 1     xlsx  13.06  13.16  13.65  13.75  14.16  14.13
# 2 openxlsx   2.82   2.84   2.85   2.85   2.84   2.89
# 3   readxl   1.00   1.00   1.00   1.00   1.00   1.00
# 4    gdata 128.62 128.67 129.22 129.86 129.69 126.75
So readxl is the clear winner when it comes to speed. gdata better have something else going for it, as it’s painfully slow in reading Excel files, and this problem is only exacerbated for larger tables.
Two draws of openxlsx are 1) its extensive other methods (readxl is designed to do only one thing, which is probably part of why it’s so fast), especially its write.xlsx function, and 2) (more of a drawback for readxl) the col_types argument in readxl only (as of this writing) accepts some nonstandard R: "text" instead of "character" and "date" instead of "Date".
- Preleminary tasks
- Copying data from Excel and import into R
- On Windows system
- On Mac OSX system
- Importing Excel files into R using readxl package
- Installing and loading readxl package
- Using readxl package
- Importing Excel files using xlsx package
- Installing and loading xlsx package
- Using xlsx package
- Read more
- Summary
- Related articles
- Infos
Previously, we described the essentials of R programming and some best practices for preparing your data. We also provided quick start guides for reading and writing txt and csv files using R base functions as well as using a most modern R package named readr, which is faster (X10) than R base functions.
In this article, you’ll learn how to read data from Excel xls or xlsx file formats into R. This can be done either by:
- copying data from Excel
- using readxl package
- or using xlsx package
Preleminary tasks
-
Launch RStudio as described here: Running RStudio and setting up your working directory
-
Prepare your data as described here: Best practices for preparing your data
Copying data from Excel and import into R
On Windows system
-
Open the Excel file containing your data: select and copy the data (ctrl + c)
-
Type the R code below to import the copied data from the clipboard into R and store the data in a data frame (my_data):
my_data <- read.table(file = "clipboard",
                      sep = "t", header=TRUE)
On Mac OSX system
-
Select and copy the data (Cmd + c)
-
Use the function pipe(pbpaste) to import the data you’ve copied (with Cmd + c):
my_data <- read.table(pipe("pbpaste"), sep="t", header = TRUE)Importing Excel files into R using readxl package
The readxl package, developed by Hadley Wickham, can be used to easily import Excel files (xls|xlsx) into R without any external dependencies.
Installing and loading readxl package
- Install
install.packages("readxl")- Load
library("readxl")Using readxl package
The readxl package comes with the function read_excel() to read xls and xlsx files
- Read both xls and xlsx files
# Loading
library("readxl")
# xls files
my_data <- read_excel("my_file.xls")
# xlsx files
my_data <- read_excel("my_file.xlsx")
The above R code, assumes that the file “my_file.xls” and “my_file.xlsx” is in your current working directory. To know your current working directory, type the function getwd() in R console.
- It’s also possible to choose a file interactively using the function file.choose(), which I recommend if you’re a beginner in R programming:
my_data <- read_excel(file.choose())If you use the R code above in RStudio, you will be asked to choose a file.
- Specify sheet with a number or name
# Specify sheet by its name
my_data <- read_excel("my_file.xlsx", sheet = "data")

# Specify sheet by its index
my_data <- read_excel("my_file.xlsx", sheet = 2)- Case of missing values: NA (not available). If NAs are represented by something (example: “—”) other than blank cells, set the na argument:
my_data <- read_excel("my_file.xlsx", na = "---")Importing Excel files using xlsx package
The xlsx package, a java-based solution, is one of the powerful R packages to read, write and format Excel files.
Installing and loading xlsx package
- Install
install.packages("xlsx")- Load
library("xlsx")Using xlsx package
There are two main functions in xlsx package for reading both xls and xlsx Excel files: read.xlsx() and read.xlsx2() [faster on big files compared to read.xlsx function].
The simplified formats are:
read.xlsx(file, sheetIndex, header=TRUE)
read.xlsx2(file, sheetIndex, header=TRUE)- file: file path
- sheetIndex: the index of the sheet to be read
- header: a logical value. If TRUE, the first row is used as column names.
Example of usage:
library("xlsx")
my_data <- read.xlsx(file.choose(), 1)  # read first sheet
Summary
-
Read Excel files using readxl package: read_excel(file.choose(), sheet = 1)
- Read Excel files using xlsx package: read.xlsx(file.choose(), sheetIndex = 1)
Related articles
- Previous chapters
- R programming basics
- Best practices in preparing data files for importing into R
- Reading data from txt|csv files: R base functions
- Fast Reading of Data From txt|csv Files into R: readr package
- Next chapters
- Exporting data from R
Infos
This analysis has been performed using R (ver. 3.2.3).
Enjoyed this article? I’d be very grateful if you’d help it spread by emailing it to a friend, or sharing it on Twitter, Facebook or Linked In.
Show me some love with the like buttons below… Thank you and please don’t forget to share and comment below!!
Avez vous aimé cet article? Je vous serais très reconnaissant si vous aidiez à sa diffusion en l’envoyant par courriel à un ami ou en le partageant sur Twitter, Facebook ou Linked In.
Montrez-moi un peu d’amour avec les like ci-dessous … Merci et n’oubliez pas, s’il vous plaît, de partager et de commenter ci-dessous!
Работа с файлами Excel
Многие пакеты в R взаимодействуют с Microsoft Excel.
Пакет readxl
Для начала установим и загрузим пакет readxl.
#install.packages('readxl')
library('readxl')
Рассмотрим 2 функции в этом пакете:
excel_sheetsread_excel
Функция excel_sheets()
Пропишем один раз путь к файлу для удобства:
path = '/home/ahmedushka/GitHub/R/docs/scripts/semester_2_data_analysis/sem_2/exchange_rate.xlsx'У функции excel_sheets() на вход идёт один аргумент: путь к файлу. Если файл находится в директории, то его название.
[
excel_sheets(«data.xlsx»»)
]
Данная функция показывает нам какие листы есть в нашем excel файле. Это очень удобно: поонять структуру excel файла.
## Error: `path` does not exist: '/home/ahmedushka/GitHub/R/docs/scripts/semester_2_data_analysis/sem_2/exchange_rate.xlsx'Функция read_excel()
У этой функции есть 1 обязательный аргумент: путь к файлу. Посмотрим, что сделает функция, когда у нас имеется 2 листа.
[
data <- read_excel(«data.xlsx», sheet = «my_sheet»)
]
data_1 <- read_excel(path)## Error: `path` does not exist: '/home/ahmedushka/GitHub/R/docs/scripts/semester_2_data_analysis/sem_2/exchange_rate.xlsx'## Error in head(data_1): объект 'data_1' не найденКак мы видим данная функция импортировала нам только 1-ый лист. Чтобы подгрузить какой-то другой лист используем необязательный аргумент sheet.
data_2 <- read_excel(path, sheet = 2)## Error: `path` does not exist: '/home/ahmedushka/GitHub/R/docs/scripts/semester_2_data_analysis/sem_2/exchange_rate.xlsx'## Error in head(data_2): объект 'data_2' не найденdata_2 <- read_excel(path, sheet = "EUR")## Error: `path` does not exist: '/home/ahmedushka/GitHub/R/docs/scripts/semester_2_data_analysis/sem_2/exchange_rate.xlsx'## Error in head(data_2): объект 'data_2' не найденЧтобы удобно хранить все листы в одном месте, можно использовать функцию list:
data <- list(data_1, data_2)## Error in eval(expr, envir, enclos): объект 'data_1' не найден## function (..., list = character(), package = NULL, lib.loc = NULL, verbose = getOption("verbose"),
## envir = .GlobalEnv, overwrite = TRUE)Комбинируем функции excel_sheets() и read_excel() с помощью lapply()
Представьте, что у вас есть файл, в котором 10 листов. Писать 10 строчек с подгрузкой каждого листа это нудно. Но у нас есть функция lapply!
data <- lapply(excel_sheets(path), read_excel, path = path)## Error: `path` does not exist: '/home/ahmedushka/GitHub/R/docs/scripts/semester_2_data_analysis/sem_2/exchange_rate.xlsx'## function (..., list = character(), package = NULL, lib.loc = NULL, verbose = getOption("verbose"),
## envir = .GlobalEnv, overwrite = TRUE)Более детально разберёмся с read_excel()
На самом деле у функции read_excel есть и другие аргументы:
[
data <- read_excel(«data.xlsx», sheet = «my_sheet», col_names = TRUE, col_types = NULL, skip = 0)
]
col_names— есть ли названия столбцов в excel файле (попробовать поставитьFALSE) или можно сразу их задаватьcol_names = c('Name', 'Population').col_types— можем вручную задавать тип переменных в столбце(например:col_types('text', 'text').skip— пропускает какое-то количество строк. Если используем, то нужно указать название столбцов илиFALSE.
Пакет gdata
Для начала подгрузим пакет:
#install.packages('gdata')
library('gdata')
Функция read.xls()
Схемка как это работает через read.csv()
Файл с расширением *.xls — это формат всех файлов версии Excel 2003 и раньше. Он имеет меньше возможностей, работает медленнее.
Файл с расширением *.xlsx — это формат подавляющего большинства файлов Excel на настоящий момент, используется начиная с версии Microsoft Office 2007.
## Error in xls2sep(xls, sheet, verbose = verbose, ..., method = method, : Intermediate file '/var/folders/yg/vflc3lc17m7d29qfq34cj8vr0000gn/T//Rtmp6f3Ksr/file4ee4939a4cf.csv' missing!## Error in file.exists(tfn): неправильный аргумент 'file'Работает через read.csv , следовательно параметры такие же как и там:
data <- read.xls(path, sheet = 2,
                      skip = 50, header = FALSE, stringsAsFactors = FALSE,
                      col.names = c('Date', 'USD/RUB'))
## Error in xls2sep(xls, sheet, verbose = verbose, ..., method = method, : Intermediate file '/var/folders/yg/vflc3lc17m7d29qfq34cj8vr0000gn/T//Rtmp6f3Ksr/file4ee3d46cf90.csv' missing!## Error in file.exists(tfn): неправильный аргумент 'file'Пакет XLConnect
Особенности пакета:
- Работа в excel через R.
- Мост между R и excel.
- Поддержка xls и xlsx.
- Простой функционал
- Можно записывать формулы Excel.
Чтобы пользоваться возможностями данного пакета, нужно уставновить Java.
Установим пакет:
# install.packages("XLConnect")
library("XLConnect")
Функция loadWorkbook()
Эта функция создаёт “мост” между файлом Excel и R.
book <- loadWorkbook(path)
str(book)
print(class(book))
Функция getSheets()
Показывает список листов в файле.
Функция readWorksheet
Импортирует определенный лист
readWorksheet(book, sheet = 2)Краткая инструкция:
my_book <- loadWorkbook("urbanpop.xlsx")
sheets <- getSheets(my_book)
all <- lapply(sheets, readWorksheet, object = my_book)
str(all)
# startCol и endCol:(ПОДГРУЗКА ОПРЕДЕЛЕННЫХ СТОЛБЦОВ)
urbanpop_sel <- readWorksheet(my_book, sheet = 2, startCol = 3, endCol = 5)
Изменение листов
Предположим у нас есть новые данные. Пусть пока будет cars.
Функция createSheet()
Создаем лист в нашем файле Excel:
book <- loadWorkbook(path)
createSheet(book, name = 'cars')
Функция writeWorksheet()
Заполняет наш лист.
book <- loadWorkbook(path)
createSheet(book, name = 'cars')
writeWorksheet(book, cars, sheet = "cars")
Функция saveWorkbook()
Сохраняет наши изменения:
book <- loadWorkbook(path)
createSheet(book, name = 'cars')
writeWorksheet(book, cars, sheet = "cars")
saveWorkbook(book, file = "exchange_rate2.xlsx")
Функция renameSheet()
Меняет название листов в Excel:
renameSheet(book, 'cars', 'Данные о машинках')
saveWorkbook(book, file = "exchange_rate3.xlsx")
Функция removeSheet()
Удаляет лист в Excel:
removeSheet(book, sheet = 'Данные о машинках')
saveWorkbook(book, file = "exchange_rate4.xlsx")
Базы данных SQL
Подключение и базовые функции
Есть много пакетов для работы с базами данных:
- MySQL: пакет
RMySQL - PostgresSQL: пакет
RPostgresSQL - Oracle: пакет
ROracle
Эти пакеты – это реализации. Нужен так же пакет DBI, который будет являться “интерфейсом”. Если установить пакет RMySQL, то установится и пакет DBI.
# install.packages('RMySQL')
library(RMySQL)
В первую очередь нужно подключиться к базе данных, то есть создать соединение с ней. Давайте подключимся к учебной базе данных, которую предоставляет Datacamp.
con <- dbConnect(RMySQL::MySQL(), # тип базы данных
                 dbname = "company",
                 host = "courses.csrrinzqubik.us-east-1.rds.amazonaws.com",
                 port = 3306,
                 user = "student",
                 password = "datacamp")
con
Прежде чем работать с таблицами, давайте посмотрим какие доступны нам.
А теперь прочитаем табличку employees.
dbReadTable(con, "employees")Можно также создавать и удалять таблички. Или изменять текущие, но мы сейчас говорим об импорте.
Хорошим тоном является закрытие соединения с базой данных.
Запросы
Подгружать такую маленькую табличку очень удобно, но что если у нас миллионы наблюдений? Нам скорее не нужна вся табличка, а нужна какая-то часть. Можно выгрузить часть информации с помощью запросов.
Допустим, мы хотим получить имена работников, которые начали работать после первого сентября 2012 года. Сделаем соответсвующий запрос.
dbGetQuery(con, "SELECT name FROM employees WHERE started_at > '2012-09-01' ")Попробуем еще один запрос.
dbGetQuery(con, "SELECT * FROM products WHERE contract=1")Также имеются функции dbSendQuery(),dbFetch() и dbClearResult(). С помощью которых можно извлекать данные кусками.
SPSS, STATA и SAS
STATA
Для загрузки файлов STATA (файлы с расширением .dta) потребуется библиотека foreign.
# install.packages("foreign")
library(foreign)
Теперь загрузим dta-файл.
stata_data <- read.dta("example.dta")SPSS
Для загрузки файлов SPSS (файлы с расширением .sav) потребуется библиотека Hmisc.
# install.packages("Hmisc")
library(Hmisc)
Загрузим sav-файл.
sav_data <- spss.get("example.sav")Еще немного пакетов для импорта
data.table— функцияfreadеще быстрее пакетаreadr.haven— читает файлы приложений SPSS, Stata и SAS.DBI— позволяет взаимодействовать с базами данных.jsonlite— для работы с форматом JSON.xml— для работы с форматом XML.rio— для работы с огромным типом файлов.
Excel is the most popular spreadsheet software used to store tabular data. So, it’s important to be able to efficiently import and export data from these files.
R’s xlsx package makes it easy to read, write, and format excel files.
The xlsx Package
The xlsx package provides necessary tools to interact with both .xls or .xlsx format files from R.
In order to get started you first need to install and load the package.
# Install and load xlsx package
install.packages("xlsx")
library("xlsx")
Read an Excel file
Suppose you have the following Excel file.

You can read the contents of an Excel worksheet using the read.xlsx() or read.xlsx2() function.
The read.xlsx() function reads the data and creates a data frame.
# Read the first excel worksheet
library(xlsx)
mydata <- read.xlsx("mydata.xlsx", sheetIndex=1)
mydata
  name age       job     city
1  Bob  25   Manager  Seattle
2  Sam  30 Developer New York
3  Amy  20 Developer  Houston
read.xlsx() vs read.xlsx2()
Both the functions work exactly the same except, read.xlsx() is slow for large data sets (worksheet with more than 100 000 cells).
On the contrary, read.xlsx2() is faster on big files.
Specify a File Name
When you specify the filename only, it is assumed that the file is located in the current folder. If it is somewhere else, you can specify the exact path that the file is located at.
Remember! While specifying the exact path, characters prefaced by (like n r t etc.) are interpreted as special characters.
You can escape them using:
- Changing the backslashes to forward slashes like:
"C:/data/myfile.xlsx" - Using the double backslashes like:
"C:\data\myfile.xlsx"
# Specify absolute path like this
mydata <- read.csv("C:/data/mydata.xlsx")

# or like this
mydata <- read.csv("C:\data\mydata.xlsx")
Specify Worksheet
When you use read.xlsx() function, along with a filename you also need to specify the worksheet that you want to import data from.
To specify the worksheet, you can pass either an integer indicating the position of the worksheet (for example, sheetIndex=1) or the name of the worksheet (for example, sheetName="Sheet1" )
The following two lines do exactly the same thing; they both import the data in the first worksheet (called Sheet1):
mydata <- read.xlsx("mydata.xlsx", sheetIndex = 1)

mydata <- read.xlsx("mydata.xlsx", sheetIndex = "Sheet1")
Import the Data as is
The read.xlsx() function automatically coerces character data into a factor (categorical variable). You can see that by inspecting the structure of your data frame.
# By default, character data is coerced into a factor
mydata <- read.xlsx("mydata.xlsx", sheetIndex = 1)
str(mydata)
'data.frame':	3 obs. of  4 variables:
 $ name: Factor w/ 3 levels "Amy","Bob","Sam": 2 3 1
 $ age : num  25 30 20
 $ job : Factor w/ 2 levels "Developer","Manager": 2 1 1
 $ city: Factor w/ 3 levels "Houston","New York",..: 3 2 1
If you want your data interpreted as string rather than a factor, set the stringsAsFactors parameter to FALSE.
# Set stringsAsFactors parameter to TRUE to interpret the data as is
mydata <- read.xlsx("mydata.xlsx",
                    sheetIndex = 1,
                    stringsAsFactors = FALSE)
str(mydata)
'data.frame':	3 obs. of  4 variables:
 $ name: chr  "Bob" "Sam" "Amy"
 $ age : num  25 30 20
 $ job : chr  "Manager" "Developer" "Developer"
 $ city: chr  "Seattle" "New York" "Houston"
Read Specific Range
If you want to read a range of rows, specify the rowIndex argument.
# Read first three lines of a file
mydata <- read.xlsx("mydata.xlsx",
                    sheetIndex = 1,
                    rowIndex = 1:3)
mydata
  name age       job     city
1  Bob  25   Manager  Seattle
2  Sam  30 Developer New York
If you want to read a range of columns, specify the colIndex argument.
# Read first two columns of a file
mydata <- read.xlsx("mydata.xlsx",
                    sheetIndex = 1,
                    colIndex = 1:2)
mydata
  name age
1  Bob  25
2  Sam  30
3  Amy  20
Specify Starting Row
Sometimes the excel file (like the file below) may contain notes, comments, headers, etc. at the beginning which you may not want to include.
To start reading data from a specified row in the excel worksheet, pass startRow argument.

# Read excel file from third row
mydata <- read.xlsx("mydata.xlsx",
                    sheetIndex = 1,
                    startRow = 3)
mydata
  name age       job     city
1  Bob  25   Manager  Seattle
2  Sam  30 Developer New York
3  Amy  20 Developer  Houston
Write Data to an Excel File
To write to an existing file, use write.xlsx() method and pass the data in the form of matrix or data frame.
# Export data from R to an excel workbook
df
  name age       job     city
1  Bob  25   Manager  Seattle
2  Sam  30 Developer New York
3  Amy  20 Developer  Houston

write.xlsx(df, file = "mydata.xlsx")

Notice that the write.xlsx() function prepends each row with a row name by default. If you don’t want row labels in your excel file, set row.names to FALSE.
# Remove row labels while writing an excel File
write.xlsx(df, file="mydata.xlsx",
           row.names = FALSE)
To set the name of the current worksheet, specify sheetName argument.
# Rename current worksheet
write.xlsx(df, file="mydata.xlsx",
           row.names = FALSE,
           sheetName = "Records")

Add Multiple Datasets at once
To add multiple data sets in the same Excel workbook, you have to set the append argument to TRUE.
# Write the first data set
write.xlsx(iris, file = "mydata.xlsx",
           sheetName = "IRIS", append = FALSE)

# Add a second data set
write.xlsx(mtcars, file = "mydata.xlsx",
           sheetName = "CARS", append = TRUE)

# Add a third data set
write.xlsx(Titanic, file = "mydata.xlsx",
           sheetName = "TITANIC", append = TRUE)

Create and Format an Excel Workbook
Sometimes you may wish to create a .xlsx file with some formatting. With the help of xlsx package, you can edit titles, borders, column width, format data table, add plot and much more.
The following example shows how to do so:
Step 1. Create a new excel workbook
You can create a new workbook using the createWorkbook() function.
# create new workbook
wb <- createWorkbook()
Step 2. Define cell styles for formatting the workbook
In R, using the CellStyle() function you can create your own cell styles to change the appearance of, for example:
- The sheet title
- The row and column names
- Text alignment for the columns
- Cell borders around the columns
# define style for title
title_style <- CellStyle(wb) +
  Font(wb, heightInPoints = 16,
       isBold = TRUE)

# define style for row and column names
rowname_style <- CellStyle(wb) +
  Font(wb, isBold = TRUE)
colname_style <- CellStyle(wb) +
  Font(wb, isBold = TRUE) +
  Alignment(wrapText = TRUE, horizontal = "ALIGN_CENTER") +
  Border(color = "black",
         position =c("TOP", "BOTTOM"),
         pen =c("BORDER_THIN", "BORDER_THIN"))
Step 3. Create worksheet and add title
Before you add data, you have to create an empty worksheet in the workbook. You can do this by using the creatSheet() function.
# create a worksheet named 'Data'
ws <- createSheet(wb, sheetName = "Data")
Step 4. Add sheet title
Here’s how you can add a title.
# create a new row
rows <- createRow(ws, rowIndex = 1)

# create a cell in the row to contain the title.
sheetTitle <- createCell(rows, colIndex = 1)

# set the cell value
setCellValue(sheetTitle[[1,1]], "Vapor Pressure of Mercury")

# set the cell style
setCellStyle(sheetTitle[[1,1]], title_style)
Step 5. Add a table into a worksheet
With the addDataframe() function, you can add the data table in the newly created worksheet.
Below example adds built-in pressure dataset on row #3.
# add data table to worksheet
addDataFrame(pressure, sheet = ws, startRow = 3, startColumn = 1,
             colnamesStyle = colname_style,
             rownamesStyle = rowname_style,
             row.names = FALSE)
Step 6. Add a plot into a worksheet
You can add a plot in the worksheet using the addPicture() function.
# create a png plot
png("plot.png", height=900, width=1600, res=250, pointsize=8)
plot(pressure, xlab = "Temperature (deg C)",
     ylab = "Pressure (mm of Hg)",
     main = "pressure data: Vapor Pressure of Mercury",
     col="red", pch=19, type="b")
dev.off()

# Create a new sheet to contain the plot
sheet <-createSheet(wb, sheetName = "plot")

# Add the plot created previously
addPicture("plot.png", sheet, scale = 1, startRow = 2,
           startColumn = 1)

# Remove the plot from the disk
res<-file.remove("plot.png")
Step 7. Change column width
Now change the column width to fit the contents.
# change column width of first 2 columns
setColumnWidth(sheet = ws, colIndex = 1:2, colWidth = 15)
Step 8. Save the workbook
Finally, save the workbook with the saveWorkbook() function.
# save workbook
saveWorkbook(wb, file = "mydata.xlsx")
Step 9. View the result


Март 31, 2016

Начинающие пользователи часто сталкиваются с проблемой загрузки своих данных в среду R: данные просто не загружаются или неправильно отображаются, возникают разного рода ошибки. Особенно эта проблема актуальна для тех, кто хранит свои данные в таблицах Excel и пытается именно их загрузить в R. Проблемы загрузки данных в среду R не всегда подробно рассматриваются в учебниках или на курсах, поэтому я решил написать эту статью и надеюсь, она облегчит жизнь тем, кто только заинтересовался R!
Правильная структура таблицы — залог успеха!
Большинство студентов, аналитиков и ученых работают с таблицами данных, поэтому именно их мы и загрузим в среду R. В качестве примера я создал таблицу в Excel с физическими данными студентов одного из военных ВУЗов (все данные вымышлены, любое совпадение имен и событий с реальными являются случайностью). В ней я заведомо нарушил все каноны построения таблиц, потому что неправильная структура таблицы является главным препятствием для загрузки данных не только в R, но и в другие статистические программы. Скачать таблицу можно по этой ссылке.
Как видно на рисунке ниже наша «таблица данных» имеет ряд структурных ошибок.

Во-первых, мы фактически имеем две таблицы в одной. Названия столбцов в этих таблицах кажутся разными, но на самом деле они просто написаны на разных языках. Так что мы можем смело объединить данные в одну таблицу. Я рекомендую использовать английский, так как это упростит работу в R. Теперь наша таблица стала единой.

Во-вторых, в некоторых столбцах мы имеем неоднородность данных. Например, в «Weight» и «Blood group» часть данных отображена числами, а часть словами. Всегда приводите данные одного столбца к одному формату. То же самое касается и «Rhesus factor». Также убедитесь, что в Excel листе нет заполненных ячеек , находящихся за пределами созданной таблицы. В итоге, результат должен получиться такой же, как на рисунке ниже.

Загрузка данных в среду R напрямую из Excel таблиц
Итак, теперь наша таблица имеет правильную структуру. Для загрузки файлов в форматах программы Excel (.xsl или .xlsx) существует R-пакет «xlsx», который позволяет загружать их без особых проблем.
Сначала загружаем пакет «xlsx» в среду R:
> install.packages("xlsx", dep = T)
Подключаем этот пакет при помощи команды:
> library("xlsx")
> имя таблицы в R <- read.xlsx("путь к файлу/имя файла.xlsx",
                               sheetIndex = "номер листа")
В нашем случае имя файла «voenvuz.xlsx», а имя таблицы данных в среде R — «voenvuz1»:
> voenvuz <- read.xlsx("D:/Samoedd.com/Статьи/05 Загрузка данных в R/Students2.xlsx", sheetIndex = 1)
Проверим, все ли нормально со структурой таблицы, вызвав имя таблицы «voenvuz1» в командной строке:

Все готово, наша таблица загружена корректно в среду R. Но прежде чем перейти к анализу загруженных данных, следует также освоить другой, более популярный среди опытных пользователей R метод загрузки данных — импортирование .txt и .csv файлов. В своей работе я использую именно его!
Классический вариант: импорт таблиц форматов .txt или .csv в среду R
Есть по крайней мере три причины, почему большинство пользователей R предпочитают пользоваться именно этим вариантом. Во-первых, не нужно подключать в R никаких дополнительных пакетов. Во-вторых, множество «сырых» данных сохраняется именно в форматах .txt и .csv. В третьих, эти форматы меньше весят в сравнении с тяжелыми .xls и .xlsx, и в них нет никаких ограничений по количеству строк или столбцов. Другими словами, они универсальны.
Создадим файлы voenvuz.txt и voenvuz.csv прямо в программе Excel. Для этого проделаем следующее:
- Нажимаем на вкладку «Файл» в левом верхнем углу;
- Выбираем «Экспорт» и находим опцию «Изменить тип файла»;
- Кликаем на нее и видим перед собой список различных форматов;
- Выбираем .txt (разделитель — знак табуляцией ‘tab’) или .csv (разделитель — запятая);
- Прописываем расположение и имя файла.
Теперь необходимо лишь импортировать полученные файлы в среду R. Для этого воспользуемся командами:
# для .csv:
> voenvuz2 <- read.csv("D:/Samoedd.com/Статьи/05 Загрузка данных в R/voenvuz.csv", sep = ";")
# для .txt:
> voenvuz3 <- read.table("D:/Samoedd.com/Статьи/05 Загрузка данных в R/voenvuz.txt", sep = "t")
Несмотря на то, что мы загружали данные из разных форматов (.xlsx, .csv, .txt), результат должен получиться одним и тем же. Именно поэтому в среде R у нас появилось три абсолютно одинаковых таблицы под именами «voenvuz1», «voenvuz2», «voenvuz3».
Полезная информация, небольшой трюк и заключение…
Чтобы быстро и эффективно загружать свои данные в среду R важно понимать, что такое «рабочая директория». Говоря простыми словами — это папка (директория), где расположен исполняемый файл программы. Для того, чтобы узнать рабочую папку R, следует набрать команду: > getwd()
Файлы, расположенные в этой папке, не нуждаются в указании «пути к файлу» при загрузке в среду R, что существенно экономит время, и уменьшает количество букв в коде. Именно поэтому важно не только знать, но и уметь изменять расположение рабочей папки. Измените расположение рабочей директории R на ту папку, в которой Вы разместили файлы voenvuz.xlsx, voenvuz.csv, voenvuz.txt.
> setwd("D:/Samoedd.com/Статьи/05 Загрузка данных в R")
Теперь Вы можете загрузить любую из таблиц, используя гораздо более короткий код, например:
> voenvuz4 <- read.table("voenvuz.txt", sep = "t")
Трюк с ярлыком R

Есть способ, при котором не нужно прописывать путь рабочей директории в R консоли, он будет создан автоматически. Для этого надо кликнуть по ярлыку программы R правой кнопкой и выбрать «Свойства». Во вкладке ярлык Вы увидите окошко «Рабочая папка». Удалите все, что там написано, чтобы оно было пустым, и нажмите «Применить».
Теперь просто скопируйте ярлык и вставьте его туда, где хранятся Ваши таблицы данных. Запустите R через этот ярлык. Все, Вы уже автоматически установили рабочую папку там, куда вставили ярлык. Для проверки можете воспользоваться командой dir(), которая выведет в консоль список файлов, находящихся в рабочей папке.
И напоследок, пара советов…
I. Если по каким-то причинам, таблица загрузилась в среду R неправильно, обратите внимание на аргументы функции read.table(). Возможно, стоит вручную прописать разделитель столбцов (sep = «») и десятичный знак (dec = «»). Аргумент header = TRUE, говорит о том, что у Вас в таблице присутствует заголовок для столбцов. Если его нет, замените на header = FALSE. Больше справочной информации об аргументах вы найдете, написав в консоли ?read.table
В качестве примера, я прописал некоторые аргументы для импорта нашей «voenvuz.txt» таблицы:
> voenvuz5 <- read.table("voenvuz.txt", header = TRUE, sep = "t", dec = ".")
II. Если Ваш путь к таблице данных прописан на кириллице, то при вводе кода в консоль, убедитесь, что у Вас стоит английская раскладка. В противном случае, Вы увидите ошибку, проиллюстрированную ниже.

Если у Вас возникли вопросы или проблемы с загрузкой Ваших данных, пишите в комментариях к этой статье. Я обязательно отвечу и постараюсь Вам помочь. Спасибо за внимание!