
|
Marshal Пользователь Сообщений: 83 |
#1 18.10.2016 02:18:33 Доброго времени. Но данная защита снимается нажатием правой кнопкой на листе «Снять защиту листа». Всем спасибо
|
||
|
vikttur Пользователь Сообщений: 47199 |
#2 18.10.2016 02:22:31
|
||
|
Marshal Пользователь Сообщений: 83 |
Спасибо за ответ. с этим я и воююю |
|
k61 Пользователь Сообщений: 2441 |
#4 18.10.2016 02:51:08 Прикрутка:
|
||
|
Marshal Пользователь Сообщений: 83 |
#5 18.10.2016 04:25:06 Спасибо большое, прикрутил.
|
||
I want to stop others from editing the cell contents in my excel sheet using VBA. Is it possible to do this?
![]()
armstrhb
4,0243 gold badges20 silver badges28 bronze badges
asked Jun 14, 2010 at 13:05
![]()
1
You can first choose which cells you don’t want to be protected (to be user-editable) by setting the Locked status of them to False:
Worksheets("Sheet1").Range("B2:C3").Locked = False
Then, you can protect the sheet, and all the other cells will be protected.
The code to do this, and still allow your VBA code to modify the cells is:
Worksheets("Sheet1").Protect UserInterfaceOnly:=True
or
Call Worksheets("Sheet1").Protect(UserInterfaceOnly:=True)
answered Jun 14, 2010 at 17:31
![]()
Lance RobertsLance Roberts
22.2k32 gold badges112 silver badges129 bronze badges
5
Try using the Worksheet.Protect method, like so:
Sub ProtectActiveSheet()
    Dim ws As Worksheet
    Set ws = ActiveSheet
    ws.Protect DrawingObjects:=True, Contents:=True, _
        Scenarios:=True, Password="SamplePassword"
End Sub
You should, however, be concerned about including the password in your VBA code. You don’t necessarily need a password if you’re only trying to put up a simple barrier that keeps a user from making small mistakes like deleting formulas, etc.
Also, if you want to see how to do certain things in VBA in Excel, try recording a Macro and looking at the code it generates. That’s a good way to get started in VBA.
answered Jun 14, 2010 at 13:54
![]()
Ben McCormackBen McCormack
31.8k46 gold badges145 silver badges221 bronze badges
Let’s say for example in one case, if you want to locked cells from range A1 to I50 then below is the code:
Worksheets("Enter your sheet name").Range("A1:I50").Locked = True
ActiveSheet.Protect Password:="Enter your Password"
In another case if you already have a protected sheet then follow below code:
ActiveSheet.Unprotect Password:="Enter your Password"
Worksheets("Enter your sheet name").Range("A1:I50").Locked = True
ActiveSheet.Protect Password:="Enter your Password"
answered Sep 18, 2013 at 9:40
![]()
Milan ShethMilan Sheth
84412 silver badges10 bronze badges
You can also do it on the worksheet level captured in the worksheet’s change event. If that suites your needs better. Allows for dynamic locking based on values, criteria, ect…
Private Sub Worksheet_Change(ByVal Target As Range)

    'set your criteria here
    If Target.Column = 1 Then

        'must disable events if you change the sheet as it will
        'continually trigger the change event
        Application.EnableEvents = False
        Application.Undo
        Application.EnableEvents = True

        MsgBox "You cannot do that!"
    End If
End Sub
answered Jun 15, 2010 at 15:28
![]()
FinkFink
3,31619 silver badges26 bronze badges
Sub LockCells()

Range("A1:A1").Select

Selection.Locked = True

Selection.FormulaHidden = False

ActiveSheet.Protect DrawingObjects:=False, Contents:=True, Scenarios:= False, AllowFormattingCells:=True, AllowFormattingColumns:=True, AllowFormattingRows:=True, AllowInsertingColumns:=True, AllowInsertingRows:=True, AllowInsertingHyperlinks:=True, AllowDeletingColumns:=True, AllowDeletingRows:=True, AllowSorting:=True, AllowFiltering:=True, AllowUsingPivotTables:=True

End Sub
answered Jun 14, 2010 at 21:41
![]()
You can modify a sheet via code by taking these actions
- Unprotect
- Modify
- Protect
In code this would be:
Sub UnProtect_Modify_Protect()

  ThisWorkbook.Worksheets("Sheet1").Unprotect Password:="Password"
'Unprotect

  ThisWorkbook.ActiveSheet.Range("A1").FormulaR1C1 = "Changed"
'Modify

  ThisWorkbook.Worksheets("Sheet1").Protect Password:="Password"
'Protect

End Sub
The weakness of this method is that if the code is interrupted and error handling does not capture it, the worksheet could be left in an unprotected state.
The code could be improved by taking these actions
- Re-protect
- Modify
The code to do this would be:
Sub Re-Protect_Modify()

ThisWorkbook.Worksheets("Sheet1").Protect Password:="Password", _
 UserInterfaceOnly:=True
'Protect, even if already protected

  ThisWorkbook.ActiveSheet.Range("A1").FormulaR1C1 = "Changed"
'Modify

End Sub
This code renews the protection on the worksheet, but with the ‘UserInterfaceOnly’ set to true. This allows VBA code to modify the worksheet, while keeping the worksheet protected from user input via the UI, even if execution is interrupted.
This setting is lost when the workbook is closed and re-opened. The worksheet protection is still maintained.
So the ‘Re-protection’ code needs to be included at the start of any procedure that attempts to modify the worksheet or can just be run once when the workbook is opened.
Предположим, у вас есть рабочий лист, и только определенный диапазон пустых ячеек требует ввода данных, и после завершения ввода данных вам нужно, чтобы ячейки были автоматически заблокированы, чтобы предотвратить повторные изменения. Как вы можете этого добиться? Эта статья может вам помочь.
Блокировать или защищать ячейки после ввода данных или ввода с помощью кода VBA
Блокировать или защищать ячейки после ввода данных или ввода с помощью кода VBA
Например, определенный диапазон пустых ячеек — A1: F8. Чтобы заблокировать эти ячейки после ввода данных в Excel, сделайте следующее.
1. Сначала разблокируйте этот диапазон, выберите ячейки и щелкните правой кнопкой мыши, затем выберите Формат ячеек в контекстном меню и в Формат ячеек диалоговое окно, сняв флажок Заблокированный поле под защиту вкладка и, наконец, щелкнув OK кнопка. Смотрите скриншот:

2. Нажмите Обзор > Защитить лист. И укажите пароль для защиты этого рабочего листа.
3. Щелкните правой кнопкой мыши вкладку листа и выберите Просмотреть код из контекстного меню. Затем скопируйте и вставьте приведенный ниже код VBA в окно кода. Смотрите скриншот:
Код VBA: блокировка или защита ячеек после ввода или ввода данных
Dim mRg As Range
Dim mStr As String

Private Sub Worksheet_BeforeDoubleClick(ByVal Target As Range, Cancel As Boolean)
If Not Intersect(Range("A1:F8"), Target) Is Nothing Then
    Set mRg = Target.Item(1)
    mStr = mRg.Value
End If
End Sub
Private Sub Worksheet_Change(ByVal Target As Range)
    Dim xRg As Range
    On Error Resume Next
    Set xRg = Intersect(Range("A1:F8"), Target)
    If xRg Is Nothing Then Exit Sub
    Target.Worksheet.Unprotect Password:="123"
    If xRg.Value <> mStr Then xRg.Locked = True
    Target.Worksheet.Protect Password:="123"
End Sub
Private Sub Worksheet_SelectionChange(ByVal Target As Range)
If Not Intersect(Range("A1:F8"), Target) Is Nothing Then
    Set mRg = Target.Item(1)
     mStr = mRg.Value
End If
End Sub
Внимание: В коде «A1: F8» — это диапазон, который вам нужен для ввода данных; и «123» — пароль этого защищенного рабочего листа. Пожалуйста, измените их по своему усмотрению.
4. Нажмите другой + Q клавиши одновременно, чтобы закрыть Microsoft Visual Basic для приложений окно.
После завершения ввода данных в ячейки диапазона A1: F8 они будут заблокированы автоматически. И вы получите диалоговое окно с запросом, если попытаетесь изменить содержимое любой ячейки этого диапазона. Смотрите скриншот:

Статьи по теме:
- Как заблокировать сразу все ссылки на ячейки в формулах в Excel?
- Как заблокировать или разблокировать ячейки на основе значений в другой ячейке в Excel?
- Как заблокировать изображение / изображение в ячейке или внутри нее в Excel?
Лучшие инструменты для работы в офисе
Kutools for Excel Решит большинство ваших проблем и повысит вашу производительность на 80%
- Снова использовать: Быстро вставить сложные формулы, диаграммы и все, что вы использовали раньше; Зашифровать ячейки с паролем; Создать список рассылки и отправлять электронные письма …
- Бар Супер Формулы (легко редактировать несколько строк текста и формул); Макет для чтения (легко читать и редактировать большое количество ячеек); Вставить в отфильтрованный диапазон…
- Объединить ячейки / строки / столбцы без потери данных; Разделить содержимое ячеек; Объединить повторяющиеся строки / столбцы… Предотвращение дублирования ячеек; Сравнить диапазоны…
- Выберите Дубликат или Уникальный Ряды; Выбрать пустые строки (все ячейки пустые); Супер находка и нечеткая находка во многих рабочих тетрадях; Случайный выбор …
- Точная копия Несколько ячеек без изменения ссылки на формулу; Автоматическое создание ссылок на несколько листов; Вставить пули, Флажки и многое другое …
- Извлечь текст, Добавить текст, Удалить по позиции, Удалить пробел; Создание и печать промежуточных итогов по страницам; Преобразование содержимого ячеек в комментарии…
- Суперфильтр (сохранять и применять схемы фильтров к другим листам); Расширенная сортировка по месяцам / неделям / дням, периодичности и др .; Специальный фильтр жирным, курсивом …
- Комбинируйте книги и рабочие листы; Объединить таблицы на основе ключевых столбцов; Разделить данные на несколько листов; Пакетное преобразование xls, xlsx и PDF…
- Более 300 мощных функций. Поддерживает Office/Excel 2007-2021 и 365. Поддерживает все языки. Простое развертывание на вашем предприятии или в организации. Полнофункциональная 30-дневная бесплатная пробная версия. 60-дневная гарантия возврата денег.
")
Вкладка Office: интерфейс с вкладками в Office и упрощение работы
- Включение редактирования и чтения с вкладками в Word, Excel, PowerPoint, Издатель, доступ, Visio и проект.
- Открывайте и создавайте несколько документов на новых вкладках одного окна, а не в новых окнах.
- Повышает вашу продуктивность на 50% и сокращает количество щелчков мышью на сотни каждый день!
")
Комментарии (74)
Номинальный 5 из 5
·
рейтинги 1
This macro allows you to have a cell automatically locked after a user enters something into it or into another specific cell, range, column, or row.
This is different than just locking an entire spreadsheet because you still want to be able to edit and work with the other cells in the worksheet without having to select and unlock them individually.
Sections:
Unlock the Cells
Macro to Auto-Lock Cells
Lock a Specific Cell
Lock Cell Other Than the One that was Edited
Lock Last Edited Cell
Lock Cell in a Specific Column or Row
Notes
Unlock the Cells
The first thing you have to do is to unlock all of the cells in the worksheet.
- Select all of the cells by hitting Ctrl + A or clicking the square next to row 1 and column A.

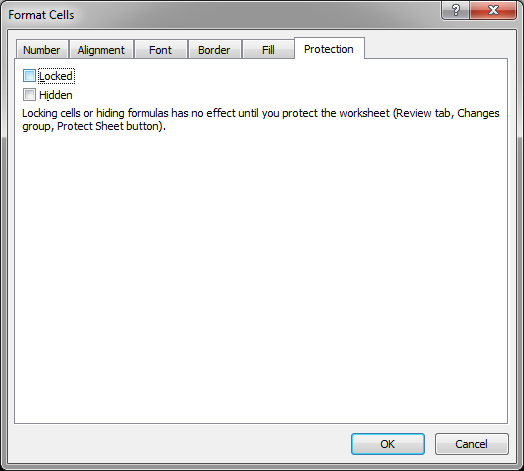
- Right click in the worksheet and choose Format Cells
- Go to the Protection tab and uncheck the Locked option at the top.
- Hit OK and you’re done with this part.

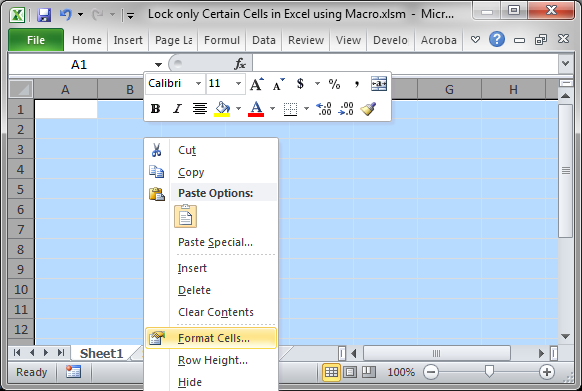
Now, none of the cells in the worksheet are protected, which means that all of the cells in the worksheet will be editable when you go to protect the worksheet.
This needs to be done so that only specific cells that we choose will be locked from editing.
Macro to Auto-Lock Cells
Private Sub Worksheet_Change(ByVal Target As Range)

If Target.Address = "$A$1" And Target.Value <> "" Then

    ActiveSheet.Protect Contents:=False
    Range(Target.Address).Locked = True
    ActiveSheet.Protect Contents:=True

End If

End Sub
The important code is this part:
ActiveSheet.Protect Contents:=False
Range(Target.Address).Locked = True
ActiveSheet.Protect Contents:=True
It unprotects the worksheet, locks the cell, and then re-protects the sheet.
This macro needs to be installed into the worksheet where it will run. To do this, right-click the tab of the desired worksheet and click View Code and paste the macro into the window that opens.
This example is a generic example that is easy to modify. It checks which cell was edited and, if a certain cell was edited, it is then locked.
I will show you how to edit this macro in the examples below.
Lock a Specific Cell
Looking at the macro above, this is the line that limits the macro to run only on specific cells:
If Target.Address = "$A$1" And Target.Value <> "" Then
This says that a cell should be locked only if cell A1 was edited and it is not empty.
To make the macro work on cell B1 or D15 or any cell, just replace $A$1 with the desired cell reference. You must put dollar signs in front of the column and row reference for this to work.
You can also lock the cell only if a certain value was input by changing <> «» in the line above to = «desired value» and that allows you to do something like lock the cell only if OK was entered or something similar.
Lock Cell Other Than the One that was Edited
Change this line:
Range(Target.Address).Locked = True
Target.Address is the cell that will be locked and this says to lock the cell that was just edited.
To lock another cell, just use the Range method of referencing cells.
To lock cell B5, it would be Range(B5).Locked = True
Continue that pattern for whichever cell or range you want to lock.
Lock Last Edited Cell
You can lock the last edited cell regardless of which one it was by removing the IF statement in the macro and leaving it like this:
Private Sub Worksheet_Change(ByVal Target As Range)

ActiveSheet.Protect Contents:=False
Range(Target.Address).Locked = True
ActiveSheet.Protect Contents:=True

End Sub
Lock Cell in a Specific Column or Row
To limit the locking to a certain column or row, change the IF statement.
Limit to a row:
If Target.Row = 1 And Target.Value <> "" Then
Change the 1 to whichever row you want and the code will only run on that row.
Limit to a Column:
If Target.Column = 1 And Target.Value <> "" Then
Change the 1 to whichever column you want the code to run on.
Notes
This is a handy macro that allows you to have a lot of control over a worksheet and protecting the data within it.
I didn’t show you how to password protect the worksheet here because I wanted to focus on the method needed to protect only specific cells. Once you get this form of the macro running well, then, add-in the other pieces that you want, like password protection.
Make sure to download the sample file attached to this tutorial so you can work with these examples in Excel.
Similar Content on TeachExcel
Email List of People from Excel Using a Macro
: Send Emails from Excel Course
Send emails to everyone in a list in Excel using a macro. Th…
Loop through a Range of Cells in Excel VBA/Macros
Tutorial: How to use VBA/Macros to iterate through each cell in a range, either a row, a column, or …
Select Cells in Excel using Macros and VBA
Tutorial: This is actually a very easy thing to do and only requires a couple lines of code. Below I…
Select Ranges of Cells in Excel using Macros and VBA
Tutorial: This Excel VBA tutorial focuses specifically on selecting ranges of cells in Excel. This…
Allow Only Certain People to Edit Specific Cells in Excel
Tutorial:
How to allow only certain people to edit certain cells or ranges in Excel.
This is a sec…
Add a Drop Down Menu to a Cell in Excel — Data Validation Macro
Macro: Add a drop down menu or list to a cell in Excel with this free Excel macro. This is a grea…